
Planet Python
Last update: April 27, 2024 07:42 AM UTC
April 26, 2024
ListenData
How to Scrape Google News with Python
This tutorial explains how to scrape Google News for articles related to the topic of your choice using Python.
We are interested to see the following information for each news article.
- Title : Article Headline
- Source : Original News Source or Blogger Name
- Time : Publication Date/Time
- Author : Article Author
- Link : Article Link

4 Ways to Use ChatGPT API in Python
In this tutorial, we will explain how to use ChatGPT API in Python, along with examples.
Please follow the steps below to access the ChatGPT API.
- Visit the OpenAI Platform and sign up using your Google, Microsoft or Apple account.
- After creating your account, the next step is to generate a secret API key to access the API. The API key looks like this -
sk-xxxxxxxxxxxxxxxxxxxx - If your phone number has not been associated with any other OpenAI account previously, you may get free credits to test the API. Otherwise you have to add atleast 5 dollars into your account and charges will be based on the usage and the type of model you use. Check out the pricing details in the OpenAI website.
- Now you can call the API using the code below.
Real Python
The Real Python Podcast – Episode #202: Pydantic Data Validation & Python Web Security Practices
How do you verify and validate the data coming into your Python web application? What tools and security best practices should you consider as a developer? Christopher Trudeau is back on the show this week, bringing another batch of PyCoder's Weekly articles and projects.
[ Improve Your Python With 🐍 Python Tricks 💌 – Get a short & sweet Python Trick delivered to your inbox every couple of days. >> Click here to learn more and see examples ]
April 25, 2024
Data School
How to prevent data leakage in pandas & scikit-learn ☔

Let&aposs pretend you&aposre working on a supervised Machine Learning problem using Python&aposs scikit-learn library. Your training data is in a pandas DataFrame, and you discover missing values in a column that you were planning to use as a feature.
After considering your options, you decide to impute the missing values, which means that you&aposre going to fill in the missing values with reasonable values.
How should you perform the imputation?
- Option 1 is to fill in the missing values in pandas, and then pass the transformed data to scikit-learn.
- Option 2 is to pass the original data to scikit-learn, and then perform all data transformations (including missing value imputation) within scikit-learn.
Option 1 will cause data leakage, whereas option 2 will prevent data leakage.
Here are questions you might be asking:
- What is data leakage?
- Why is data leakage problematic?
- Why would data leakage result from missing value imputation in pandas?
- How can I prevent data leakage when using pandas and scikit-learn?
Answers below! 👇
What is data leakage?
Data leakage occurs when you inadvertently include knowledge from testing data when training a Machine Learning model.
Why is data leakage problematic?
Data leakage is problematic because it will cause your model evaluation scores to be less reliable. This may lead you to make bad decisions when tuning hyperparameters, and it will lead you to overestimate how well your model will perform on new data.
It&aposs hard to know whether data leakage will skew your evaluation scores by a negligible amount or a huge amount, so it&aposs best to just avoid data leakage entirely.
Why would data leakage result from missing value imputation in pandas?
Your model evaluation procedure (such as cross-validation) is supposed to simulate the future, so that you can accurately estimate right now how well your model will perform on new data.
But if you impute missing values on your whole dataset in pandas and then pass your dataset to scikit-learn, your model evaluation procedure will no longer be an accurate simulation of reality. That&aposs because the imputation values will be based on your entire dataset (meaning both the training portion and the testing portion), whereas the imputation values should just be based on the training portion.
In other words, imputation based on the entire dataset is like peeking into the future and then using what you learned from the future during model training, which is definitely not allowed.
How can we avoid this in pandas?
You might think that one way around this problem would be to split your dataset into training and testing sets and then impute missing values using pandas. (Specifically, you would need to learn the imputation value from the training set and then use it to fill in both the training and testing sets.)
That would work if you&aposre only ever planning to use train/test split for model evaluation, but it would not work if you&aposre planning to use cross-validation. That&aposs because during 5-fold cross-validation (for example), the rows contained in the training set will change 5 times, and thus it&aposs quite impractical to avoid data leakage if you use pandas for imputation while using cross-validation!
How else can data leakage arise?
So far, I&aposve only mentioned data leakage in the context of missing value imputation. But there are other transformations that if done in pandas on the full dataset will also cause data leakage.
For example, feature scaling in pandas would lead to data leakage, and even one-hot encoding (or "dummy encoding") in pandas would lead to data leakage unless there&aposs a known, fixed set of categories.
More generally, any transformation which incorporates information about other rows when transforming a row will lead to data leakage if done in pandas.
How does scikit-learn prevent data leakage?
Now that you&aposve learned how data transformations in pandas can cause data leakage, I&aposll briefly mention three ways in which scikit-learn prevents data leakage:
- First, scikit-learn transformers have separate
fitandtransformsteps, which allow you to base your data transformations on the training set only, and then apply those transformations to both the training set and the testing set. - Second, the
fitandpredictmethods of a Pipeline encapsulate all calls tofit_transformandtransformso that they&aposre called at the appropriate times. - Third,
cross_val_scoresplits the data prior to performing data transformations, which ensures that the transformers only learn from the temporary training sets that are created during cross-validation.
Conclusion
When working on a Machine Learning problem in Python, I recommend performing all of your data transformations in scikit-learn, rather than performing some of them in pandas and then passing the transformed data to scikit-learn.
Besides helping you to prevent data leakage, this enables you to tune the transformer and model hyperparameters simultaneously, which can lead to a better performing model!
One final note...
This post is an excerpt from my upcoming video course, Master Machine Learning with scikit-learn.
Join the waitlist below to get free lessons from the course and a special launch discount 👇
Programiz
Getting Started with Python
In this tutorial, you will learn to write your first Python program.
Django Weblog
Livestream: Django Trends for 2024

Today at 3pm UTC – Discover the latest trends in the Django ecosystem, based on insights from 4,000 developers who participated in the Django Developers Survey. Join the livestream with Sarah Abdermane, a Django Software Foundation Board member, and Sarah Boyce, a Django Fellow, to reflect on insights from the Django community.
April 24, 2024
Sumana Harihareswara - Cogito, Ergo Sumana
Model UX Research & Design Docs for Command-Line Open Source
Model UX Research & Design Docs for Command-Line Open Source
Real Python
What's Lazy Evaluation in Python?
Being lazy is not always a bad thing. Every line of code you write has at least one expression that Python needs to evaluate. Python lazy evaluation is when Python takes the lazy option and delays working out the value returned by an expression until that value is needed.
An expression in Python is a unit of code that evaluates to a value. Examples of expressions include object names, function calls, expressions with arithmetic operators, literals that create built-in object types such as lists, and more. However, not all statements are expressions. For example, if statements and for loop statements don’t return a value.
Python needs to evaluate every expression it encounters to use its value. In this tutorial, you’ll learn about the different ways Python evaluates these expressions. You’ll understand why some expressions are evaluated immediately, while others are evaluated later in the program’s execution. So, what’s lazy evaluation in Python?
Get Your Code: Click here to download the free sample code that shows you how to use lazy evaluation in Python.
Take the Quiz: Test your knowledge with our interactive “What's Lazy Evaluation in Python?” quiz. You’ll receive a score upon completion to help you track your learning progress:

Interactive Quiz
What's Lazy Evaluation in Python?In this quiz, you'll test your understanding of the differences between lazy and eager evaluation in Python. By working through this quiz, you'll revisit how Python optimizes memory use and computational overhead by deciding when to compute values.
In Short: Python Lazy Evaluation Generates Objects Only When Needed
An expression evaluates to a value. However, you can separate the type of evaluation of expressions into two types:
- Eager evaluation
- Lazy evaluation
Eager evaluation refers to those cases when Python evaluates an expression as soon as it encounters it. Here are some examples of expressions that are evaluated eagerly:
 1>>> 5 + 10
 215
 3
 4>>> import random
 5>>> random.randint(1, 10)
 64
 7
 8>>> [2, 4, 6, 8, 10]
 9[2, 4, 6, 8, 10]
10>>> numbers = [2, 4, 6, 8, 10]
11>>> numbers
12[2, 4, 6, 8, 10]
Interactive environments, such as the standard Python REPL used in this example, display the value of an expression when the line only contains the expression. This code section shows a few examples of statements and expressions:
- Lines 1 and 2: The first example includes the addition operator
+, which Python evaluates as soon as it encounters it. The REPL shows the value15. - Lines 4 to 6: The second example includes two lines:
- The import statement includes the keyword
importfollowed by the name of a module. The module namerandomis evaluated eagerly. - The function call
random.randint()is evaluated eagerly, and its value is returned immediately. All standard functions are evaluated eagerly. You’ll learn about generator functions later, which behave differently.
- The import statement includes the keyword
- Lines 8 to 12: The final example has three lines of code:
- The literal to create a list is an expression that’s evaluated eagerly. This expression contains several integer literals, which are themselves expressions evaluated immediately.
- The assignment statement assigns the object created by the list literal to the name
numbers. This statement is not an expression and doesn’t return a value. However, it includes the list literal on the right-hand side, which is an expression that’s evaluated eagerly. - The final line contains the name
numbers, which is eagerly evaluated to return the list object.
The list you create in the final example is created in full when you define it. Python needs to allocate memory for the list and all its elements. This memory won’t be freed as long as this list exists in your program. The memory allocation in this example is small and won’t impact the program. However, larger objects require more memory, which can cause performance issues.
Lazy evaluation refers to cases when Python doesn’t work out the values of an expression immediately. Instead, the values are returned at the point when they’re required in the program. Lazy evaluation can also be referred to as call-by-need.
This delay of when the program evaluates an expression delays the use of resources to create the value, which can improve the performance of a program by spreading the time-consuming process across a longer time period. It also prevents values that will not be used in the program from being generated. This can occur when the program terminates or moves to another part of its execution before all the generated values are used.
When large datasets are created using lazily-evaluated expressions, the program doesn’t need to use memory to store the data structure’s contents. The values are only generated when they’re needed.
An example of lazy evaluation occurs within the for loop when you iterate using range():
for index in range(1, 1_000_001):
    print(f"This is iteration {index}")
The built-in range() is the constructor for Python’s range object. The range object does not store all of the one million integers it represents. Instead, the for loop creates a range_iterator from the range object, which generates the next number in the sequence when it’s needed. Therefore, the program never needs to have all the values stored in memory at the same time.
Lazy evaluation also allows you to create infinite data structures, such as a live stream of audio or video data that continuously updates with new information, since the program doesn’t need to store all the values in memory at the same time. Infinite data structures are not possible with eager evaluation since they can’t be stored in memory.
There are disadvantages to deferred evaluation. Any errors raised by an expression are also deferred to a later point in the program. This delay can make debugging harder.
The lazy evaluation of the integers represented by range() in a for loop is one example of lazy evaluation. You’ll learn about more examples in the following section of this tutorial.
What Are Examples of Lazy Evaluation in Python?
In the previous section, you learned about using range() in a for loop, which leads to lazy evaluation of the integers represented by the range object. There are other expressions in Python that lead to lazy evaluation. In this section, you’ll explore the main ones.
Other Built-In Data Types
Read the full article at https://realpython.com/python-lazy-evaluation/ »
[ Improve Your Python With 🐍 Python Tricks 💌 – Get a short & sweet Python Trick delivered to your inbox every couple of days. >> Click here to learn more and see examples ]
Talk Python to Me
#458: Serverless Python in 2024
What is the state of serverless computing and Python in 2024? What are some of the new tools and best practices? We are lucky to have Tony Sherman who has a lot of practical experience with serverless programming on the show.<br/> <br/> <strong>Episode sponsors</strong><br/> <br/> <a href='https://talkpython.fm/sentry'>Sentry Error Monitoring, Code TALKPYTHON</a><br> <a href='https://talkpython.fm/mailtrap'>Mailtrap</a><br> <a href='https://talkpython.fm/training'>Talk Python Courses</a><br/> <br/> <strong>Links from the show</strong><br/> <br/> <div><b>Tony Sherman on Twitter</b>: <a href="https://twitter.com/tsh3rman" target="_blank" rel="noopener">twitter.com</a><br/> <b>Tony Sherman</b>: <a href="https://www.linkedin.com/in/tony--sherman/" target="_blank" rel="noopener">linkedin.com</a><br/> <b>PyCon serverless talk</b>: <a href="https://www.youtube.com/watch/2SZ6Wks5iK4" target="_blank" rel="noopener">youtube.com</a><br/> <b>AWS re:Invent talk</b>: <a href="https://www.youtube.com/watch?v=52W3Qyg242Y" target="_blank" rel="noopener">youtube.com</a><br/> <b>Powertools for AWS Lambda</b>: <a href="https://docs.powertools.aws.dev/lambda/python/latest/" target="_blank" rel="noopener">docs.powertools.aws.dev</a><br/> <b>Pantsbuild: The ergonomic build system</b>: <a href="https://www.pantsbuild.org/" target="_blank" rel="noopener">pantsbuild.org</a><br/> <b>aws-lambda-power-tuning</b>: <a href="https://github.com/alexcasalboni/aws-lambda-power-tuning" target="_blank" rel="noopener">github.com</a><br/> <b>import-profiler</b>: <a href="https://github.com/cournape/import-profiler" target="_blank" rel="noopener">github.com</a><br/> <b>AWS Fargate</b>: <a href="https://aws.amazon.com/fargate/" target="_blank" rel="noopener">aws.amazon.com</a><br/> <b>Run functions on demand. Scale automatically.</b>: <a href="https://www.digitalocean.com/products/functions" target="_blank" rel="noopener">digitalocean.com</a><br/> <b>Vercel</b>: <a href="https://vercel.com/docs/functions/serverless-functions/runtimes/python" target="_blank" rel="noopener">vercel.com</a><br/> <b>Deft</b>: <a href="https://deft.com" target="_blank" rel="noopener">deft.com</a><br/> <b>37 Signals We stand to save $7m over five years from our cloud exit</b>: <a href="https://world.hey.com/dhh/we-stand-to-save-7m-over-five-years-from-our-cloud-exit-53996caa" target="_blank" rel="noopener">world.hey.com</a><br/> <b>The Global Content Delivery Platform That Truly Hops</b>: <a href="https://bunny.net" target="_blank" rel="noopener">bunny.net</a><br/> <b>Watch this episode on YouTube</b>: <a href="https://www.youtube.com/watch?v=A5bbUq-ZJh0" target="_blank" rel="noopener">youtube.com</a><br/> <b>Episode transcripts</b>: <a href="https://talkpython.fm/episodes/transcript/458/serverless-python-in-2024" target="_blank" rel="noopener">talkpython.fm</a><br/> <br/> <b>--- Stay in touch with us ---</b><br/> <b>Subscribe to us on YouTube</b>: <a href="https://talkpython.fm/youtube" target="_blank" rel="noopener">youtube.com</a><br/> <b>Follow Talk Python on Mastodon</b>: <a href="https://fosstodon.org/web/@talkpython" target="_blank" rel="noopener"><i class="fa-brands fa-mastodon"></i>talkpython</a><br/> <b>Follow Michael on Mastodon</b>: <a href="https://fosstodon.org/web/@mkennedy" target="_blank" rel="noopener"><i class="fa-brands fa-mastodon"></i>mkennedy</a><br/></div>
Test and Code
219: Building Django Apps & SaaS Pegasus - Cory Zue
I'm starting a SaaS project using Django, and there are tons of decisions right out of the gate.
To help me navigate these decisions, I've brought on Cory Zue.
Cory is the creator of SaaS Pegasus, and has tons of experience with Django.
Some of the topics discussed:
- Building Django applications
- SaaS Pegasus
- placecard.me
- What boilerplate projects are
- Django cookiecutter
- Cookiecutter
- Which database to use, probably PostgreSQL
- Authentication choises, probably Allauth
- Docker, Docker for development, Docker for deployment
- Deployment targets / hosting services. Render, Heroku, Fly.io, for PaaS options.
- Front end frameworks. Bootstrap, Tailwind, DaisyUI, TailwindUI
- HTMX vs React vs straight Django templates
- Rockets
- Font Awesome
- and of course, SaaS Pegasus
Sponsored by Mailtrap.io
- An Email Delivery Platform that developers love.
- An email-sending solution with industry-best analytics, SMTP, and email API, SDKs for major programming languages, and 24/7 human support.
- Try for Free at MAILTRAP.IO
Sponsored by PyCharm Pro
- Use code PYTEST for 20% off PyCharm Professional at jetbrains.com/pycharm
- Now with Full Line Code Completion
- See how easy it is to run pytest from PyCharm at pythontest.com/pycharm
The Complete pytest Course
- For the fastest way to learn pytest, go to courses.pythontest.com
- Whether your new to testing or pytest, or just want to maximize your efficiency and effectiveness when testing.
Seth Michael Larson
Open Source Summit North America 2024
Open Source Summit North America 2024
This critical role would not be possible without funding from the Alpha-Omega project. Massive thank-you to Alpha-Omega for investing in the security of the Python ecosystem!
Last week I attended SOSS Community Day and OSS Summit. It was great to catch up with friends and to meet new people for the first time at a cross-ecosystem open source event.
I gave a talk "Embrace the Differences: Securing software ecosystems where they are" which funnily enough had a complementary talk about the ways software repositories can collaborate for security.
My talk focused on how security standards and tools typically want to operate across software ecosystems and differences in standards, tools, maintainers, and user expectations between ecosystems can make that difficult.
You can download my slides and the recording will be available eventually on YouTube.
OpenSSF Tabletop Session
I also participated in the first OpenSSF Tabletop Session organized and hosted by Dana Wang. I played the role of "open source maintainer" and represented how an exploited zero-day vulnerability would appear from the perspective of an open source project.
I emphasized the realities of vulnerability disclosure to open source projects like under-resourcing, most maintainers being volunteers, and stress caused during times of crisis.
 Cast of the tabletop session!
So many people!
I also met up with many folks doing open source security, maintenance, and funding:- Met with many folks from the Alpha-Omega cohort. I'm looking forward to having more cross-functional discussions about new approaches to securing open source.
- Met with Michael Winser from Alpha-Omega to work on our PyCon US 2024 talk State of Supply Chain Security for Python.
- Met with my friend William Woodruff from Trail of Bits and discussed the system TLS proposal and build provenance for Homebrew (and what could be learned for Python).
- Met with Samuel Giddins and Martin Emde from the Ruby ecosystem to discuss shared challenges for introducing security into an ecosystem.
- Met Lauren Hanford from Tidelift to discuss supporting and funding maintainers.
- Met Mirko from Sovereign Tech Fund and discuss their program for hiring open source maintainers.
- Attended the talk by Kara Sowles from GitHub on the state of open source funding and learned about "downturn-resilient" funding.
- Many folks who asked me about security initiatives happening in the Python ecosystem.
Other items
- Participating in the pre-PEP discussion for reviving PEP 543 (system TLS).
- Created a proposal for allowing any release manager to create a CPython release.
- Created a pull request for uploading Windows SBOMs to python.org/downloads.
- Merging and backporting the upgrade to libexpat 2.6.2
- Chose which proposal(s) I would be willing to mentor for Google Summer of Code 2024 (thanks to the folks who submitted!)
- Triaged reports and fixes for the PSRT.
- I wasn't involved, but PyPI has added Trusted Publisher support for ActiveState, GitLab, and Google Cloud Build.
Note that I've been summoned for jury duty starting next week, so expect fewer updates over the next two weeks depending on how that goes.
That's all for this week! 👋 If you're interested in more you can read last week's report.
Thanks for reading! ♡ Did you find this article helpful and want more content like it? Get notified of new posts by subscribing to the RSS feed or the email newsletter.
This work is licensed under CC BY-SA 4.0 ![]()
![]()
![]()
April 23, 2024
PyCoder’s Weekly
Issue #626 (April 23, 2024)
#626 – APRIL 23, 2024
View in Browser »

Asyncio Handle Control-C (SIGINT)
When the user presses CTRL-C on the keyboard, the OS raises an interrupt signal to your program. When writing concurrent code this can get complicated as the signal goes to the process. This article shows you how to handle capturing CTRL-C elegantly when using asyncio.
JASON BROWNLEE
Using raise for Effective Exceptions
In this video course, you’ll learn how to raise exceptions in Python, which will improve your ability to efficiently handle errors and exceptional situations in your code. This way, you’ll write more reliable, robust, and maintainable code.
REAL PYTHON course
Securing Python and Open Source Ecosystems

Join this fireside chat featuring Dustin Ingram, Fellow at the Python Software Foundation (PSF), as we discuss trust and security for PyPI and other repositories in light of recent attacks, and initiatives such as Trusted Publishing - Tune in this Thursday! →
ACTIVESTATE sponsor
Ruff Gets a Big Speed-Up
Ruff has changed from a generated parser to a hand-written recursive descent parser in the latest release. This has resulted in >2x speedup in its linting performance. This article covers what has changed and why they did it.
DHRUV MANILAWALA
Articles & Tutorials
OpenStreetMaps, Overpass API and Python
OpenStreetMaps (OSM) is an an open source mapping project that allows people to browse the world map and to plan routes. Not only does it have the expected web interface, but it also has an API known as Overpass. This article shows you two ways to use Python to query Overpass.
JUDITH VOCKENROTH
Python Gotcha: strip Can Remove More Than Expected
The Python strip, lstrip, and rstrip functions can have unexpected behavior: they strip a list of characters, not strings. Even though this is documented, it can lead to unexpected results. This post explains what happens and shows you two functions to use instead.
ANDREW WEGNER
Decoupling Systems to Get Closer to the Data
What are the benefits of using a decoupled data processing system? How do you write reusable queries for a variety of backend data platforms? This week on the show, Phillip Cloud, the lead maintainer of Ibis, will discuss this portable Python dataframe library.
REAL PYTHON podcast
Announcing py2wasm: A Python to Wasm Compiler
Wasmer, a company that builds Wasm tools, has announced py2wasm which converts your Python programs to WebAssembly, running at 3x faster speeds than direct Wasm. This post introduces you to the tool and shows how they took advantage of the Nuitka library.
SYRUS AKBARY
How to Format Floats Within F-Strings in Python
In this tutorial, you’ll learn how to use Python format specifiers within an f-string to allow you to neatly format a float to your required precision. You’ll also learn how to extract digits from existing strings and format them as well.
REAL PYTHON
Memory Management in mpmetrics
The mpmetrics library contains tools for determining runtime metrics on your code. To do this it requires some esoteric memory management techniques normally not undergone in Python. This post describe what they’ve done and why.
TRENDS BLOG
The Time Complexities Python Data Structures in Python
Big O notation describes the relationship between an algorithm, how much data it is using, and the time it takes to run. This article covers the time complexities of a variety of Python data structures.
TREY HUNNER
Django Project on NGINX Unit
Unit is a web server developed by the NGINX folks with pluggable support for Python using WSGI and ASGI. Aidas tried it out and this post talks about how he got some Django code working on this server.
AIDAS BENDORAITIS
I Asked 100 Devs Why They Aren’t Shipping Faster?
Daksh asked 100 developers why they aren’t shipping faster and this blog post shares what he learned. Problems include dependency bugs, overly complicated code bases, waiting on requirements, and more.
DAKSH GUPTA
Shape Typing in Python
This quick blog post shows you how to use Python type checking to ensure the dimensions of matrices being multiplied together. Typing is no longer just “is it an integer”.
JAMES FISHER
Software Needs to Be More Expensive
Open source is free, and although that is a good thing, it also means companies get to take without giving back. This opinion piece talks about how that should change.
GLYPH LEFKOWITZ
Projects & Code
escaping: Suppress Exceptions With Callbacks and Logs
GITHUB.COM/POMPONCHIK • Shared by Evgeniy Blinov
Events
Weekly Real Python Office Hours Q&A (Virtual)
April 24, 2024
REALPYTHON.COM
SPb Python Drinkup
April 25, 2024
MEETUP.COM
Django Girls Ekpoma Workshop
April 26 to April 28, 2024
DJANGOGIRLS.ORG
Open Source With Python
April 27, 2024
MEETUP.COM
PythOnRio Meetup
April 27, 2024
PYTHON.ORG.BR
Launching Python Niger
April 28 to April 29, 2024
FB.ME
Happy Pythoning!
This was PyCoder’s Weekly Issue #626.
View in Browser »
[ Subscribe to 🐍 PyCoder’s Weekly 💌 – Get the best Python news, articles, and tutorials delivered to your inbox once a week >> Click here to learn more ]
Real Python
Python Basics Exercises: Scopes
On your Python journey, you’ve worked with functions and loops. To fully understand functions and loops in Python, you need to be familiar with the issue of scope.
In this Python Basics Exercises video course, you’ll practice:
- Identifying the scope of objects
- Working with the
globalkeyword - Exploring the LEGB rule for scope resolution
- Using the
returnstatement in a function
Scope can be one of the more difficult programming concepts to understand, so in this video course, you’ll get additional practice working with it.
This video course is part of the Python Basics series, which accompanies Python Basics: A Practical Introduction to Python 3. You can also check out the other Python Basics courses.
Note that you’ll be using IDLE to interact with Python throughout this course. If you’re just getting started, then you might want to check out Python Basics: Setting Up Python before diving into this course.
[ Improve Your Python With 🐍 Python Tricks 💌 – Get a short & sweet Python Trick delivered to your inbox every couple of days. >> Click here to learn more and see examples ]
Django Weblog
DjangoCon US 2024 CFP Last Call
Update: The CFP has been extended to Monday, April 29th at 12 PM EDT
Hey Django enthusiasts!
Have you submitted your talk or tutorial for DjangoCon US 2024, in beautiful Durham, North Carolina, USA?
Time flies, and we're fast approaching the deadline (April 29, 2024 at 12 PM EDT) for DjangoCon US 2024 Call for Proposals (CFP). If you've been pondering sharing your Django journey, showcasing your innovative projects, or imparting your expertise to fellow developers, now is the perfect moment to seize the opportunity!
Here's why you should take action and submit your proposals before the clock runs out:
- Share Your Knowledge: DjangoCon US isn't just a conference; it's a platform for sharing insights, discoveries, and lessons learned. Your unique experiences could be just what someone else needs to overcome a hurdle or spark a new idea.
- Join the Community: DjangoCon US isn't just about talks; it's about building connections. By presenting at the conference, you become an integral part of the vibrant Django community, exchanging ideas, and forging new friendships with like-minded developers.
- Boost Your Profile: Whether you're a seasoned speaker or a first-time presenter, DjangoCon US offers a valuable opportunity to elevate your profile in the tech industry. Showcase your expertise, gain visibility, and enhance your professional credibility among peers and potential employers.
- Contribute to Diversity: DjangoCon US values diversity and inclusion. Your perspective matters, and by sharing your voice, you contribute to creating a more inclusive and representative tech community.
Submitting a proposal is easy! Just head over to the DjangoCon US website, fill out the submission form, and share your compelling idea with us. Whether it's a deep dive into a technical topic, a case study of your latest project, or a discussion on the future of Django, we want to hear from you.
Remember, the deadline for CFP submissions is fast approaching, so don't wait until the last minute. Take this opportunity to inspire, educate, and connect with your fellow Django enthusiasts at DjangoCon US 2024!
See you at the conference!
If you have questions feel free to contact us.
PyPy
PyPy v7.3.16 release
PyPy v7.3.16: release of python 2.7, 3.9, and 3.10
The PyPy team is proud to release version 7.3.16 of PyPy.
This release includes security fixes from upstream CPython, and bugfixes to the garbage collector, described in a gc bug-hunt blog post.
The release includes three different interpreters:
PyPy2.7, which is an interpreter supporting the syntax and the features of Python 2.7 including the stdlib for CPython 2.7.18+ (the
+is for backported security updates)PyPy3.9, which is an interpreter supporting the syntax and the features of Python 3.9, including the stdlib for CPython 3.9.19.
PyPy3.10, which is an interpreter supporting the syntax and the features of Python 3.10, including the stdlib for CPython 3.10.14.
The interpreters are based on much the same codebase, thus the multiple release. This is a micro release, all APIs are compatible with the other 7.3 releases. It follows after 7.3.15 release on Jan 15, 2024
We recommend updating. You can find links to download the v7.3.16 releases here:
We would like to thank our donors for the continued support of the PyPy project. If PyPy is not quite good enough for your needs, we are available for direct consulting work. If PyPy is helping you out, we would love to hear about it and encourage submissions to our blog via a pull request to https://github.com/pypy/pypy.org
We would also like to thank our contributors and encourage new people to join the project. PyPy has many layers and we need help with all of them: bug fixes, PyPy and RPython documentation improvements, or general help with making RPython's JIT even better.
If you are a python library maintainer and use C-extensions, please consider making a HPy / CFFI / cppyy version of your library that would be performant on PyPy. In any case, both cibuildwheel and the multibuild system support building wheels for PyPy.
What is PyPy?
PyPy is a Python interpreter, a drop-in replacement for CPython It's fast (PyPy and CPython 3.7.4 performance comparison) due to its integrated tracing JIT compiler.
We also welcome developers of other dynamic languages to see what RPython can do for them.
We provide binary builds for:
x86 machines on most common operating systems (Linux 32/64 bits, Mac OS 64 bits, Windows 64 bits)
64-bit ARM machines running Linux (
aarch64).Apple M1 arm64 machines (
macos_arm64).s390x running Linux
PyPy support Windows 32-bit, Linux PPC64 big- and little-endian, and Linux ARM 32 bit, but does not release binaries. Please reach out to us if you wish to sponsor binary releases for those platforms. Downstream packagers provide binary builds for debian, Fedora, conda, OpenBSD, FreeBSD, Gentoo, and more.
What else is new?
For more information about the 7.3.16 release, see the full changelog.
Please update, and continue to help us make pypy better.
Cheers, The PyPy Team
Real Python
Python Sequences: A Comprehensive Guide
In this quiz, you’ll test your understanding of Python sequences.
By working through this quiz, you’ll revisit the basic characteristics of a sequence, operations common to most sequences, special methods associated with sequences, and how to create user-defined mutable and immutable sequences.
[ Improve Your Python With 🐍 Python Tricks 💌 – Get a short & sweet Python Trick delivered to your inbox every couple of days. >> Click here to learn more and see examples ]
Python Bytes
#380 Debugging with your eyes
<strong>Topics covered in this episode:</strong><br> <ul> <li><a href="https://pirsquared.org/blog/numfocus-concerns.html"><strong>NumFOCUS concerns</strong></a></li> <li><a href="https://github.com/leapingio/leaping">leaping pytest debugger llm</a></li> <li><strong>Extra, Extra, Extra,</strong></li> <li><a href="https://blog.pypi.org/posts/2023-11-14-1-pypi-completes-first-security-audit/">PyPI has completed its first security audit</a></li> <li><strong>Extras</strong></li> <li><strong>Joke</strong></li> </ul><a href='https://www.youtube.com/watch?v=axdty2K79v8' style='font-weight: bold;'data-umami-event="Livestream-Past" data-umami-event-episode="380">Watch on YouTube</a><br> <p><strong>About the show</strong></p> <p>Sponsored by us! Support our work through:</p> <ul> <li>Our <a href="https://training.talkpython.fm/"><strong>courses at Talk Python Training</strong></a></li> <li><a href="https://courses.pythontest.com/p/the-complete-pytest-course"><strong>The Complete pytest Course</strong></a></li> <li><a href="https://www.patreon.com/pythonbytes"><strong>Patreon Supporters</strong></a></li> </ul> <p><strong>Connect with the hosts</strong></p> <ul> <li>Michael: <a href="https://fosstodon.org/@mkennedy"><strong>@mkennedy@fosstodon.org</strong></a></li> <li>Brian: <a href="https://fosstodon.org/@brianokken"><strong>@brianokken@fosstodon.org</strong></a></li> <li>Show: <a href="https://fosstodon.org/@pythonbytes"><strong>@pythonbytes@fosstodon.org</strong></a></li> </ul> <p>Join us on YouTube at <a href="https://pythonbytes.fm/stream/live"><strong>pythonbytes.fm/live</strong></a> to be part of the audience. Usually Tuesdays at 11am PT. Older video versions available there too.</p> <p>Finally, if you want an artisanal, hand-crafted digest of every week of </p> <p>the show notes in email form? Add your name and email to <a href="https://pythonbytes.fm/friends-of-the-show">our friends of the show list</a>, we'll never share it.</p> <p><strong>Brian #1:</strong> <a href="https://pirsquared.org/blog/numfocus-concerns.html"><strong>NumFOCUS concerns</strong></a></p> <ul> <li>Suggested by Pamphile Roy</li> <li>Write up of the current challenges faced by NumFOCUS, by Paul Ivanov (one of the OG of Scientific Python: Jupyter, Matplotlib, etc.) <ul> <li>Struggling to meet the needs of sponsored and affiliated projects.</li> <li>In February, NumFOCUS announced it is moving in a new direction.</li> <li>NumFOCUS initiated an effort to run an election for open board seats and proposed changing its governance structure.</li> <li>Some projects are considering and actively pursuing alternative venues for fiscal sponsorship.</li> <li>Quite a bit more detail and discussion in the article.</li> </ul></li> <li><a href="https://numfocus.org/sponsored-projects">NumFOCUS covers a lot of projects</a> <ul> <li>NumPy, Matplotlib, pandas, Jupyter, SciPy, Astropy, Bokeh, Dask, Conda, and so many more.</li> </ul></li> </ul> <p><strong>Michael #2:</strong> <a href="https://github.com/leapingio/leaping">leaping pytest debugger llm</a></p> <ul> <li>You can ask Leaping questions like: <ul> <li>Why am I not hitting function x?</li> <li>Why was variable y set to this value?</li> <li>What was the value of variable x at this point?</li> <li>What changes can I make to this code to make this test pass?</li> </ul></li> </ul> <p><strong>Brian #3:</strong> <strong>Extra, Extra, Extra,</strong></p> <ul> <li><a href="https://scientific-python.org/summits/developer/2024/">2024 Developer Summit</a> <ul> <li>Also suggested by Pamphile, related to Scientific Python</li> <li><em>The Second Scientific Python Developer Summit , June 3-5, Seattle, WA</em></li> <li>Lots of great work came out of the <a href="https://blog.scientific-python.org/scientific-python/dev-summit-1/">First Summit in 2023</a></li> </ul></li> <li><a href="https://github.com/tylerjereddy/pytest-regex">pytest-regex</a> - Use regexs to specify tests to run <ul> <li>Came out of the ’23 summit</li> <li>I’m not sure if I’m super happy about this or a little afraid that I probably could use this.</li> <li>Still, cool that it’s here.</li> </ul></li> <li><a href="https://jcarlosroldan.com/post/329/my-latest-tils-about-python">Cool short example of using </a><a href="https://jcarlosroldan.com/post/329/my-latest-tils-about-python">__init__</a><a href="https://jcarlosroldan.com/post/329/my-latest-tils-about-python"> and </a><a href="https://jcarlosroldan.com/post/329/my-latest-tils-about-python">__call__</a><a href="https://jcarlosroldan.com/post/329/my-latest-tils-about-python"> to hand-roll a decorator.</a></li> <li><a href="https://astral.sh/blog/ruff-v0.4.0">ruff got faster</a></li> </ul> <p><strong>Michael #4:</strong> <a href="https://blog.pypi.org/posts/2023-11-14-1-pypi-completes-first-security-audit/">PyPI has completed its first security audit</a></p> <ul> <li>Trail of Bits spent a total of 10 engineer-weeks of effort identifying issues, presenting those findings to the PyPI team, and assisting us as we remediated the findings.</li> <li>Scope: The audit was focused on "Warehouse", the open-source codebase that powers <a href="https://pypi.org">pypi.org</a></li> <li>As a result of the audit, Trail of Bits detailed 29 different advisories discovered across both codebases. When evaluating severity level of each advisory, 14 were categorized as "informational", 6 as "low", 8 as "medium" and zero as "high".</li> </ul> <p><strong>Extras</strong> </p> <p>Brian:</p> <ul> <li>pytest course community to try out Podia Communities.</li> <li>Anyone have a podia community running strong now? <ul> <li>If so, let me know through Mastodon: <a href="https://fosstodon.org/@brianokken">@brianokken@fosstodon.org</a></li> </ul></li> <li>Want to join the community when it’s up and running? <ul> <li>Same. Or join our <a href="https://pythonbytes.fm/friends-of-the-show">our friends of the show list</a>, and read our newsletter. I’ll be sure to drop a note in there when it’s ready.</li> </ul></li> </ul> <p>Michael:</p> <ul> <li><a href="https://www.youtube.com/watch?v=Jh24NVM2FDY">VS Code AMA @ Talk Python</a><a href="https://www.youtube.com/watch?v=Jh24NVM2FDY"> </a>[<a href="https://www.youtube.com/watch?v=Jh24NVM2FDY">video]</a></li> <li><a href="https://nvd.nist.gov/vuln/detail/CVE-2024-1135">Gunicorn CVE</a></li> <li>Talk submissions are now open for both remote and in-person talks at the 2024 PyConZA? The conference will be held on 3 and 4 October 2024 in Cape Town, South Africa. Details are on <a href="http://za.pycon.org">za.pycon.org</a>.</li> <li><a href="https://flaskcon.com/2024/">FlaskCon 2024</a> will be happening Friday, May 17 inside PyCon US 2024. Call for proposals are now live!</li> </ul> <p><strong>Joke:</strong> <a href="https://devhumor.com/media/debugging-with-your-eyes">Debugging with your eyes</a></p>
April 22, 2024
Django Weblog
An open letter regarding the DjangoCon Europe CfP
As many of you are not doubt aware there have recently been some community conversation regarding a license agreement that was published as part of the DjangoCon Europe Call for Proposals for organizers. I believe it is fair to characterize the reaction as negative, with expressions of anger, frustration, and confusion towards the DSF for placing burdensome and one sided requirements for hosting a DjangoCon Europe.
I want to state first and foremost that I added the licensing agreement to the CfP. My deepest apologies for everyone who felt betrayed by it. I hold our conference organizers in the highest regard, for the equity, effort, blood, sweat, and tears they put into creating amazing community events that bring us all together. I considered resigning from the board for the pain and confusion that I have caused. I have not because I want to be part of finding a way forward and keeping DjangoCon Europe the calendar event that so many of us eagerly await. It will be up to all of you if I can be part of that journey back.
The most difficulty accusation to face is that of a lack of transparency and surprising former and prospective organizers with the license. It is difficult for me because I honestly believed I was increasing the level of transparency to organizers. This licensing agreement is not a new document, though I now understand that it is new to, well, everyone. The license has existed in the DSF legal documents repository since at least 2016 and has been signed for at least one DjangoCon Europe. In my years on the board prior to my presidency on several occasions there were todos to have selected organizers "sign the organizer contract". In addition I know that DEFNA is party to an almost identical licensing contract with the DSF. It was my intention to provide to potential organizers with the contract prior to making a proposal so that when a proposal was selected the organizers would not be taken aback when being presented with the license.
I was mortified when I heard, first in private and then publicly, that no DjangoCon Europe organizers of current memory had ever signed the license. The group of some of our community's most dedicated volunteers felt like with the click of a keyboard had turned into an arms length transaction among lawyers. At the same time I was mortified at the potential legal jeopardy the DSF had unknowingly been in by not having license agreements in place for all DjangoCons.
I'd like to touch on several points brought up in the discussion that has come from this.
The first regards the time window of DjangoCon Europe as laid out in the CfP. The DSF has long standing agreements with the PSF, DEFNA, and EuroPython to not adversely impact each other's conferences by scheduling them too close together. The agreement specifies that no two conferences should be within a month of each other. The sentiment of the agreement is well placed, but I believe it is time to revisit it. With new conferences coming into the fold (it was rightly pointed out the DjangoCon Africa is not mentioned in the license), the ability for conferences to have meaningful remote participation, and a calendar that due to weather often has the four stated conferences vying for a 5-7 month slot the one month gap is difficult to plan around. I am publicly proposing here that the interested parties to this agreement modify it such that the one month window apply to either region or theme, but not both. That would have, for instance, DjangoCon US avoiding Pycon and DjangoCons Europe and Africa but not EuroPython and vice versa.
The second point is in regards to the requirement to not schedule against major religious and cultural holidays. While I did not write that, I embody it. My first DjangoCon was DjangoCon Europe. I was unable to attend DjangoCon US in Chicago while I was living in Chicago as it had been partly scheduled against Rosh Hashanah. So I convinced my boss to send me to France instead and fell in love with the Django community.
Finally to the comments that the DSF does not care about organizers and has no interest in helping them put on a conference. Unfortunately DSF does not have inherent knowledge of running conferences, no legal entity outside the US to bring to bear, or the finances to backstop a DjangoCon. We ask for your help every year to run DjangoCon Europe because, quite simply, we can't. There was a meeting in Edinburgh of former organizers to discuss how organizing a DjangoCon Europe coule be improved. That meeting was the start of the European Organizers Support working group. It did take time to get started. We have it now. It is the sincerest hope of all of us that it is the first step in improving the experience of European organizers, and hopefully others down the line. It is a slow process, but one I dearly hope bears fruit.
I sincerely hope that we can all together still work to make DjangoCon Europe 2025 a reality. I will do all that I can to make that happen, if you will continue to have me. I do not participate in social media, but have started a thread on the Django Forum to continue this discussion. For most of the next week I will be unavailable due to the Passover holiday but it was imperative to me that I get this message to you all as soon as I could.
Thank you for your time, and for letting me serve you, Chaim Kirby President, Django Software Foundation
ListenData
4 Ways to Correct Grammar with Python
This tutorial explains various methods for checking and correcting grammar using Python. Automatic grammar correction helps students, professionals and content creators to make sure their writing follows proper grammar rules.

Real Python
Write Unit Tests for Your Python Code With ChatGPT
Having a good battery of tests for your code may be a requirement for many Python projects. In practice, writing unit tests is hard and can take a lot of time and effort. Therefore, some developers don’t like to write them. However, with large language models (LLMs) and tools like ChatGPT, you can quickly create robust and complete sets of tests for your Python code.
In Python, you can use multiple different tools for writing tests. The most commonly used tools include doctest, unittest, and pytest. ChatGPT can be of great help in writing tests with any of these tools.
In this tutorial, you’ll:
- Prompt ChatGPT to create tests using
doctest - Use ChatGPT to write
unittesttests, fixtures, and suites - Craft ChatGPT prompts to write
pytesttests and fixtures - Use alternative prompts for cases where the code isn’t available
To get the most out of this tutorial, you should set up a ChatGPT account and know the basics of interacting with this tool using prompt engineering. You should also know the basics of how to test code in Python.
Get Your Code: Click here to download the free sample code you’ll use to write unit tests for your Python code using ChatGPT.
Benefits of Using ChatGPT for Testing Python Code
Having good and up-to-date unit tests for your code is a must for any Python project. Poorly tested code or code without tests may end up being unreliable and weak. With automated tests, you can ensure and show that your code works correctly in different scenarios. So, having tests is important from the technical and commercial point of view.
Writing good tests is hard and can take a lot of time. That’s why some developers don’t like to write them at all. Using large language models (LLM) like ChatGPT can be a viable alternative for providing your projects and code with proper tests.
Note: You can use ChatGPT and other LLMs in many useful ways in the context of Python development. Check out the following resources for other use cases and useful insights:
Some of the benefits of using ChatGPT to write tests for your Python code include the following:
- Efficiency and speed: It can generate unit tests based on specifications or code snippets. This possibility significantly reduces the time that you need to spend writing tests. So you can focus on writing application logic.
- Coverage improvement: It can suggest tests for edge cases or scenarios that developers might not immediately consider. This way, you can improve your code’s test coverage.
- Error reduction: It can reduce human error in writing repetitive or boilerplate test code.
- Learning and onboarding: It can serve as an educational tool for developers who are new to testing frameworks or unfamiliar with best practices in unit testing. The generated tests can help developers learn about testing patterns, assertions, and ways to effectively write tests.
With ChatGPT, you can generate unit tests for your Python code in almost no time. However, you must note that even though the generated tests can look good, you should still review and possibly refine the generated tests.
Note: For this tutorial, you’ll use a free ChatGPT account that’s powered by the GPT-3.5 LLM. You can use this model for free with the default web interface by OpenAI. If you use a paid account with GPT-4, then your results might be more accurate and faster.
Additionally, you’ll use an individual chat thread for each major section in the tutorial. So you’ll use different threads for the doctest, unittest, and pytest sections.
Using a single chat thread to run all the examples in this tutorial may cause the chat to generate significantly different responses because of the past context, which includes previous prompts and responses.
In the following sections, you’ll learn the basics of using ChatGPT as an assistant for creating coherent unit tests for your Python projects using different test frameworks and libraries.
Writing doctest Tests With ChatGPT
Python’s doctest module provides a lightweight testing framework that you can use for test automation. It can read the test cases from your project’s documentation and your code’s docstrings. This framework comes with the Python interpreter, so you’ll have it at your disposal with any Python installation, which is great.
Note: To dive deeper into how to use the doctest module for testing your code, check out Python’s doctest: Document and Test Your Code at Once.
With doctest, you can write code that provides examples of how your code works, simulating REPL sessions. These examples work as documentation and also as test cases or unit tests. Each doctest test needs a statement or expression and an expected result.
You can use ChatGPT to help you out with writing doctest tests. First, you need some code to test. The following function tries to tackle the FizzBuzz challenge, where you return "fizz" for numbers divisible by three, "buzz" for those divisible by five, and "fizz buzz" for those divisible by both three and five.
Go ahead and create a fizzbuzz.py file and add the following code to it:
fizzbuzz.py
def fizzbuzz(number):
    if number % 3 == 0:
        return "fizz"
    elif number % 5 == 0:
        return "buzz"
    elif number % 15 == 0:
        return "fizz buzz"
    else:
        return number
This function works okay for numbers divisible by 3 or 5. However, there is a slight issue with numbers that are divisible by both. Even though you know this, go ahead and start a new chat thread. Then, prompt ChatGPT to write doctest test for the function:
You: Write
doctesttests for the following function:PythonCopied!def fizzbuzz(number): if number % 3 == 0: return "fizz" elif number % 5 == 0: return "buzz" elif number % 15 == 0: return "fizz buzz" else: return numberChatGPT:
Certainly! The function you’ve provided implements a basic FizzBuzz algorithm but with a slight logical error. The check for divisibility by
15should come before checks for3and5, as every number divisible by15is also divisible by both3and5, but your current order will never reach the"fizz buzz"case. Here’s a corrected version of your function with the logical order fixed, followed bydoctesttests for it:PythonCopied!def fizzbuzz(number): """ Returns 'fizz' if number is divisible by 3, 'buzz' if number is divisible by 5, 'fizz buzz' if number is divisible by 15, and the number itself otherwise. >>> fizzbuzz(3) 'fizz' >>> fizzbuzz(5) 'buzz' >>> fizzbuzz(15) 'fizz buzz' >>> fizzbuzz(4) 4 >>> fizzbuzz(30) 'fizz buzz' >>> fizzbuzz(9) 'fizz' >>> fizzbuzz(10) 'buzz' >>> fizzbuzz(2) 2 """ if number % 15 == 0: return "fizz buzz" elif number % 3 == 0: return "fizz" elif number % 5 == 0: return "buzz" else: return numberTo use these
doctesttests, you’ll need to include them in the docstring of your function as shown above. Then, you can run the tests with thedoctestmodule by adding the following to your script:PythonCopied!if __name__ == "__main__": import doctest doctest.testmod()This code will automatically run the tests defined in the docstrings when you execute the Python file. Remember, the corrected order of conditions in the function ensures that numbers divisible by both
3and5return"fizz buzz", which is crucial for the FizzBuzz logic.
Wow! That great! The chat not only wrote the doctest tests for you. It also fixed the issue, explained important concepts around doctest, and provided instructions on how to run the tests. Note that the tests cover both regular and edge cases, which is pretty convenient.
Read the full article at https://realpython.com/chatgpt-unit-tests-python/ »
[ Improve Your Python With 🐍 Python Tricks 💌 – Get a short & sweet Python Trick delivered to your inbox every couple of days. >> Click here to learn more and see examples ]
Zato Blog
Enterprise Python: Integrating with Salesforce
Enterprise Python: Integrating with Salesforce
Overview
Salesforce connections are one of the newest additions to Zato 3.2, allowing you to look up and manage Salesforce records and other business data. To showcase it, the article will create a sample Salesforce marketing campaign in a way that does not require the usage of anything else except for basic REST APIs combined with plain Python objects, such as dicts.
If you have not done it already, you can download Zato here.
Basic workflow
The scope of our works will be:
- Creating Salesforce credentials for our integration project
- Defining a Salesforce connection in Zato
- Authoring a service that will map input data to the format that Salesforce expects
- Creating a Zato REST channel that will be invoked through curl during tests
- Testing the integration
Creating Salesforce credentials
To be able to create as connection to Salesforce in the next step, we need a few credentials. There is a full article about how to prepare them and this section is the gist of it.
In runtime, based on this information, Zato will obtain the necessary authentication and authorization tokens itself, which means that you will only focus on the business side of the integrations, not on the low-level aspects of it.
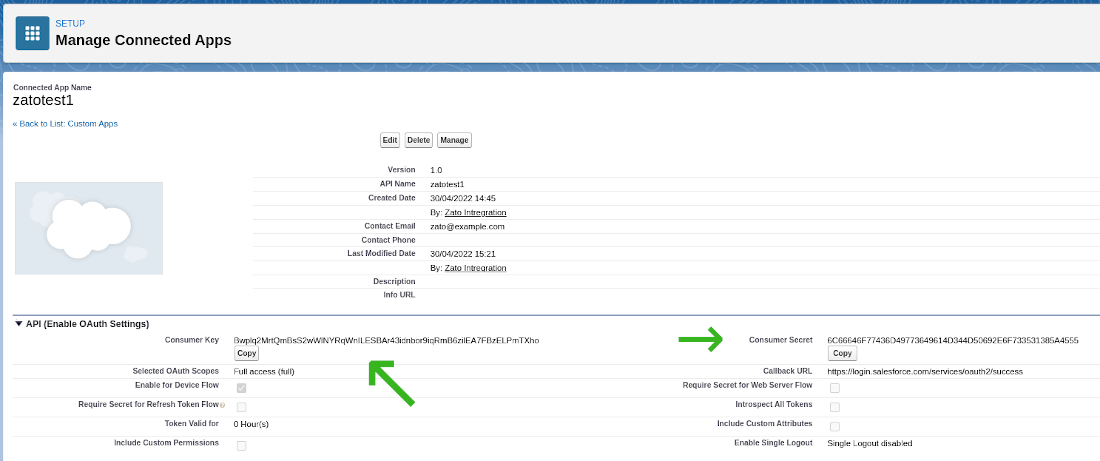
The process of obtaining the credentials needs to be coordinated with an administrator of your organization. To assist in that, the screenshots below explain where to find them.
The credentials are:
- Username and password
- Consumer key
- Consumer secret
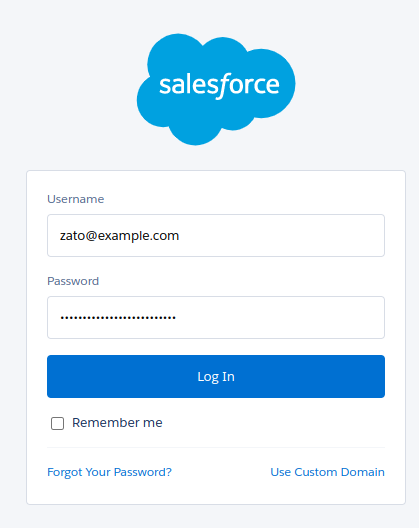
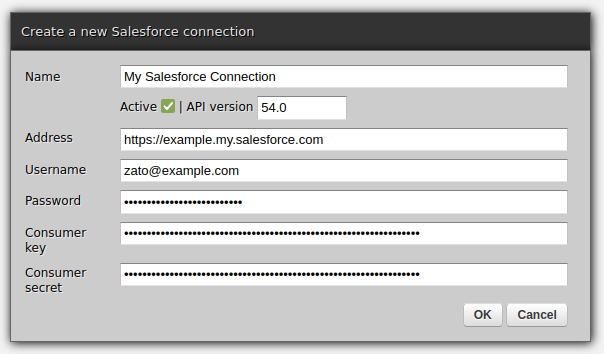
The username and password are simply the same credentials that can be used to log in to Salesforce:
Consumer key and secret are properties of a connected app - this is a term that Salesforce uses for API clients that invoke its services. If you are already an experienced Salesforce REST API user, you may know the key and secret under their aliases of "client_id" and "client_secret" - these are the same objects.
Note that when a connected app already exists and you would like to retrieve the key and secret, they will be available under the "View" menu option for the app, not under "Edit" or "Manage".
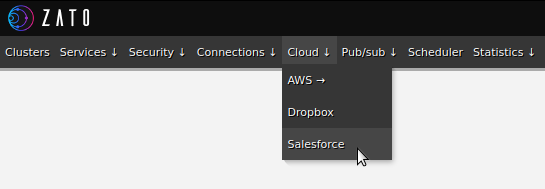
Defining a Salesforce connection in Zato
With all the credentials in place, we can create a new Salesforce connection in Zato Dashboard, as below.
Authoring an integration service in Python
Above, we created a connection definition that lets Zato obtain session tokens and establish connections to Salesforce. Now, we can create an API service that will make use of such connections.
In the example below, we are using the POST REST method to invoke an endpoint that creates new Salesforce campaigns. In your own integrations, you can invoke any other Salesforce endpoint, using any REST method as needed, by following the same pattern, which is, create a model with input fields, build a Python dict for the request to Salesforce, invoke it and map all the required from the response from Salesforce to that which your own service returns to its own callers.
Note that we use a datamodel-based SimpleIO definition for the service. Among other things, although we are not going to do it here, this would let us offer definitions for this and other services.
# -*- coding: utf-8 -*-

# stdlib
from dataclasses import dataclass

# Zato
from zato.server.service import Model, Service

# ###########################################################################

if 0:
    from zato.server.connection.salesforce import SalesforceClient

# ###########################################################################

@dataclass(init=False)
class CreateCampaignRequest(Model):
    name:    str
    segment: str

# ###########################################################################

@dataclass(init=False)
class CreateCampaignResponse(Model):
    campaign_id: str

# ###########################################################################

class CreateCampaign(Service):

    class SimpleIO:
        input  = CreateCampaignRequest
        output = CreateCampaignResponse

    def handle(self):

        # This is our input data
        input = self.request.input # type: CreateCampaignRequest

        # Salesforce REST API endpoint to invoke - note that Zato
        # will add a prefix to it containing the API version.
        path = '/sobjects/Campaign/'

        # Build the request to Salesforce based on what we received
        request = {
          'Name': input.name,
          'Segment__c': input.segment,
        }

        # .. create a reference to our connection definition ..
        salesforce = self.cloud.salesforce['My Salesforce Connection']

        # .. obtain a client to Salesforce ..
        with salesforce.conn.client() as client: # type: SalesforceClient

            # .. create the campaign now ..
            sf_response = client.post(path, request)

        # .. build our response object ..
        response = CreateCampaignResponse()
        response.campaign_id = sf_response['id']

        # .. and return its ID to our caller.
        self.response.payload = response

# ###########################################################################
Creating a REST channel
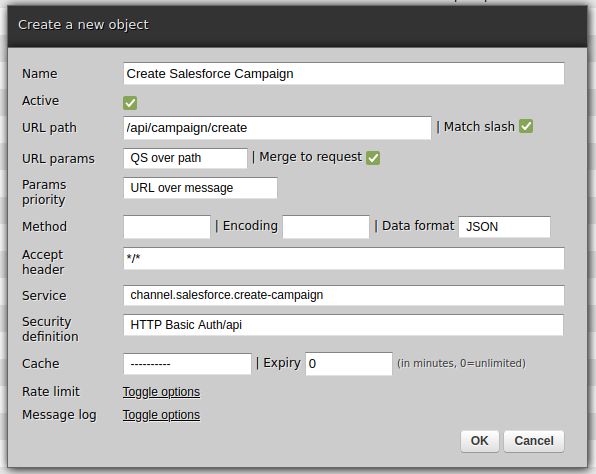
Note that we assign HTTP Basic Auth credentials to the channel. In this manner, it is possible for clients of this REST channel to authenticate using a method that they are already familiar which simplifies everyone's work - it is Zato that deals with how to authenticate against Salesforce whereas your API clients use the ubiquitous HTTP Basic Auth method.
Testing
The last step is to invoke the newly created channel:
$ curl http://api:password@localhost:17010/api/campaign/create -d '{"name":"Hello", "segment":"123"}'
{"campaign_id":"8901Z3VHXDTebEJWs"}
$
That is everything - you have just integrated with Salesforce and exposed a REST channel for external applications to integrate with!
April 21, 2024
Go Deh
Searching OEIS tables
A few months ago I submitted a series to OEIS* that was accepted; yes, but OEIS does not seem to leave my series searchable!
*OEIS is the Online Encyclopedia of Integer Series. I guess table is not in the name, but...
(best viewed on larger than a portrait phone)
Let me explain.
The documentation for OEIS, explains that if you have a 2D triangle or table of values rather than a one dimensional strict series, then one should antidiagonalise the data and submit the series produced.
They give as an example A003987 . This gives this table:
The above gets antidiagonalised to the series beginning:
Searching...
If we search for a sub-sequence of the antidiagonalised table, we can find the correct entry.
If, however, we search for a row of the values from the table, A003987 is not found!
The values chosen: to search for: 5,4,7,6,1,0,3 appear near the end of the table which shows that that row of numbers should be followed by a 2.
The table shows 13*13 / 2 ~ 85 values. OEIS has a list of 104 values, so it has the data to search through.
No intuitive search of OEIS tables
It seems to me that the most intuitive way to search a table of values is by row, left to right. There are other ways to search a table, (assuming an origin at top left and the table extends to the right and down):
- By row, L2R. →, R2L ←
- By Column Top2Bottom, ↓, B2T ↑
- By 45 degree diagonals, ↘, ↖, ↙, ↗
OEIS doesn't seem to do these searches on tabular data.
Regenerating a 2D table from antidiagonalised data.
I did play around and created some code to recreate a table as a list of row-lists, in Python, given an OEIS B-file. The options handling is a work in progress, but the main part was being able to generate the table.
And antidiagonals.py is this:
END.
April 20, 2024
ListenData
How to Build ChatGPT Clone in Python
In this article, we will see the steps involved in building a chat application and an answering bot in Python using the ChatGPT API and gradio.
Developing a chat application in Python provides more control and flexibility over the ChatGPT website. You can customize and extend the chat application as per your needs. It also help you to integrate with your existing systems and other APIs.

April 19, 2024
Python Morsels
Multiline comments in Python
Python does not have multiline comments. But you can use alternatives like docstrings, editor shortcuts, and conventional commenting methods, depending on your requirements.
Table of contents
Does Python have multi-line comments?
For single-line comments, Python uses the octothorpe character (#), also known as pound, number sign, crunch, and of course, the hashtag character:
# This is a comment

this = "is not a comment"
But what if you want to comment out a whole block of code?
Unlike some programming languages, Python does not have multi-line comments.
What about triple quotes?
You might be thinking, wait, …
Read the full article: https://www.pythonmorsels.com/multiline-comments/
Real Python
Python's unittest: Writing Unit Tests for Your Code
In this quiz, you’ll test your understanding of testing your Python code with the unittest framework.
Testing in Python is a huge topic and can come with a lot of complexity, but it doesn’t need to be hard. You can create simple tests for your application in a few easy steps and then build on them from there.
With this quiz, you can check your understanding of testing with Python’s unittest framework. Good luck!
[ Improve Your Python With 🐍 Python Tricks 💌 – Get a short & sweet Python Trick delivered to your inbox every couple of days. >> Click here to learn more and see examples ]