Planet Python
Last update: April 16, 2024 10:44 AM UTC
April 15, 2024
I’ve added experimental function and class coverage reports to coverage.py.
I’d like feedback
about whether they behave the way you want them to.
I haven’t made a PyPI release. To try the new reports, install coverage from
GitHub. Be sure to include the hash:
$ python3 -m pip install git+https://github.com/nedbat/coveragepy@f10c455b7c8fd26352de#egg=coverage==0.0
Then run coverage and make an HTML report as you usually do. You should
have two new pages, not linked from the index page (yet).
“htmlcov/function_index.html” is the function coverage report, and the classes
are in “htmlcov/class_index.html”.
I had to decide how to categorize nested functions and classes. Inner
functions are not counted as part of their outer functions. Classes consist of
the executable lines in their methods, but not lines outside of methods, because
those lines run on import. Each file has an entry in the function report for
all of the lines outside of any function, called “(no function)”. The class
report has “(no class)” entries for lines outside of any classes.
The result should be that every line is part of one function, or the “(no
function)” entry, and every line is part of one class, or the “(no class)”
entry. This is what made sense to me, but maybe there’s a compelling reason to
do it differently.
The reports have a sortable column for the file name, and a sortable column
for the function or class. Where functions or classes are nested, the name is a
dotted sequence, but is sorted by only the last component. Just like the
original file listing page, the new pages can be filtered to focus on areas of
interest.
You can look at some sample reports:
It would be helpful if you could give me
feedback on the
original issue about some questions:
- Is it useful to have “(no function)” and “(no class)” entries or is it just
distracting pedantry? With the entries, the total is the same as the file
report, but they don’t seem useful by themselves.
- Does the handling of nested functions and classes make sense?
- Should these reports be optional (requested with a switch) or always
produced?
- Is it reasonable to produce one page with every function? How large does a
project have to get before that’s not feasible or useful?
- And most importantly: do these reports help you understand how to improve
your code?
This is only in the HTML report for now, but we can do more in the future.
Other ideas
about improvements are of course welcome. Thanks!
April 15, 2024 08:02 PM UTC
Are you a regular Django user? Do you find yourself wanting to decouple your back end and front end? Do you want to handle data persistence in the API while you display the data in a single-page app (SPA) in the browser using a JavaScript framework like React or Vue?
If you answered yes to any of these questions, then you’re in luck. This tutorial will take you through the process of building a Django blog back end and a Vue front end, using GraphQL to communicate between them.
Projects are an effective way to learn and solidify concepts. This tutorial is structured as a step-by-step project so you can learn in a hands-on way and take breaks as needed.
In this tutorial, you’ll learn how to:
- Translate your Django models into a GraphQL API
- Run the Django server and a Vue application on your computer at the same time
- Administer your blog posts in the Django admin
- Consume a GraphQL API in Vue to show data in the browser
You can download all the source code you’ll use to build your Django blog application by clicking the link below:
Demo: A Django Blog Admin, a GraphQL API, and a Vue Front End
Blog applications are a common starter project because they involve create, read, update, and delete (CRUD) operations. In this project, you’ll use the Django admin to do the heavy CRUD lifting and you’ll focus on providing a GraphQL API for your blog data.
You’ll use Vue.js 3 and its composition API for the front end of your blog. Vue lets you create dynamic interfaces pretty smoothly, thanks to its reactive data binding and easy-to-manage components. Plus, since you’re dealing with data from a GraphQL API, you can leverage the Vue Apollo plugin.
Here’s a demonstration of the completed project in action:
Next, you’ll make sure you have all the necessary background information and tools before you dive in and build your blog application.
Project Overview
For this project, you’ll create a small blogging application with some rudimentary features:
- Authors can write many posts.
- Posts can have many tags and can be either published or unpublished.
You’ll build the back end of this blog in Django, complete with an admin for adding new blog content. Then you’ll expose the content data as a GraphQL API and use Vue to display that data in the browser.
You’ll accomplish this in several high-level steps. At the end of each step, you’ll find a link to the source code for that stage of the project.
If you’re curious about how the source code for each step looks, then you can click the link below:
Prerequisites
You’ll be best equipped for this tutorial if you already have a solid foundation in some web application concepts. You should understand how HTTP requests and responses and APIs work. You can check out Python & APIs: A Winning Combo for Reading Public Data to understand the details of using GraphQL APIs vs REST APIs.
Because you’ll use Django to build the back end for your blog, you’ll want to be familiar with starting a Django project and customizing the Django admin. If you haven’t used Django much before, you might also want to try building another Django-only project first. For a good introduction, check out Get Started with Django Part 1: Build a Portfolio App.
And because you’ll be using Vue on the front end, some experience with JavaScript will also help. If you’ve only used a JavaScript framework like jQuery in the past, the Vue introduction is a good foundation.
Familiarity with JSON is also important because GraphQL queries are JSON-like and return data in JSON format. You can read about Working with JSON Data in Python for an introduction.
[ Improve Your Python With 🐍 Python Tricks 💌 – Get a short & sweet Python Trick delivered to your inbox every couple of days. >> Click here to learn more and see examples ]
April 15, 2024 02:00 PM UTC
The following text is in German, since we're announcing a regional user group meeting in Düsseldorf, Germany.
Ankündigung
Das nächste Python Meeting Düsseldorf findet an folgendem Termin statt:
17.04.2024, 18:00 Uhr
Raum 1, 2.OG im Bürgerhaus Stadtteilzentrum Bilk
Düsseldorfer Arcaden, Bachstr. 145, 40217 Düsseldorf
Programm
Bereits angemeldete Vorträge
- Marc-André Lemburg:
Advanced parsing structured data with Python's new match statement
- Jens Diemer:
Anbindung von Tinkerforge in Home Assistant
- Charlie Clark:
Eine kleine Datenanalyse
- Detlef Lannert:
Überblick über CLI-Frameworks
Weitere Vorträge können gerne noch angemeldet werden. Bei Interesse, bitte unter
info@pyddf.de melden.
Startzeit und Ort
Wir treffen uns um 18:00 Uhr im Bürgerhaus in den
Düsseldorfer Arcaden.
Das Bürgerhaus teilt sich den Eingang mit dem Schwimmbad und befindet
sich an der Seite der Tiefgarageneinfahrt der Düsseldorfer Arcaden.
Über dem Eingang steht ein großes "Schwimm’ in Bilk" Logo. Hinter der Tür
direkt links zu den zwei Aufzügen, dann in den 2. Stock hochfahren. Der
Eingang zum Raum 1 liegt direkt links, wenn man aus dem Aufzug kommt.
>>> Eingang in Google Street View
⚠️ Wichtig: Bitte nur dann anmelden, wenn ihr absolut
sicher seid, dass ihr auch kommt. Angesichts der begrenzten Anzahl Plätze, haben
wir kein Verständnis für kurzfristige Absagen oder No-Shows.
Einleitung
Das Python Meeting Düsseldorf ist eine regelmäßige Veranstaltung in Düsseldorf, die sich an Python Begeisterte aus der Region wendet.
Einen guten Überblick über die Vorträge bietet unser
PyDDF YouTube-Kanal, auf dem wir Videos der Vorträge nach den Meetings veröffentlichen.
Veranstaltet wird das Meeting von der eGenix.com GmbH, Langenfeld, in Zusammenarbeit mit Clark Consulting & Research, Düsseldorf:
Format
Das Python Meeting Düsseldorf nutzt eine Mischung aus (Lightning) Talks und offener Diskussion.
Vorträge können vorher angemeldet werden, oder auch spontan
während des Treffens eingebracht werden. Ein Beamer mit HDMI und FullHD Auflösung
steht zur Verfügung.
(Lightning) Talk Anmeldung bitte formlos per EMail an info@pyddf.de
Kostenbeteiligung
Das Python Meeting Düsseldorf wird von Python Nutzern für Python Nutzer veranstaltet.
Da Tagungsraum, Beamer, Internet und Getränke Kosten produzieren,
bitten wir die Teilnehmer um einen Beitrag in Höhe von EUR 10,00 inkl.
19% Mwst. Schüler und Studenten zahlen EUR 5,00 inkl.
19% Mwst.
Wir möchten alle Teilnehmer bitten, den Betrag in bar mitzubringen.
Anmeldung
Da wir nur 25 Personen in dem angemieteten Raum empfangen können, möchten wir bitten, sich vorher anzumelden.
Meeting Anmeldung bitte per Meetup
Weitere Informationen
Weitere Informationen finden Sie auf der Webseite des Meetings:
https://pyddf.de/
Viel Spaß !
Marc-Andre Lemburg, eGenix.com
April 15, 2024 08:00 AM UTC
2024-04-15, by Dariusz Suchojad


An integral part of
Zato, its scalable, service-oriented scheduler makes it is possible to execute high-level API integration processes as background tasks. The scheduler runs periodic jobs which in turn trigger services and services are what is used to integrate systems.
Integration process
In this article we will check how to use the scheduler with three kinds of jobs, one-time, interval-based and Cron-style ones.
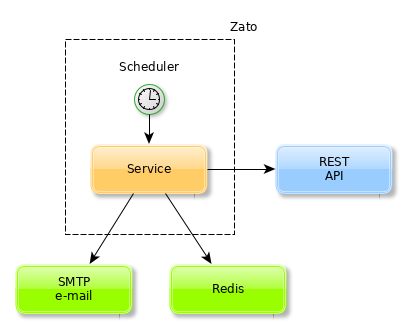
What we want to achieve is a sample yet fairly common use-case:
- Periodically consult a remote REST endpoint for new data
- Store data found in Redis
- Push data found as an e-mail attachment
Instead of, or in addition to, Redis or e-mail, we could use SQL and SMS, or MongoDB and AMQP or anything else - Redis and e-mail are just example technologies frequently used in data synchronisation processes that we use to highlight the workings of the scheduler.
No matter the input and output channels, the scheduler works always the same - a definition of a job is created and the job's underlying service is invoked according to the schedule. It is then up to the service to perform all the actions required in a given integration process.
Python code
Our integration service will read as below:
# -*- coding: utf-8 -*-
# Zato
from zato.common.api import SMTPMessage
from zato.server.service import Service
class SyncData(Service):
name = 'api.scheduler.sync'
def handle(self):
# Which REST outgoing connection to use
rest_out_name = 'My Data Source'
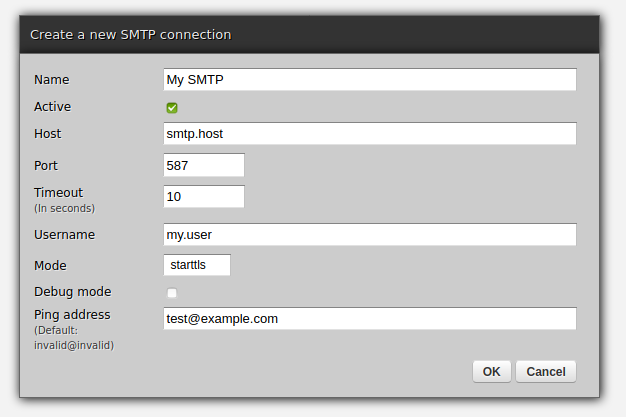
# Which SMTP connection to send an email through
smtp_out_name = 'My SMTP'
# Who the recipient of the email will be
smtp_to = 'hello@example.com'
# Who to put on CC
smtp_cc = 'hello.cc@example.com'
# Now, let's get the new data from a remote endpoint ..
# .. get a REST connection by name ..
rest_conn = self.out.plain_http[rest_out_name].conn
# .. download newest data ..
data = rest_conn.get(self.cid).text
# .. construct a new e-mail message ..
message = SMTPMessage()
message.subject = 'New data'
message.body = 'Check attached data'
# .. add recipients ..
message.to = smtp_to
message.cc = smtp_cc
# .. attach the new data to the message ..
message.attach('my.data.txt', data)
# .. get an SMTP connection by name ..
smtp_conn = self.email.smtp[smtp_out_name].conn
# .. send the e-mail message with newest data ..
smtp_conn.send(message)
# .. and now store the data in Redis.
self.kvdb.conn.set('newest.data', data)
Now, we just need to make it run periodically in background.
Mind the timezone
In the next steps, we will use
the Zato Dashboard
to configure new jobs for the scheduler.
Keep it mind that any date and time that you enter in web-admin is always interepreted to be in your web-admin user's timezone and this applies to the scheduler too - by default the timezone is UTC. You can change it by clicking Settings and picking the right timezone to make sure that the scheduled jobs run as expected.
It does not matter what timezone your Zato servers are in - they may be in different ones than the user that is configuring the jobs.

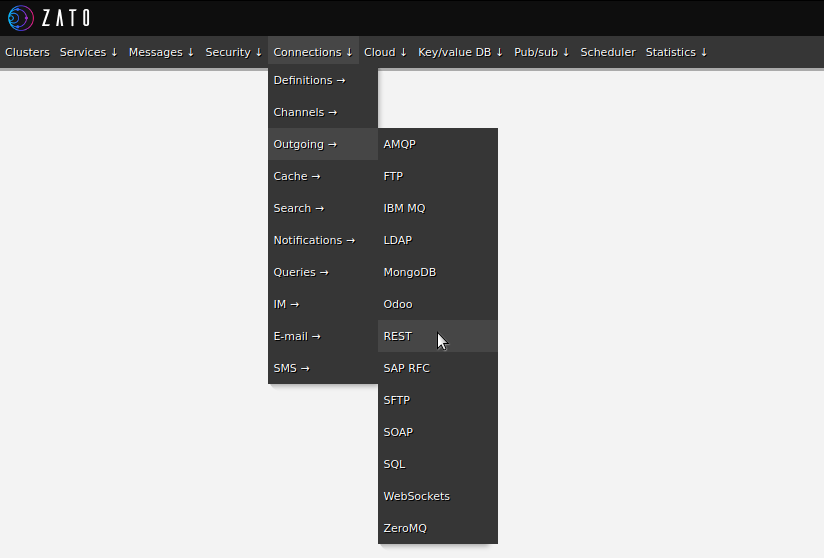
Endpoint definitions
First, let's use web-admin to define the endpoints that the service uses. Note that Redis does not need an explicit declaration because it is always available under "self.kvdb" in each service.
- Configuring outgoing REST APIs
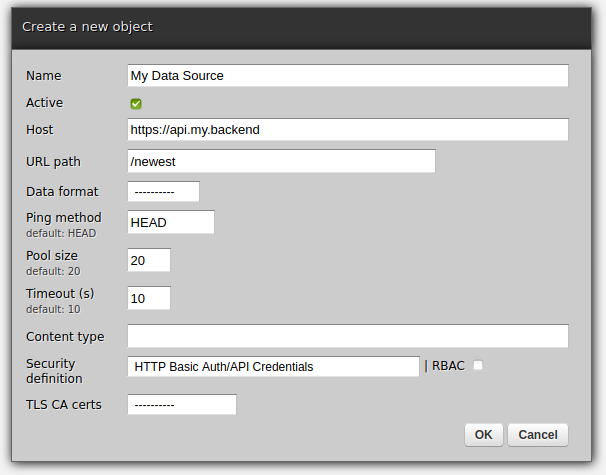

Now, we can move on to the actual scheduler jobs.
Three types of jobs
To cover different integration needs, three types of jobs are available:
- One-time - fires once only at a specific date and time and then never runs again
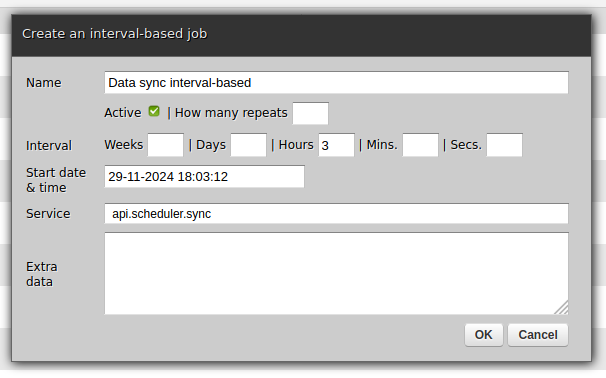
- Interval-based - for periodic processes, can use any combination of weeks, days, hours, minutes and seconds for the interval
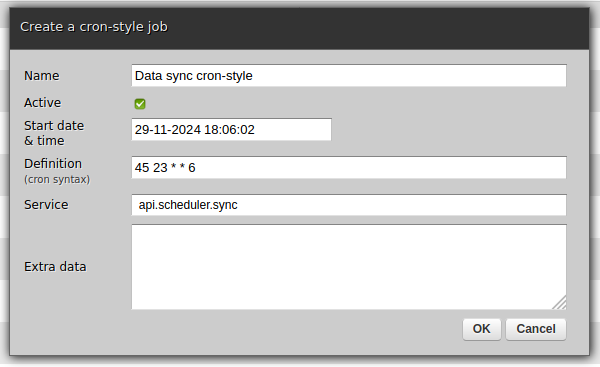
- Cron-style - similar to interval-based but uses the syntax of Cron for its configuration

One-time
Select one-time if the job should not be repeated after it runs once.

Interval-based
Select interval-based if the job should be repeated periodically. Note that such a job will by default run indefinitely but you can also specify after how many times it should stop, letting you to express concepts such as "Execute once per hour but for the next seven days".
Cron-style
Select cron-style if you are already familiar with the syntax of
Cron
or if you have some Cron tasks that you would like to migrate to Zato.
Running jobs manually
At times, it is convenient to run a job on demand, no matter what its schedule is and regardless of what type a particular job is. Web-admin lets you always execute a job directly. Simply find the job in the listing, click "Execute" and it will run immediately.
It is very often useful to provide additional context data to a service that the scheduler runs - to achieve it, simply enter any arbitrary value in the "Extra" field when creating or an editing a job in web-admin.
Afterwards, that information will be available as self.request.raw_request in the service's handle method.
Reusability
There is nothing else required - all is done and the service will run in accordance with a job's schedule.
Yet, before concluding, observe that our integration service is completely reusable - there is nothing scheduler-specific in it despite the fact that we currently run it from the scheduler.
We could now invoke the service from command line. Or we could mount it on a REST, AMQP, WebSocket or trigger it from any other channel - exactly the same Python code will run in exactly the same fashion, without any new programming effort needed.
April 15, 2024 08:00 AM UTC
April 12, 2024
What is error culture, and how do you avoid it within your organization? How do you navigate alert and notification fatigue? Hey, it's episode #200! Real Python's editor-in-chief, Dan Bader, joins us this week to celebrate. Christopher Trudeau also returns to bring another batch of PyCoder's Weekly articles and projects.
[ Improve Your Python With 🐍 Python Tricks 💌 – Get a short & sweet Python Trick delivered to your inbox every couple of days. >> Click here to learn more and see examples ]
April 12, 2024 12:00 PM UTC
There is no such thing as a “root field”.
There is a common - seemingly universal - misconception that GraphQL root fields are somehow special, in both usage and implementation. The better conceptual model is that there are root types, and all types have fields. The difference is not just semantics; it leads to actual misunderstandings.
Multiple queries
A common beginner question is “can there be multiple queries in a request”. The question would be better phrased as “can multiple fields on the root query type be requested”. The answer is of course, because requesting multiple fields on a type is normal. The implementation would have to go out of its way to restrict that behavior on just the root type. The only need for further clarity would be to introduce aliases for duplicate fields.
Flat namespace
GraphQL types share a global namespace, causing conflicts when federating multiple graphs. Nothing can be done about that unless GraphQL adopts namespaces.
But many APIs design the root query type to have unnecessarily flat fields. One often sees a hierarchy of types and fields below the root, but the top-level fields resemble a loose collections of functions. Verbs at the top level; nouns the rest of the way down. This design choice appears to be in a feedback loop with the notion of “root fields”.
Even the convention of calling the root query type Query demonstrates a lack of specificity. In a service-oriented architecture, a particular service might be more narrowly defined.
Mutations
Top-level mutation fields are special in one aspect: they are executed in order. This has resulted in even flatter namespaces for mutations,
mutation {
    createUser # executed first
    deleteUser
}
This is not necessary, but seems widely believed that it is. Nested mutations work just fine.
mutation {
    user {
        create # executed in arbitrary order
        delete
    }
}
If the underlying reason is truly execution order, the client could be explicit instead.
mutation {
    created: user { # executed first
        create
    }
    deleted: user {
        delete
    }
}
There is no reason it has to influence API design.
Static methods
At the library level, the effect is top-level resolvers are implemented as functions (or static methods), whereas all other resolver are methods. This may lead to redundant or inefficient implementations, is oddly inconsistent, and is contrary to the documentation.
A resolver function receives four arguments:
obj The previous object, which for a field on the root Query type is often not used.
Sure, “often not used” by the developer of the API. That does not mean “should be unset” by the GraphQL library, but that is what has happened. Some libraries even exclude the object parameter entirely. In object-oriented libraries like strawberry, the code looks unnatural.
import strawberry


@strawberry.type
class Query:
    @strawberry.field
    def instance(self) -> bool | None:
        return None if self is None else isinstance(self, Query)


schema = strawberry.Schema(Query)
query = '{ instance }'
schema.execute_sync(query).data
Strawberry allows omitting self for this reason, creating an implicit staticmethod.
Root values
Libraries which follow the reference javascript implementation allow setting the root value explicitly.
schema.execute_sync(query, root_value=Query()).data
Strawberry unofficially supports supplying an instance, but it has no effect.
schema = strawberry.Schema(Query())
schema.execute_sync(query).data
And of course self can be of any type.
schema.execute_sync(query, root_value=...).data
Moreover, the execute functions are for internal usage. Each library will vary in how to configure the root in a production application. Strawberry requires subclassing the application type.
import strawberry.asgi


class GraphQL(strawberry.asgi.GraphQL):
    def __init__(self, root):
        super().__init__(strawberry.Schema(type(root)))
        self.root_value = root

    async def get_root_value(self, request):
        return self.root_value
Example
Consider a more practical example where data is loaded, and clearly should not be reloaded on each request.
@strawberry.type
class Dictionary:
    def __init__(self, source='/usr/share/dict/words'):
        self.words = {line.strip() for line in open(source)}

    @strawberry.field
    def is_word(self, text: str) -> bool:
        return text in self.words
Whether Dictionary is the query root - or attached to the query root - it should be instantiated only once. Of course it can be cached, but again there is a more natural way to write this outside the context of GraphQL.
@strawberry.type
class Query:
    dictionary: Dictionary

    def __init__(self):
        self.dictionary = Dictionary()
Caching, context values, and root values are all clunky workarounds compared to the consistency of letting the root be Query() instead of Query. The applications which do not require this feature would never notice the difference.
The notion of “root fields” behaving as “top-level functions” has resulted in needless confusion, poorer API design, and incorrect implementations.
April 12, 2024 12:00 AM UTC
April 11, 2024
Are you new to Django development? Are you already familiar with it and want to expand your knowledge? PyCharm has Django learning resources for everyone. In this article, you’ll find a compilation of all the Django-related resources created by the experts at PyCharm to help you navigate through them all. From creating a new Django […]
April 11, 2024 10:53 AM UTC
If you've ever thought about starting a podcast or a SaaS project, you'll want to listen to this episode.
Justin is one of the people who motivated me to get started podcasting.
He's also running a successful SaaS company, transistor.fm, which hosts this podcast.
Topics:
- Podcasting
- Building new SaaS (software as a service) products
- Balancing work, side hustle, and family
- Great places to snowboard in British Columbia
BTW. This episode was recorded last summer before I switched to transistor.fm.
I'm now on Transistor for most of a year now, and I love it.
Links from the show:
Sponsored by Mailtrap.io
- An Email Delivery Platform that developers love.
- An email-sending solution with industry-best analytics, SMTP, an email API, SDKs for major programming languages, and 24/7 human support.
- Try for Free at MAILTRAP.IO
Sponsored by PyCharm Pro
The Complete pytest Course
- For the fastest way to learn pytest, go to courses.pythontest.com
- Whether your new to testing or pytest, or just want to maximize your efficiency and effectiveness when testing.
<p>If you've ever thought about starting a podcast or a SaaS project, you'll want to listen to this episode.<br> <br>Justin is one of the people who motivated me to get started podcasting. <br>He's also running a successful SaaS company, <a href="https://transistor.fm/?via=okken">transistor.fm</a>, which hosts this podcast.</p><p>Topics:</p><ul><li>Podcasting</li><li>Building new SaaS (software as a service) products</li><li>Balancing work, side hustle, and family</li><li>Great places to snowboard in British Columbia</li></ul><p>BTW. This episode was recorded last summer before I switched to <a href="https://transistor.fm/?via=okken">transistor.fm</a>.<br>I'm now on Transistor for most of a year now, and I love it.</p><p>Links from the show:</p><ul><li><a href="https://transistor.fm/?via=okken">Transistor.fm</a> - excellent podcast hosting, Justin is a co-founder</li><li><a href="https://transistor.fm/how-to-start-a-podcast/?via=okken">How to start a podcast in 2024</a></li><li>Podcasts from Justin<ul><li><a href="https://saas.transistor.fm/">Build your SaaS</a> - current</li><li><a href="https://www.buildandlaunch.net/">Build & Launch</a> - an older one, but great</li><li><a href="https://podcast.megamaker.co/">MegaMaker</a> - from 2021 / 2022</li></ul></li></ul>
<br><p><strong>Sponsored by Mailtrap.io</strong></p><ul><li>An Email Delivery Platform that developers love. </li><li>An email-sending solution with industry-best analytics, SMTP, an email API, SDKs for major programming languages, and 24/7 human support. </li><li>Try for Free at <a href="https://l.rw.rw/pythontest">MAILTRAP.IO</a></li></ul><p><strong>Sponsored by PyCharm Pro</strong></p><ul><li>Use code PYTEST for 20% off PyCharm Professional at <a href="https://www.jetbrains.com/pycharm/">jetbrains.com/pycharm</a></li><li>Now with Full Line Code Completion</li><li>See how easy it is to run pytest from PyCharm at <a href="https://pythontest.com/pycharm/">pythontest.com/pycharm</a></li></ul><p><strong>The Complete pytest Course</strong></p><ul><li>For the fastest way to learn pytest, go to <a href="https://courses.pythontest.com/p/complete-pytest-course">courses.pythontest.com</a></li><li>Whether your new to testing or pytest, or just want to maximize your efficiency and effectiveness when testing.</li></ul>
April 11, 2024 07:36 AM UTC
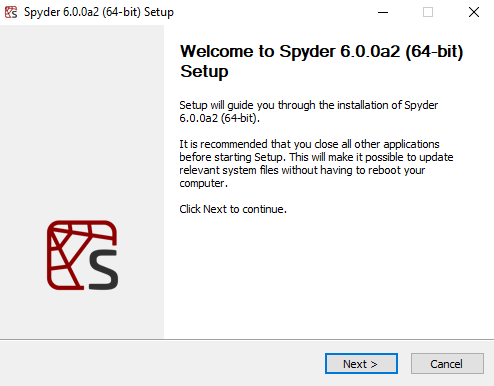
For the last several years, Spyder has offered standalone installers for Windows and macOS which isolate Spyder's runtime environment from users' development environments.
This provides a more stable user experience than traditional conda or pip installation methods.
However, these standalone installers did not allow implementing desirable features, such as automatic incremental updates or installing external Spyder plugins like Spyder-Notebook and Spyder-Unittest.
Additionally, these standalone applications were limited to Windows and macOS.
Our new installers will provide a more consistent experience for users across all platforms, including Linux, while maintaining the benefits of an isolated runtime environment for Spyder.
Additionally, they are fully compatible with incremental updates and external plugin management.
Look for future announcements about these and other features!
So, what will you see with these new installers?
If you are a Windows user, you will continue to have a graphical interface guiding you through the installation process, and will likely not notice any difference from the previous experience.
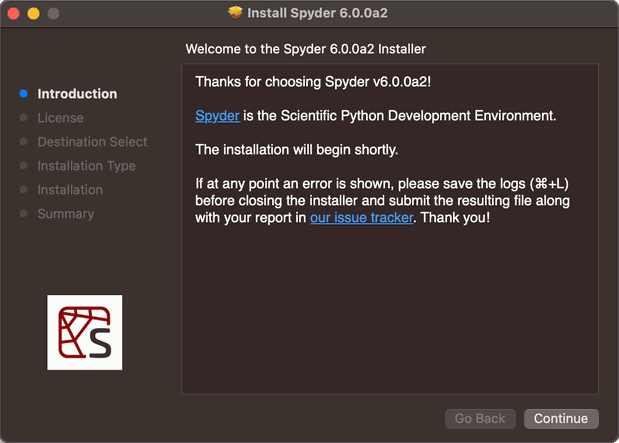
If you are a macOS user, you will now have a .pkg package installer instead of a .dmg disk image.
Rather than drag-and-drop the application to the Applications folder, the .pkg installer provides a graphical interface that will guide you through the installation process with more flexibility.
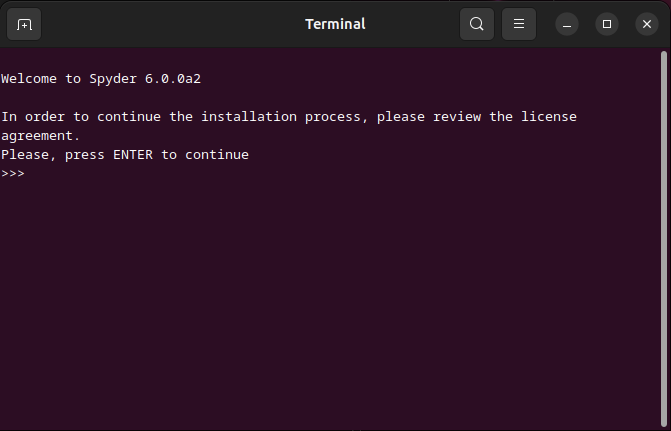
If you are a Linux user, you will have an interactive shell script guiding you through the installation process.
This ensures it is compatible with as many distributions and desktop environments as possible.
In all cases, you will not need to have Anaconda installed, nor do you need an existing Python environment; in fact, you don't even need a preexisting Python installation!
These installers are completely self-contained.
Spyder will continue to include popular packages such as NumPy, SciPy, Pandas and Matplotlib so you can start coding out-of-the-box.
However, you will still be able to use Spyder with your existing conda, venv, Python.org, and other Python installers and environments as before.
Furthermore, only Spyder and its critical dependencies will be updated on each new release, which will make getting the latest version a lean and frictionless process.
The Spyder team is really excited about these new installers and the new features they will make possible, and we hope you enjoy them too!
April 11, 2024 12:00 AM UTC
April 10, 2024

Let&aposs say that you&aposre working on a supervised Machine Learning problem, and you&aposre deciding how to encode the features in your training data.
With a categorical feature, you might consider using one-hot encoding or ordinal encoding. But with a continuous numeric feature, you would normally pass that feature directly to your model. (Makes sense, right?)
However, one alternative strategy that is sometimes used with continuous features is to "discretize" or "bin" them into categorical features before passing them to the model.
First, I&aposll show you how to do this in scikit-learn. Then, I&aposll explain whether I think it&aposs a good idea!
How to discretize in scikit-learn
In scikit-learn, we can discretize using the KBinsDiscretizer class:
When creating an instance of KBinsDiscretizer, you define the number of bins, the binning strategy, and the method used to encode the result:
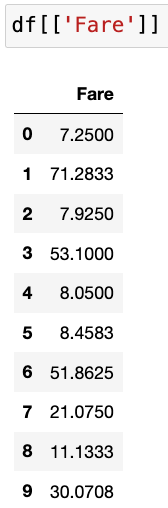
As an example, here&aposs a numeric feature from the famous Titanic dataset:
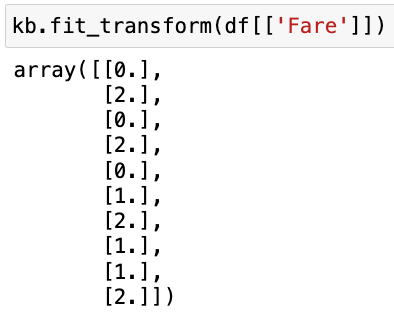
And here&aposs the output when we use KBinsDiscretizer to transform that feature:
Because we specified 3 bins, every sample has been assigned to bin 0 or 1 or 2. The smallest values were assigned to bin 0, the largest values were assigned to bin 2, and the values in between were assigned to bin 1.
Thus, we&aposve taken a continuous numeric feature and encoded it as an ordinal feature (meaning an ordered categorical feature), and this ordinal feature could be passed to the model in place of the numeric feature.
Is discretization a good idea?
Now that you know how to discretize, the obvious follow-up question is: Should you discretize your continuous features?
Theoretically, discretization can benefit linear models by helping them to learn non-linear trends. However, my general recommendation is to not use discretization, for three main reasons:
- Discretization removes all nuance from the data, which makes it harder for a model to learn the actual trends that are present in the data.
- Discretization reduces the variation in the data, which makes it easier to find trends that don&apost actually exist.
- Any possible benefits of discretization are highly dependent on the parameters used with KBinsDiscretizer. Making those decisions by hand creates a risk of overfitting the training data, and making those decisions during a tuning process adds both complexity and processing time. As such, neither option is attractive to me!
For all of those reasons, I don&apost recommend discretizing your continuous features unless you can demonstrate, through a proper model evaluation process, that it&aposs providing a meaningful benefit to your model.
Going further
🔗 Discretization in the scikit-learn User Guide
🔗 Discretize Predictors as a Last Resort from Feature Engineering and Selection (section 6.2.2)
This post is drawn directly from my upcoming course, Master Machine Learning with scikit-learn. If you&aposre interested in receiving more free lessons from the course, please join the waitlist below:
April 10, 2024 03:12 PM UTC
Pydantic is a powerful data validation and settings management library for Python, engineered to enhance the robustness and reliability of your codebase. From basic tasks, such as checking whether a variable is an integer, to more complex tasks, like ensuring highly-nested dictionary keys and values have the correct data types, Pydantic can handle just about any data validation scenario with minimal boilerplate code.
In this tutorial, you’ll learn how to:
- Work with data schemas with Pydantic’s
BaseModel
- Write custom validators for complex use cases
- Validate function arguments with Pydantic’s
@validate_call
- Manage settings and configure applications with
pydantic-settings
Throughout this tutorial, you’ll get hands-on examples of Pydantic’s functionalities, and by the end you’ll have a solid foundation for your own validation use cases. Before starting this tutorial, you’ll benefit from having an intermediate understanding of Python and object-oriented programming.
Python’s Pydantic Library
One of Python’s main attractions is that it’s a dynamically typed language. Dynamic typing means that variable types are determined at runtime, unlike statically typed languages where they are explicitly declared at compile time. While dynamic typing is great for rapid development and ease of use, you often need more robust type checking and data validation for real-world applications. This is where Python’s Pydantic library has you covered.
Pydantic has quickly gained popularity, and it’s now the most widely used data validation library for Python. In this first section, you’ll get an overview of Pydantic and a preview of the library’s powerful features. You’ll also learn how to install Pydantic along with the additional dependencies you’ll need for this tutorial.
Getting Familiar With Pydantic
Pydantic is a powerful Python library that leverages type hints to help you easily validate and serialize your data schemas. This makes your code more robust, readable, concise, and easier to debug. Pydantic also integrates well with many popular static typing tools and IDEs, which allows you to catch schema issues before running your code.
Some of Pydantic’s distinguishing features include:
-
Customization: There’s almost no limit to the kinds of data you can validate with Pydantic. From primitive Python types to highly nested data structures, Pydantic lets you validate and serialize nearly any Python object.
-
Flexibility: Pydantic gives you control over how strict or lax you want to be when validating your data. In some cases, you might want to coerce incoming data to the correct type. For example, you could accept data that’s intended to be a float but is received as an integer. In other cases, you might want to strictly enforce the data types you’re receiving. Pydantic enables you to do either.
-
Serialization: You can serialize and deserialize Pydantic objects as dictionaries and JSON strings. This means that you can seamlessly convert your Pydantic objects to and from JSON. This capability has led to self-documenting APIs and integration with just about any tool that supports JSON schemas.
-
Performance: Thanks to its core validation logic written in Rust, Pydantic is exceptionally fast. This performance advantage gives you swift and reliable data processing, especially in high-throughput applications such as REST APIs that need to scale to a large number of requests.
-
Ecosystem and Industry Adoption: Pydantic is a dependency of many popular Python libraries such as FastAPI, LangChain, and Polars. It’s also used by most of the largest tech companies and throughout many other industries. This is a testament to Pydantic’s community support, reliability, and resilience.
These are a few key features that make Pydantic an attractive data validation library, and you’ll get to see these in action throughout this tutorial. Up next, you’ll get an overview of how to install Pydantic along with its various dependencies.
Installing Pydantic
Pydantic is available on PyPI, and you can install it with pip. Open a terminal or command prompt, create a new virtual environment, and then run the following command to install Pydantic:
This command will install the latest version of Pydantic from PyPI onto your machine. To verify that the installation was successful, start a Python REPL and import Pydantic:
If the import runs without error, then you’ve successfully installed Pydantic, and you now have the core of Pydantic installed on your system.
Adding Optional Dependencies
You can install optional dependencies with Pydantic as well. For example, you’ll be working with email validation in this tutorial, and you can include these dependencies in your install:
Pydantic has a separate package for settings management, which you’ll also cover in this tutorial. To install this, run the following command:
With that, you’ve installed all the dependencies you’ll need for this tutorial, and you’re ready to start exploring Pydantic. You’ll start by covering models—Pydantic’s primary way of defining data schemas.
[ Improve Your Python With 🐍 Python Tricks 💌 – Get a short & sweet Python Trick delivered to your inbox every couple of days. >> Click here to learn more and see examples ]
April 10, 2024 02:00 PM UTC
This tutorial explains the steps to open Google Chrome using Selenium in Python.
To read this article in full, please click here
April 10, 2024 08:05 AM UTC
CPython release automation, more Windows SBOMs
This critical role would not be possible without funding from the Alpha-Omega project. Massive thank-you to Alpha-Omega for investing in the security of the Python ecosystem!
CPython source and docs builds are automated in GitHub Actions
While I was away on vacation, the CPython Developer-in-Residence Łukasz was able to dry-run, review, and merge
my pull request
to automate source and docs builds in GitHub Actions on
the python/release-tools repository.
The automation was successfully used for the CPython 3.10.14, 3.11.9, 3.12.3, and 3.13.0a6.
This work being merged is exciting because it isolates the CPython
source and docs builds from individual release manager machines preventing those source
tarballs from being unintentionally modified. Having builds automated is a pre-requisite for
future improvements to the CPython release process, like adding automated uploads to python.org
or machine/workflow identities for Sigstore. I also expect the macOS
installer release process to be automated on GitHub Actions. Windows artifact builds are already using Azure Pipelines.
Release Managers have requested the process be further automated
which is definitely possible, especially for gathering the built release artifacts
and running the test suite locally.
Windows Software Bill-of-Materials coming for next CPython releases
I've been collaborating with Steve Dower to get SBOM documents generated
for Windows Python artifacts. Challenges of developing new CI workflows aside
we now have SBOM artifacts generating as expected.
Next step is to automate the upload of the SBOM documents to python.org so they've
automatically available to users.
During the development of Windows SBOMs I also noticed our CPE identifier for xz
was incorrect partially due to difficulties
using the CPE Dictionary search (they only allow 3+ character queries!) This issue doesn't
impact any existing published SBOM since xz-utils is only bundled with Windows artifacts, not source artifacts.
Thoughts on xz-utils
I've been a part of many discussions about xz-utils, both active and passive,
there are many thoughts percolating around our community right now. To capture
where I'm at with many of these discussions I wanted to write down my own thoughts:
- "Insider threats" and other attacks on trust are not unique to open source software.
We don't get to talk about other incidents as often because the attack isn't done in the open.
- Insider threats are notoriously difficult to defend against even with ample resources.
Volunteer maintainers shouldn't be expected to defend against patient and well-resourced attackers alone.
- Multiple ecosystems took action immediately, including Python,
to either remove compromised versions of xz or confirm they were not using affected versions.
This sort of immediate response should only be expected with full-time staffing (thanks Alpha-Omega!), but I know that volunteers were involved in the broader response to xz.
- Many folks, myself included, have remarked that this could have just as easily been them.
Reviewing the "Jia Tan" commits I can't say with certainty that I would have caught them
in code review, especially coming from a long-time co-maintainer.
How has the nature of open source affected the response to this event?
- Security experts were able to review source code, commits, conversations,
and the accounts involved immediately. We went from the public disclosure and alerts to having a timeline
of how the malicious account was able to gain trust within a few hours.
- We get to learn how the attack transpired in detail to hopefully improve in the future.
Things to keep in mind when working on solutions:
- Blaming open source software or maintainers is rarely the answer, and it definitely isn't the answer here.
- There isn't a single solution to this problem. We need both social and technical approaches, not exclusively one or the other.
Instead of pointing out how certain solutions or ways of supporting OSS "wouldn't have thwarted
this exact attack", let's focus on how the sum of contributions and support are
making attacks on open source more difficult in general.
- We need better visibility into critical languishing projects. xz likely wasn't on anyone's list of critical projects before this event (when it should have been!)
It isn't sustainable to figure out which projects are critical and need help
by waiting for the next newsworthy attack or vulnerability.
I also reflected on how my own work is contributing to one of many solutions to problems like this.
I've been focusing on reproducible builds, hardening of the CPython release process, and have been
working closely with Release Managers to improve their processes.
As I mentioned above, being full-time staff means I can respond quickly to events in the community.
The "all-clear" message for CPython, PyPI, and all Python packages was given a few hours after xz-utils
backdoor was disclosed to the Python Security Response Team.
I've also been working on Software Bill-of-Materials documents. These documents would not have done anything
to stop an attack similar to this, but would have helped users of CPython detect if they were using a vulnerable
component if the attack affected CPython.
Other items
- I'm attending SOSS Community Day and OSS Summit NA in Seattle April 15th to 19th. If you're there
and want to chat reach out to me! I spent time this week preparing to speak at SOSS Community Day.
- Added support for Python 3.13 to Truststore.
- Triaged reports to the Python Security Response Team.
That's all for this week! 👋 If you're interested in more you can read last week's report.
Thanks for reading! ♡ Did you find this article helpful and want more content like it?
Get notified of new posts by subscribing to the RSS feed or the email newsletter.
April 10, 2024 12:00 AM UTC
April 09, 2024
#624 – APRIL 9, 2024
View in Browser »

In this tutorial, you’ll learn about a tool called pipx, which lets you conveniently install and run Python packages as standalone command-line applications in isolated environments. In a way, pipx turns the Python Package Index (PyPI) into an app marketplace for Python programmers.
REAL PYTHON
In Python you can use the multiplication operator on sequences to return a repeated version of the value. When you do this with a list containing an empty list you get what might be unexpected behavior. This article explains what happens and why.
ABHINAV UPADHYAY
PEP 723 adds the ability to specify dependencies within a Python script itself. The folks who write pipx have added an experimental feature that takes advantage of this future language change. This article shows you how the new feature looks and what pipx does with it.
HENRY SCHREINER
Discussions
Articles & Tutorials
This post talks about the importance of naming conventions in your code, but takes it to the next level: use scripts to validate that conventions get followed. By using introspection you can write rules for detecting code that doesn’t follow your conventions. Examples are for Django fields but the concept works for any Python code.
LUKE PLANT
How do you customize a LLM chatbot to address a collection of documents and data? What tools and techniques can you use to build embeddings into a vector database? This week on the show, Calvin Hendryx-Parker is back to discuss developing an AI-powered, Large Language Model-driven chat interface.
REAL PYTHON podcast
The topic of multi-line lambdas, or anonymous functions akin to languages like JavaScript, comes up with some frequency in the Python community. It popped up again recently. This article talks about the history of the topic and the current reasoning against it.
JAKE EDGE
Maintaining code quality can be challenging no matter the size of your project or the number of contributors. Pre-commit hooks make it a little easier. This article provides a step-by-step guide to installing and configuring pre-commit hooks on your project.
STEFANIE MOLIN • Shared by Stefanie Molin
A code smell isn’t something that is necessarily broken, but could be a sign of deeper problems. This post teaches you how to identify and eliminate seven Python code smells with practical examples.
ARJAN
The PSF has joined with the Apache Software Foundation, the Eclipse Foundation, and other open source groups to form a group dedicated to cybersecurity initiatives in the open source community.
PYTHON SOFTWARE FOUNDATION
FastAPI is an excellent library and is quite popular in the Python community. Regardless of his respect for it, David still sticks with Django. This post discusses his ten reasons why.
DAVID DAHAN
Ensuring accessibility in your software is important, removing boundaries that limit some people from participating. This checklist is valuable for helping you determine whether your web code meets the accepted Web Content Accessibility Guidelines.
SARAH ABEREMANE
PyTorch vs Tensorflow: Which one should you use? Learn about these two popular deep learning libraries and how to choose the best one for your project.
REAL PYTHON course
Hynek talks about his Python tooling choices and how they’ve changed over the years, with a focus on environment management tools like uv and direnv.
HYNEK SCHLAWACK
Hamuko decided to try out rye. This post goes into detail about what worked and what didn’t for them.
HAMUKO
Projects & Code
Events
Happy Pythoning!
This was PyCoder’s Weekly Issue #624.
View in Browser »

[ Subscribe to 🐍 PyCoder’s Weekly 💌 – Get the best Python news, articles, and tutorials delivered to your inbox once a week >> Click here to learn more ]
April 09, 2024 07:30 PM UTC
The
PSF is pleased to announce its fourth batch of PSF Fellows for 2023! Let
us welcome the new PSF Fellows for Q4! The following people continue to
do amazing things for the Python community:
Jelle Zijlstra
Thank you for your continued contributions. We have added you to our Fellow roster online.
The
above members help support the Python ecosystem by being phenomenal
leaders, sustaining the growth of the Python scientific community,
maintaining virtual Python communities, maintaining Python libraries,
creating educational material, organizing Python events and conferences,
starting Python communities in local regions, and overall being great
mentors in our community. Each of them continues to help make Python
more accessible around the world. To learn more about the new Fellow
members, check out their links above.
Let's
continue recognizing Pythonistas all over the world for their impact on
our community. The criteria for Fellow members is available online: https://www.python.org/psf/fellows/.
If you would like to nominate someone to be a PSF Fellow, please send a
description of their Python accomplishments and their email address to
psf-fellow at python.org. Quarter 1 nominations are currently in review.
We are accepting nominations for Quarter 2 2024 through May 20,
2024.
Are you a PSF Fellow and want to help the Work Group review nominations? Contact us at psf-fellow at python.org.
April 09, 2024 04:59 PM UTC
It’s time to eclipse the Python 3.11.9 release with two releases, one of which is the very last alpha release of Python 3.13:
Python 3.12.3
300+ of the finest commits went into this latest maintenance release
of the latest Python version, the most stablest, securest, bugfreeest we
could make it.
https://www.python.org/downloads/release/python-3123/
Python 3.13.0a6
What’s that? The last alpha release? Just one more month until
feature freeze! Get your features done, get your bugs fixed, let’s get
3.13.0 ready for people to actually use! Until then, let’s test with
alpha 6. The highlights of 3.13 you ask? Well:
- In the interactive interpreter, exception tracebacks are now colorized by default.
- A preliminary, experimental JIT was added, providing the ground work for significant performance improvements.
- The (cyclic) garbage collector is now incremental, which should mean shorter pauses for collection in programs with a lot of objects.
- Docstrings now have their leading indentation stripped, reducing memory use and the size of .pyc files. (Most tools handling docstrings already strip leading indentation.)
- The dbm module has a new dbm.sqlite3 backend that is used by default when creating new files.
- PEP 594 (Removing dead batteries from the standard library) scheduled removals of many deprecated modules:
aifc, audioop, chunk, cgi, cgitb, crypt, imghdr, mailcap, msilib, nis, nntplib, ossaudiodev, pipes, sndhdr, spwd, sunau, telnetlib, uu, xdrlib, lib2to3. - Many other removals of deprecated classes, functions and methods in various standard library modules.
- New deprecations, most of which are scheduled for removal from Python 3.15 or 3.16.
- C API removals and deprecations. (Some removals present in alpha 1 were reverted in alpha 2, as the removals were deemed too disruptive at this time.)
(Hey, fellow core developer, if a feature you find important is missing from this list, let Thomas know. It’s getting to be really important now!)
https://www.python.org/downloads/release/python-3130a6/
We hope you enjoy the new releases!
Thanks to all of the many volunteers who help make Python Development
and these releases possible! Please consider supporting our efforts by
volunteering yourself, or through contributions to the Python Software Foundation or CPython itself.
Thomas “can you tell I haven’t had coffee today” Wouters
on behalf of your release team,
Ned Deily
Steve Dower
Pablo Galindo Salgado
Łukasz Langa
April 09, 2024 03:16 PM UTC
Anaconda has announced a new partnership with Teradata to bring Python and R packages to Teradata VantageCloud through the Anaconda Repository.
But what does that mean? This new partnership allows engineers to:
- Rapidly deploy and operationalize AI/ML developed using open-source Python and R packages.
- Unlock innovation and the full potential of data at scale with a wide variety of Python and R functionality on VantageCloud Lake.
- Flexibly use packages and versions of their choice for large-scale data science, AI/ML and generative AI use-cases.
- Securely work with Python/R models into VantageCloud Lake with no intellectual property (IP) leakage.
Teradata VantageCloud Lake customers can download Python and R packages from the Anaconda Repository at no additional cost. Python packages are available immediately, and R packages will be released before the end of the year.
For more information about Teradata ClearScape Analytics, please visit Teradata.com.
Learn more about partnering with Anaconda here.
The post Anaconda Partners with Teradata for AI with Python packages in the Cloud appeared first on Mouse Vs Python.
April 09, 2024 02:04 PM UTC
From restaurant e-menus to airline boarding passes, QR codes have numerous applications that impact your day-to-day life and enrich the user’s experience. Wouldn’t it be great to make them look good, too? With the help of this video course, you’ll learn how to use Python to generate beautiful QR codes for your personal use case.
In its most basic format, a QR code contains black squares and dots on a white background, with information that any smartphone or device with a dedicated QR scanner can decode. Unlike a traditional bar code, which holds information horizontally, a QR code holds the data in two dimensions, and it can hold over a hundred times more information.
In this video course, you’ll learn how to:
- Generate a basic black-and-white QR code
- Change the size and margins of the QR code
- Create colorful QR codes
- Rotate the QR code
- Replace the static background with an animated GIF
[ Improve Your Python With 🐍 Python Tricks 💌 – Get a short & sweet Python Trick delivered to your inbox every couple of days. >> Click here to learn more and see examples ]
April 09, 2024 02:00 PM UTC
<strong>Topics covered in this episode:</strong><br>
<ul>
<li><a href="https://github.com/brohrer/pacemaker"><strong>pacemaker</strong></a> - For controlling time per iteration loop in Python.</li>
<li><a href="https://www.bleepingcomputer.com/news/security/pypi-suspends-new-user-registration-to-block-malware-campaign/">PyPI suspends new user registration to block malware campaign</a></li>
<li><a href="https://hynek.me/articles/python-virtualenv-redux/"><strong>Python Project-Local Virtualenv Management Redux</strong></a></li>
<li><a href="https://blog.cloudflare.com/python-workers">Python Edge Workers at Cloudflare</a></li>
<li><strong>Extras</strong></li>
<li><strong>Joke</strong></li>
</ul><a href='https://www.youtube.com/watch?v=4oALfE-zDf8' style='font-weight: bold;'data-umami-event="Livestream-Past" data-umami-event-episode="378">Watch on YouTube</a><br>
<p><strong>About the show</strong></p>
<p>Sponsored by us! Support our work through:</p>
<ul>
<li>Our <a href="https://training.talkpython.fm/"><strong>courses at Talk Python Training</strong></a></li>
<li><a href="https://courses.pythontest.com/p/the-complete-pytest-course"><strong>The Complete pytest Course</strong></a></li>
<li><a href="https://www.patreon.com/pythonbytes"><strong>Patreon Supporters</strong></a></li>
</ul>
<p><strong>Connect with the hosts</strong></p>
<ul>
<li>Michael: <a href="https://fosstodon.org/@mkennedy"><strong>@mkennedy@fosstodon.org</strong></a></li>
<li>Brian: <a href="https://fosstodon.org/@brianokken"><strong>@brianokken@fosstodon.org</strong></a></li>
<li>Show: <a href="https://fosstodon.org/@pythonbytes"><strong>@pythonbytes@fosstodon.org</strong></a></li>
</ul>
<p>Join us on YouTube at <a href="https://pythonbytes.fm/stream/live"><strong>pythonbytes.fm/live</strong></a> to be part of the audience. Usually Tuesdays at 11am PT. Older video versions available there too.</p>
<p>Finally, if you want an artisanal, hand-crafted digest of every week of the show notes in email form? Add your name and email to <a href="https://pythonbytes.fm/friends-of-the-show">our friends of the show list</a>, we'll never share it.</p>
<p><strong>Brian #1:</strong> <a href="https://github.com/brohrer/pacemaker"><strong>pacemaker</strong></a> - For controlling time per iteration loop in Python.</p>
<ul>
<li>Brandon Rohrer</li>
<li>Good example of a small bit of code made into a small package.</li>
<li>With speedups to dependencies, like with uv, for example, I think we’ll see more small projects.</li>
<li>Cool stuff
<ul>
<li>Great README, including quirks that need to be understood by users.
<ul>
<li>“If the pacemaker experiences a delay, it will allow faster iterations to try to catch up. Heads up: because of this, any individual iteration might end up being much shorter than suggested by the pacemaker's target rate.”</li>
</ul></li>
<li>Nice use of <a href="https://docs.python.org/3/library/time.html#time.monotonic">time.monotonic()</a>
<ul>
<li>deltas are guaranteed to never go back in time regardless of what adjustments are made to the system clock.</li>
</ul></li>
</ul></li>
<li>Watch out for
<ul>
<li>pip install pacemaker-lite
<ul>
<li>NOT pacemaker</li>
<li>pacemaker is taken by a package named PaceMaker with a repo named pace-maker, that hasn’t been updated in 3 years. Not sure if it’s alive. </li>
</ul></li>
<li>No tests (yet). I’m sure they’re coming. ;)
<ul>
<li>Seriously though, Brandon says this is “a glorified snippet”. And I love the use of packaging to encapsulate shared code. Realistically, small snippet like packages have functionality that’s probably going to be tested by end user code.</li>
<li>And even if there are tests, users should test the functionality they are depending on.</li>
</ul></li>
</ul></li>
</ul>
<p><strong>Michael #2:</strong> <a href="https://www.bleepingcomputer.com/news/security/pypi-suspends-new-user-registration-to-block-malware-campaign/">PyPI suspends new user registration to block malware campaign</a></p>
<ul>
<li><a href="https://status.python.org/incidents/dc9zsqzrs0bv">Incident Report for Python Infrastructure</a></li>
<li><a href="https://medium.com/checkmarx-security/pypi-is-under-attack-project-creation-and-user-registration-suspended-heres-the-details-c3b6291d4579">PyPi Is Under Attack: Project Creation and User Registration Suspended — Here’s the details</a>
<ul>
<li>I hate medium, but it’s the best details I’ve found so far</li>
</ul></li>
</ul>
<p><strong>Brian #3:</strong> <a href="https://hynek.me/articles/python-virtualenv-redux/"><strong>Python Project-Local Virtualenv Management Redux</strong></a></p>
<ul>
<li>Hynek</li>
<li>Concise writeup of how Hynek uses various tools for dealing with environments</li>
<li>Covers (paren notes are from Brian)
<ul>
<li>In project .venv directories</li>
<li>direnv for handling .envrc files per project (time for me to try this again)</li>
<li>uv for pip and pip-compile functionality</li>
<li>Installing Python via python.org</li>
<li>Using a .python-version-default file (I’ll need to play with this a bit)
<ul>
<li>Works with GH Action setup-python. (ok. that’s cool)</li>
</ul></li>
<li>Some fish shell scripting</li>
<li>Bonus tip on using requires-python in .pyproject.toml and extracting it in GH actions to be able to get the python exe name, and then be able to pass it to Docker and reference it in a Dockerfile. (very cool)</li>
</ul></li>
</ul>
<p><strong>Michael #4:</strong> <a href="https://blog.cloudflare.com/python-workers">Python Edge Workers at Cloudflare</a></p>
<ul>
<li>What are <a href="https://developers.cloudflare.com/workers/">edge workers</a>?</li>
<li>Based on workers using Pyodide and WebAssembly</li>
<li>This new support for Python is different from how Workers have historically supported languages beyond JavaScript — in this case, we have directly integrated a Python implementation into <a href="https://github.com/cloudflare/workerd">workerd</a>, the open-source Workers runtime.</li>
<li>Python Workers can import a subset of popular Python <a href="https://developers.cloudflare.com/workers/languages/python/packages/">packages</a> including <a href="https://fastapi.tiangolo.com/">FastAPI</a>, <a href="https://python.langchain.com/docs/get_started/introduction">Langchain</a>, <a href="https://numpy.org/">numpy</a></li>
<li>Check out the <a href="https://github.com/cloudflare/python-workers-examples">examples repo</a>.</li>
</ul>
<p><strong>Extras</strong> </p>
<p>Michael:</p>
<ul>
<li><a href="https://fosstodon.org/@btskinn/112226004327304352">LPython follow up</a> from Brian Skinn</li>
<li><a href="https://github.com/epogrebnyak/justpath/issues/26">Featured on Python Bytes badge</a></li>
<li><a href="https://twitter.com/TalkPython/status/1777505296807850101">A little downtime</a>, thanks for the understanding
<ul>
<li>We were rocking a <a href="https://python-bytes-static.nyc3.digitaloceanspaces.com/python-bytes-health.png">99.98% uptime</a> until then. :)</li>
</ul></li>
</ul>
<p><strong>Joke:</strong> </p>
<ul>
<li><a href="https://devhumor.com/media/gemini-says-that-c-is-not-safe-for-people-under-18">C++ is not safe for people under 18</a></li>
<li>Baseball joke</li>
</ul>
April 09, 2024 08:00 AM UTC
April 08, 2024
“KeyError: 'GOOGLE_APPLICATION_CREDENTIALS‘”
It was way too early in the morning for this error. See if you can spot the problem. I hadn’t had my coffee before trying to debug the code I’d written the night before, so it will probably take you less time than it did me.
app.py:
from dotenv import load_dotenv
from file_handling import initialize_constants

load_dotenv()
#...
file_handling.py:
import os
from google.cloud import storage

UPLOAD_FOLDER=None
DOWNLOAD_FOLDER = None

def initialize_cloud_storage():
    """
    Initializes the Google Cloud Storage client.
    """
    os.environ["GOOGLE_APPLICATION_CREDENTIALS"]
    storage_client = storage.Client()
    bucket_name = #redacted
    return storage_client.bucket(bucket_name)

def set_upload_folder():
    """
    Determines the environment and sets the path to the upload folder accordingly.
    """
    if os.environ.get("FLASK_ENV") in ["production", "staging"]:
        UPLOAD_FOLDER = os.path.join("/tmp", "upload")
        os.makedirs(UPLOAD_FOLDER, exist_ok=True)
    else:
        UPLOAD_FOLDER = os.path.join("src", "upload_folder")
    return UPLOAD_FOLDER

def initialize_constants():
    """
    Initializes the global constants for the application.
    """
    UPLOAD_FOLDER = initialize_upload_folder()
    DOWNLOAD_FOLDER = initialize_cloud_storage()
    return UPLOAD_FOLDER, DOWNLOAD_FOLDER

DOWNLOAD_FOLDER=initialize_cloud_storage()

def write_to_gcs(content: str, file: str):
    "Writes a text file to a Google Cloud Storage file."
    blob = DOWNLOAD_FOLDER.blob(file)
    blob.upload_from_string(content, content_type="text/plain")

def upload_file_to_gcs(file_path:str, gcs_file: str):
    "Uploads a file to a Google Cloud Storage bucket"
    blob = DOWNLOAD_FOLDER.blob(gcs_file)
    with open(file_path, "rb") as f:
        blob.upload_from_file(f, content_type="application/octet-stream")
See the problem?
This was just the discussion of a recent Pybites article.
When app.py imported initialize_constants from file_handling, the Python interpreter ran
DOWNLOAD_FOLDER = initialize_cloud_storage()
and looked for GOOGLE_APPLICATION_CREDENTIALS from the environment path, but load_dotenv hadn’t added them to the environment path from the .env file yet.
Typically, configuration variables, secret keys, and passwords are stored in a file called .env and then read as environment variables rather than as pure text using a package such as python-dotenv, which is what is being used here.
So, I had a few options.
I could call load_dotenv before importing from file_handling:
from dotenv import load_dotenv
load_dotenv()

from file_handling import initialize_constants
But that’s not very Pythonic.
I could call initialize_cloud_storage inside both upload_file_to_gcs and write_to_gcs
def write_to_gcs(content: str, file: str):
    "Writes a text file to a Google Cloud Storage file."
    DOWNLOAD_FOLDER = initialize_cloud_storage()
    blob = DOWNLOAD_FOLDER.blob(file)
    blob.upload_from_string(content, content_type="text/plain")

def upload_file_to_gcs(file_path:str, gcs_file: str):
    "Uploads a file to a Google Cloud Storage bucket"
    DOWNLOAD_FOLDER = initialize_cloud_storage()
    blob = DOWNLOAD_FOLDER.blob(gcs_file)
    with open(file_path, "rb") as f:
        blob.upload_from_file(f, content_type="application/octet-stream")
But this violates the DRY principle. Plus we really shouldn’t be initializing the storage client multiple times. In fact, we already are initializing it twice in the way the code was originally written.
Going Global
So what about this?
DOWNLOAD_FOLDER = None

def initialize_constants():
    """
    Initializes the global constants for the application.
    """
    global DOWNLOAD_FOLDER
    UPLOAD_FOLDER = initialize_upload_folder()
    DOWNLOAD_FOLDER = initialize_cloud_storage()
    return UPLOAD_FOLDER, DOWNLOAD_FOLDER
Here, we are defining DOWNLOAD_FOLDER as having global scope.
This will work here.
This will work here, because upload_file_to_gcs and write_to_gcs are in the same module. But if they were in a different module, it would break.
Why does it matter?
Well, let’s go back to how Python handles imports. Remember that Python runs any code outside of a function or class at import. That applies to variable (or constant) assignment, as well. So if upload_file_to_gcs and write_to_gcs were in another module and importing DOWNLOAD_FOLDER from file_handling,p it would be importing it while assigned a value of None. It wouldn’t matter that by the time it was needed, it wouldn’t be assigned to None any longer. Inside this other module, it would still be None.
What would be necessary in this situation would be another function called get_download_folder.
def get_download_folder():
    """
    Returns the current value of the Google Cloud Storage bucket
    """
    return DOWNLOAD_FOLDER
Then, in this other module containing the upload_file_to_gcs and write_to_gcs functions, I would import get_download_folder instead of DOWNLOAD_FOLDER. By importing get_download_folder, you can get the value of DOWNLOAD_FOLDER after it has been assigned to an actual value, because get_download_folder won’t run until you explicitly call it. Which, presumably wouldn’t be until after you’ve let initialize_cloud_storage do its thing.
I have another part of my codebase where I have done this. On my site, I have a tool that helps authors create finetunes of GPT 3.5 from their books. This Finetuner is BYOK, or ‘bring your own key’ meaning that users supply their own OpenAI API key to use the tool. I chose this route because charging authors to fine-tune a model and then charging them to use it, forever, is just not something that benefits either of us. This way, they can take their finetuned model and use it an any of the multiple other BYOK AI writing tools that are out there, and I don’t have to maintain writing software on top of everything else. So the webapp’s form accepts the user’s API key, and after a valid form submit, starts a thread of my Finetuner application.
This application starts in the training_management.py module, which imports set_client and get_client from openai_client.py and passes the user’s API key to set_client right away. I can’t import client directly, because client is None until set_client has been passed the API key, which happens after import.
from openai import OpenAI

client = None

def set_client(api_key:str):
    """
    Initializes OpenAI API client with user API key
    """
    global client
    client = OpenAI(api_key = api_key)

def get_client():
    """
    Returns the initialized OpenAI client
    """
    return client
When the function that starts a fine tuning job starts, it calls get_client to retrieve the initialized client. And by moving the API client initialization into another module, it becomes available to be used for an AI-powered chunking algorithm I’m working on. Nothing amazing. Basically, just generating scene beats from each chapter to use as the prompt, with the actual chapter as the response. It needs work still, but it’s available for authors who want to try it.
A Class Act
Now, we could go one step further from here. The code we’ve settled on so far relies on global names. Perhaps we can get away with this. DOWNLOAD_FOLDER is a constant. Well, sort of. Remember, it’s defined by initializing a connection to a cloud storage container. It’s actually a class. By rights, we should be encapsulating all of this logic inside of another class.
So what could that look like? Well, it should initialize the upload and download folders, and expose them as properties, and then use the functions write_to_gcs and upload_file_to_gcs as methods like this:
class FileStorageHandler:
    def __init__(self):
        self._upload_folder = self._set_upload_folder()
        self._download_folder = self._initialize_cloud_storage()

    @property
    def upload_folder(self):
        return self._upload_folder

    @property
    def download_folder(self):
        return self._download_folder

    def _initialize_cloud_storage(self):
        """
        Initializes the Google Cloud Storage client.
        """
        os.environ["GOOGLE_APPLICATION_CREDENTIALS"]
        storage_client = storage.Client()
        bucket_name = #redacted
        return storage_client.bucket(bucket_name)

    def _set_upload_folder(self):
        """
        Determines the environment and sets the path to the upload folder accordingly.
        """
        if os.environ.get("FLASK_ENV") in ["production", "staging"]:
            upload_folder = os.path.join("/tmp", "upload")
            os.makedirs(upload_folder, exist_ok=True)
        else:
            upload_folder = os.path.join("src", "upload_folder")
        return upload_folder

    def write_to_gcs(self, content: str, file_name: str):
        """
        Writes a text file to a Google Cloud Storage file.
        """
        blob = self._download_folder.blob(file_name)
        blob.upload_from_string(content, content_type="text/plain")

    def upload_file_to_gcs(self, file_path: str, gcs_file_name: str):
        """
        Uploads a file to a Google Cloud Storage bucket.
        """
        blob = self._download_folder.blob(gcs_file_name)
        with open(file_path, "rb") as file_obj:
            blob.upload_from_file(file_obj)
Now, we can initialize an instance of FileStorageHandler in app.py and assign UPLOAD_FOLDER and DOWNLOAD_FOLDER to the properties of the class.
from dotenv import load_dotenv
from file_handling import FileStorageHandler

load_dotenv()

folders = FileStorageHandler()

UPLOAD_FOLDER = folders.upload_folder
DOWNLOAD_FOLDER = folders.download_folder
Key take away
In the example, the error arose because initialize_cloud_storage was called at the top level in file_handling.py. This resulted in Python attempting to access environment variables before load_dotenv had a chance to set them.
I had been thinking of module level imports as “everything at the top runs at import.” But that’s not true. Or rather, it is true, but not accurate. Python executes code based on indentation, and functions are indented within the module. So, it’s fair to say that every line that isn’t indented is at the top of the module. In fact, it’s even called that: top-level code, which is defined as basically anything that is not part of a function, class or other code block.
And top-level code runs runs when the module is imported. It’s not enough to bury an expression below some functions, it will still run immediately when the module is imported, whether you are ready for it to run or not. Which is really what the argument against global variables and state is all about, managing when and how your code runs.
Understanding top-level code execution at import helped solved the initial error and design a more robust pattern.
Next steps
The downside with using a class is that if it gets called again, a new instance is created, with a new connection to the cloud storage. To get around this, something to look into would be to implement something called a Singleton Pattern, which is outside of the scope of this article.
Also, the code currently doesn’t handle exceptions that might arise during initialization (e.g., issues with credentials or network connectivity). Adding robust error handling mechanisms will make the code more resilient.
Speaking of robustness, I would be remiss if I didn’t point out that a properly abstracted initialization method should retrieve the bucket name from a configuration or .env file instead of leaving it hardcoded in the method itself.
April 08, 2024 06:15 PM UTC
Execution Environments serves us the benefits of containerization by solving the issues such as software dependencies, portability. Ansible Execution Environment are Ansible control nodes packaged as container images. There are two kinds of Ansible execution environments
-
Base, includes the following
- fedora base image
- ansible core
- ansible collections : The following set of collections
ansible.posix
ansible.utils
ansible.windows
-
Minimal, includes the following
- fedora base image
- ansible core
I have been the release manager for Ansible Execution Environments. After building the images I perform certain steps of tests to check if the versions of different components of the newly built correct or not. So I wrote eercheck to ease the steps of tests.
What is eercheck?
eercheck is a command line tool to test Ansible community execution environment before release. It uses podman py to connect and work with the podman container image, and Python unittest for testing the containers.
eercheck is a command line tool to test Ansible Community Execution Environment before release. It uses podman-py to connect and work with the podman container image, and Python unittest for testing the containers. The project is licensed under GPL-3.0-or-later.
How to use eercheck?
Activate the virtual environment in the working directory.
python3 -m venv .venv
source .venv/bin/activate
python -m pip install -r requirements.txt
Activate the podman socket.
systemctl start podman.socket --user
Update vars.json with correct version numbers.Pick the correct versions of the Ansible Collections from the .deps file of the corresponding Ansible community package release. For example for 9.4.0 the Collection versions can be found in here. You can find the appropriate version of Ansible Community Package here. The check needs to be carried out each time before the release of the Ansible Community Execution Environment.
Execute the program by giving the correct container image id.
./containertest.py image_id
Happy automating.
April 08, 2024 02:25 PM UTC
While many people went hunting for Easter eggs, the Python community stayed active through March 2024. The free-threaded Python project reached a new milestone, and you can now experiment with disabling the GIL in your interpreter.
The Python Software Foundation does a great job supporting the language with limited resources. They’ve now announced a new position that will support users of PyPI. NumPy is an old workhorse in the data science space. The library is getting a big facelift, and the first release candidate of NumPy 2 is now available.
Dive in to learn more about last month’s most important Python news.
Free-Threaded Python Reaches an Important Milestone
Python’s global interpreter lock (GIL) has been part of the CPython implementation since the early days. The lock simplifies a lot of the code under the hood of the language, but also causes some issues with parallel processing.
Over the years, there have been many attempts to remove the GIL. However, until PEP 703 was accepted by the steering council last year, none had been successful.
The PEP describes how the GIL can be removed based on experimental work done by Sam Gross. It suggests that what’s now called free-threaded Python is activated through a build option. In time, this free-threaded Python is expected to become the default version of CPython, but for now, it’s only meant for testing and experiments.
When free-threaded Python is ready for bigger audiences, the GIL will still be enabled by default. You can then set an environment variable or add a command-line option to try out free-threaded Python:
[ Improve Your Python With 🐍 Python Tricks 💌 – Get a short & sweet Python Trick delivered to your inbox every couple of days. >> Click here to learn more and see examples ]
April 08, 2024 02:00 PM UTC
Hello, Python enthusiasts! 👋
Guess what? We&aposre on the home stretch now, with less than 100 days left until we all rendezvous in the enchanting city of Prague for EuroPython 2024!

Only 91 days left until EuroPython 2024!
Can you feel the excitement tingling in your Pythonic veins?
Let’s look up what&aposs been cooking in the EuroPython pot lately. 🪄🍜
📣 Programme
The curtains have officially closed on the EuroPython 2024 Call for Proposals! 🎬
We&aposve hit records with an incredible 627 submissions this year!! 🎉
Thank you to each and every one of you brave souls who tossed your hats into the ring! 🎩 Your willingness to share your ideas has truly made this a memorable journey.
EuroPython 2024 Community Voting was a blast!
The Community Voting is composed of all past EuroPython attendees and prospective speakers between 2015 and 2024.
We had 297 people contributing, making EuroPython more responsive to the community’s choices. 😎 We can’t thank you enough for helping us hear the voice of the Community.
Now, our wonderful programme crew along with the team of reviewers and community voters have been working hard to create the schedule for the conference! 📋✨
EuroPython is a volunteer-run, non-profit conference. All sponsor support goes to cover the cost of running the Europython Conference and supporting the community with Grants and Financial Aid.
If you want to support EuroPython and its efforts to make the event accessible to everyone, please consider sponsoring (or asking your employer to sponsor).
Sponsoring EuroPython guarantees you highly targeted visibility and the opportunity to present your company to one of the largest and most diverse Python communities in Europe and beyond!
There are various sponsor tiers and some have limited slots available. This year, besides our main packages, we offer add-ons as optional extras. For more information, check out our Sponsorship brochure.
🐦 We have an Early Bird 10% discount for companies that sign up by April 15th.🐦
More information at: https://ep2024.europython.eu/sponsor 🫂 Contact us at sponsoring@europython.eu
🎟️ Ticket Sales
The tickets are now open to purchase, and there is a variety of options:
- Conference Tickets: access to Conference and Sprint Weekends.
- Tutorial Tickets: access to the Workshop/Tutorial Days and Sprint Weekend (no access to the main conference).
- Combined Tickets: access to everything during the whole seven-day, i.e. workshops, conference talks and sprint weekend!
We also offer different payment tiers designed to answer each attendee&aposs needs. They are:
Business Tickets: for companies and employees funded by their companies
- Tutorial Only Business (Net price €400.00 + 21% VAT)
- Conference Only Business (Net price €500.00 + 21% VAT)
- Late Bird (Net price €750.00 + 21% VAT)
- Combines Business (Net price €800.00 + 21% VAT)
- Late Bird (Net price €1200.00 + 21% VAT)
Personal Tickets: for individuals
- Tutorial Only Personal (€200.00 incl. 21%VAT)
- Conference Only Personal (€300.00 incl. 21% VAT)
- Late Bird (€450.00 incl. 21% VAT)
- Combined Personal (€450.00 incl. 21% VAT)
- Late Bird (€675.00 incl. 21% VAT)
Education Tickets: for students and active teachers (Educational ID is required at registration)
- Conference Only Education (€135.00 incl. 21% VAT)
- Tutorial Only Education (€100.00 incl. 21% VAT)
- Combined Education (€210.00 incl. 21% VAT)
Fun fact: Czechia has been ranked among the world&aposs top 20 happiest countries recently.
Seize the chance to grab an EP24 ticket and connect with the delightful community of Pythonistas and happy locals this summer! ☀️

Need more information regarding tickets? Please visit https://ep2024.europython.eu/tickets or contact us at helpdesk@europython.eu.
⚖️ Visa Application
If you require a visa to attend EuroPython 2024 in Prague, now is the time to start preparing.
The first step is to verify if you require a visa to travel to the Czech Republic.
The Czech Republic is a part of the EU and the Schengen Area. If you already have a valid Schengen visa, you may NOT need to apply for a Czech visa. If you are uncertain, please check this website and consult your local consular office or embassy. 🏫
If you need a visa to attend EuroPython, you can lodge a visa application for Short Stay (C), up to 90 days, for the purpose of “Business /Conference”. We recommend you do this as soon as possible.
Please, make sure you read all the visa pages carefully and prepare all the required documents before making your application. The EuroPython organisers are not able nor qualified to give visa advice.
However, we are more than happy to help with the visa support letter issued by the EuroPython Society. Every registered attendee can request one; we only issue visa support letters to confirmed attendees. We kindly ask you to purchase your ticket before filling in the request form.
For more information, please check https://ep2024.europython.eu/visa or contact us at visa@europython.eu. ✈️
💶 Financial Aid
We are also pleased to announce our financial aid, sponsored by the EuroPython Society. The goal is to make the conference open to everyone, including those in need of financial assistance.
Submissions for the first round of our financial aid programme are open until April 21st 2024.
There are three types of grants including:
- Free Ticket Voucher Grant
- Travel/Accommodation Grant (reimbursement of travel costs up to €400.)
- Visa Application Fee Grant (up to €80)
⏰ FinAid timeline
If you apply for the first round and do not get selected, you will automatically be considered for the second round. No need to reapply.
| 8 March 2024 | | Applications open |
| 21 April 2024 |  | Deadline for submitting first-round applications |
| 8 May 2024 | | First round of grant notifications |
| 12 May 2024 | | Deadline to accept a first-round grant |
| 19 May 2024 |  | Deadline for submitting second-round applications1 |
| 5 June 2024 | | Second round of grant notifications |
| 12 June 2024 | | Deadline to accept a second-round grant |
| 21 July 2024 | | Deadline for submitting receipts/invoices |
Visit https://europython.eu/finaid for information on eligibility and application procedures for Financial Aid grants.
🎤 Public Speaking Workshop for Mentees
We are excited to announce that this year’s Speaker Mentorship Programme comes with an extra package!
We have selected a limited number of mentees for a 5-week interactive course covering the basics of a presentation from start to finish.
The main facilitator is the seasoned speaker Cheuk Ting Ho and the participants will end the course by delivering a talk covering all they have learned.
We look forward to the amazing talks the workshop participants will give us. 🙌
🐍 Upcoming Events in Europe
Here are some upcoming events happening in Europe soon.
Czech Open Source Policy Forum: Apr 24, 2024 (In-Person)
Interested in open source and happen to be near Brno/Czech Republic in April? Join the Czech Open Source Policy Forum and have the chance to celebrate the launch of the Czech Republic&aposs first Open Source Policy Office (OSPO). More info at: https://pretix.eu/om/czospf2024/
OSSCi Prague Meetup: May 16, 2024 (In-Person)
Join the forefront of innovation at OSSci Prague Meetup, where open source meets science. Call for Speakers is open! https://pydata.cz/ossci-cfs.html
PyCon DE & PyData Berlin: April 22-24 2024
Dive into three days of Python and PyData excellence at Pycon DE! Visit https://2024.pycon.de/ for details.
PyCon Italy: May 22-25 2024
PyCon Italia 2024 will happen in Florence. The schedule is online and you can check it out at their nice website: https://2024.pycon.it/
GeoPython 2024: May 27-29, 2024
GeoPython 2024 will happen in Basel, Switzerland. For more information visit their website: https://2024.geopython.net/
🤭 Py.Jokes
Can you imagine our newsletter without joy and laughter? We can’t. 😾🙅♀️❌ Here’s this month&aposs PyJoke:
pip install pyjokesimport

pyjokesprint(pyjokes.get_joke())

How many programmers does it take to change a lightbulb?

None, they just make darkness a standard!
🐣 See You All Next Month
Before saying goodbye, thank you so much for reading this far.
We can’t wait to reunite with all you amazing people in beautiful Prague again.
Let me remind you how pretty Prague is during summer. 🌺🌼🌺
 Rozkvetlá jarní Praha, březen 2024 by Radoslav Vnenčák
Remember to take good care of yourselves, stay hydrated and mind your posture!
Oh, and don’t forget to force encourage your friends to join us at EuroPython 2024! 😌
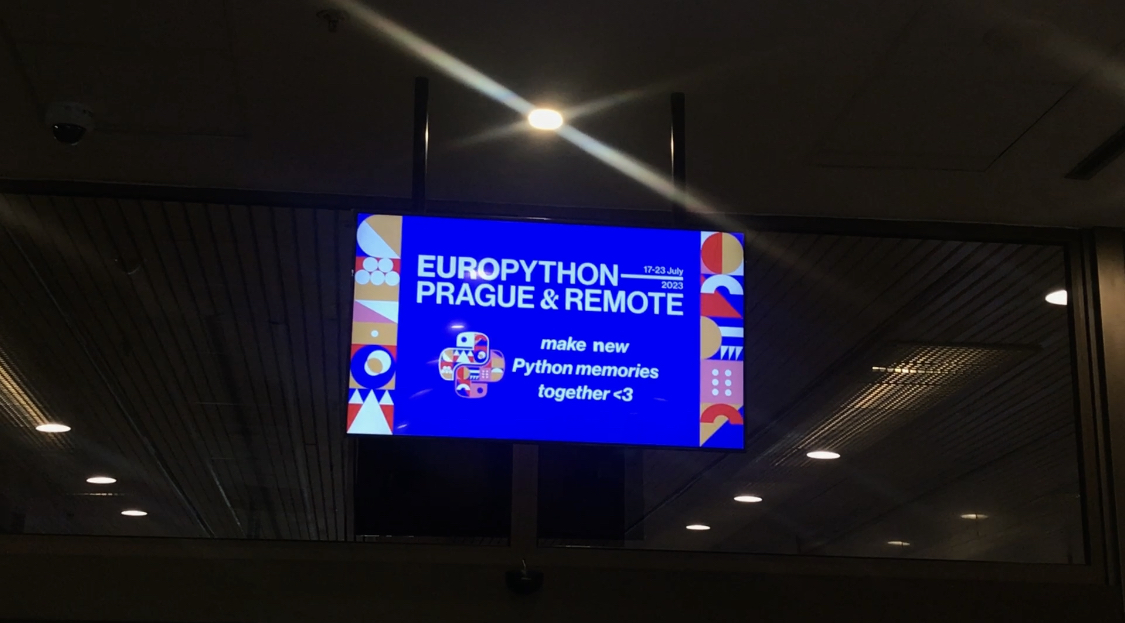 It’s time again to make new Python memories together!
Looking forward to meeting you all here next month!
With much joy and excitement,
EuroPython 2024 Team 🤗
April 08, 2024 10:42 AM UTC
2024-04-08, by Dariusz Suchojad
Overview
Continuing in the series of articles about newest cloud connections in Zato 3.2, this episode covers Atlassian Jira
from the perspective of invoking its APIs to build integrations between Jira and other systems.
There are essentially two use modes of integrations with Jira:
- Jira reacts to events taking place in your projects and invokes your endpoints accordingly via WebHooks.
In this case, it is Jira that explicitly establishes connections with and sends requests to your APIs.
- Jira projects are queried periodically or as a consequence of events triggered by Jira using means other than WebHooks.
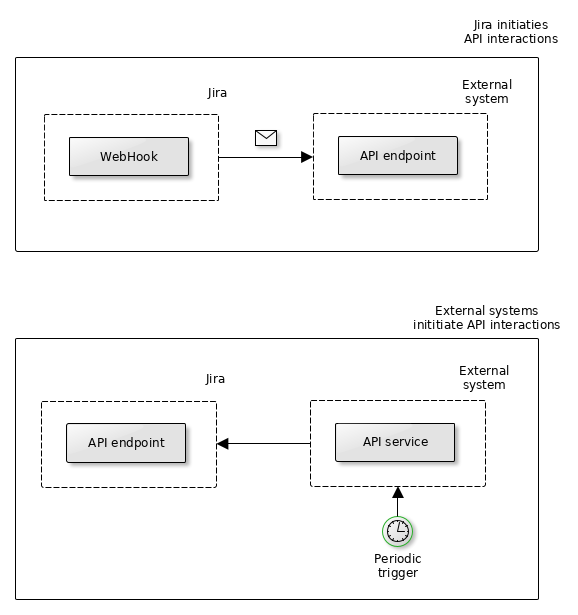
The first case is usually more straightforward to conceptualize - you create a WebHook in Jira, point it to your endpoint
and Jira invokes it when a situation of interest arises, e.g. a new ticket is opened or updated. I will talk about this variant
of integrations with Jira in a future instalment as the current one is about the other situation, when it is your systems
that establish connections with Jira.
The reason why it is more practical to first speak about the second form is that, even if WebHooks are somewhat easier
to reason about, they do come with their own ramifications.
To start off, assuming that you use the cloud-based version of
Jira (e.g. https://example.atlassian.net), you need to have a publicly available endpoint for Jira to invoke through WebHooks.
Very often, this is undesirable because the systems that you need to integrate with may be internal ones, never meant
to be exposed to public networks.
Secondly, your endpoints need to have a TLS certificate signed by a public Certificate Authority and they need to be accessible
on port 443. Again, both of these are something that most enterprise systems will not allow at all or it may take months
or years to process such a change internally across the various corporate departments involved.
Lastly, even if a WebHook can be used, it is not always a given that the initial information that you receive in the request
from a WebHook will already contain everything that you need in your particular integration service. Thus, you will still
need a way to issue requests to Jira to look up details of a particular object, such as tickets, in this way reducing
WebHooks to the role of initial triggers of an interaction with Jira, e.g. a WebHook invokes your endpoint,
you have a ticket ID on input and then you invoke Jira back anyway to obtain all the details that you
actually need in your business integration.
The end situation is that, although WebHooks are a useful concept that I will write about in a future article,
they may very well not be sufficient for many integration use cases. That is why I start with integration
methods that are alternative to WebHooks.
Alternatives to WebHooks
If, in our case, we cannot use WebHooks then what next? Two good approaches are:
- Scheduled jobs
- Reacting to emails (via IMAP)
Scheduled jobs will let you periodically inquire with Jira about the changes that you have not processed yet. For instance,
with a job definition as below:

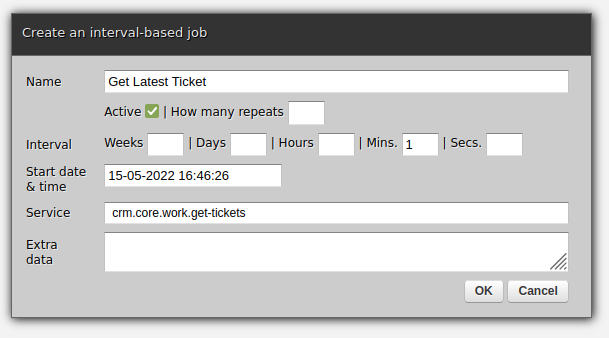
Now, the service configured for this job will be invoked once per minute to carry out any integration works required.
For instance, it can get a list of tickets since the last time it ran, process each of them as required in your business context
and update a database with information about what has been just done - the database can be based on Redis, MongoDB, SQL or anything
else.
Integrations built around scheduled jobs make most sense when you need to make periodic sweeps across a large swaths of business
data, these are the "Give me everything that changed in the last period" kind of interactions when you do not know precisely
how much data you are going to receive.
In the specific case of Jira tickets, though, an interesting alternative may be to combine scheduled jobs with IMAP connections:
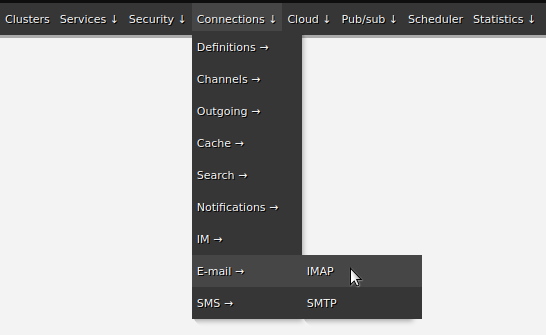
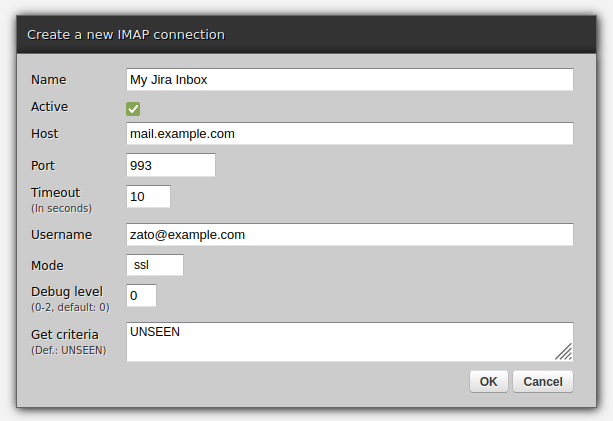
The idea here is that when new tickets are opened, or when updates are made to existing ones, Jira will send out notifications
to specific email addresses and we can take advantage of it.
For instance, you can tell Jira to CC or BCC an address such as zato@example.com. Now, Zato will still run a scheduled job
but instead of connecting with Jira directly, that job will look up unread emails for it inbox
("UNSEEN" per the relevant
RFC).
Anything that is unread must be new since the last iteration which means that we can process each such email from the inbox, in this way
guaranteeing that we process only the latest updates, dispensing with the need for our own database of tickets already processed.
We can extract the ticket ID or other details from the email, look up its details in Jira and the continue as needed.
All the details of how to work with IMAP emails are provided in the documentation but it would boil down to this:
# -*- coding: utf-8 -*-

# Zato
from zato.server.service import Service

class MyService(Service):

    def handle(self):
        conn = self.email.imap.get('My Jira Inbox').conn

        for msg_id, msg in conn.get():

            # Process the message here ..
            process_message(msg.data)

            # .. and mark it as seen in IMAP.
            msg.mark_seen()
The natural question is - how would the "process_message" function extract details of a ticket from an email?
There are several ways:
- Each email has a subject of a fixed form - "[JIRA] (ABC-123) Here goes description". In this case, ABC-123 is the ticket ID.
- Each email will contain a summary, such as the one below, which can also be parsed:
         Summary: Here goes description
             Key: ABC-123
             URL: https://example.atlassian.net/browse/ABC-123
         Project: My Project
      Issue Type: Improvement
Affects Versions: 1.3.17
     Environment: Production
        Reporter: Reporter Name
        Assignee: Assignee Name
- Finally, each email will have an "X-Atl-Mail-Meta" header with interesting metadata that can also be parsed and extracted:
X-Atl-Mail-Meta: user_id="123456:12d80508-dcd0-42a2-a2cd-c07f230030e5",
                 event_type="Issue Created",
                 tenant="https://example.atlassian.net"
The first option is the most straightforward and likely the most convenient one - simply parse out the ticket ID and
call Jira with that ID on input for all the other information about the ticket. How to do it exactly is presented in the
next chapter.
Regardless of how we parse the emails, the important part is that we know that we invoke Jira only when there are new or updated
tickets - otherwise there would not have been any new emails to process. Moreover, because it is our side that invokes Jira,
we do not expose our internal system to the public network directly.
However, from the perspective of the overall security architecture, email is still part of the attack surface so we need to make
sure that we read and parse emails with that in view. In other words, regardless of whether it is Jira invoking us
or our reading emails from Jira, all the usual security precautions regarding API integrations and accepting input from external
resources, all that still holds and needs to be part of the design of the integration workflow.
Creating Jira connections
The above presented the ways in which we can arrive at the step of when we invoke Jira and now we are ready to actually do it.
As with other types of connections, Jira connections are created in Zato Dashboard, as below. Note that you use the email
address of a user on whose behalf you connect to Jira but the only other credential is that user's API token previously
generated in Jira, not the user's password.
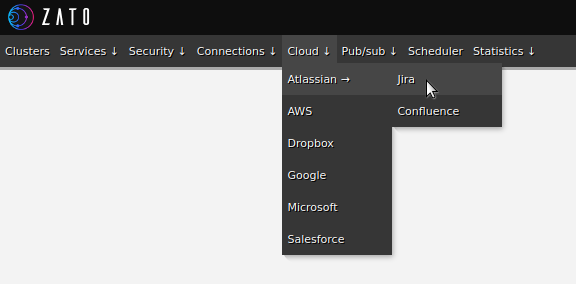
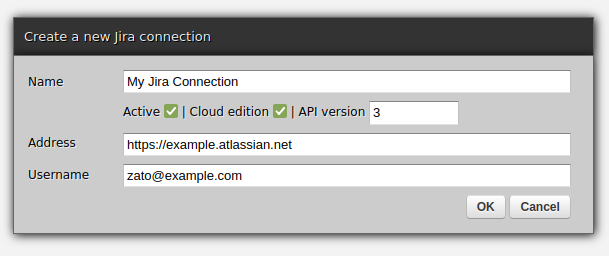

Invoking Jira
With a Jira connection in place, we can now create a Python API service. In this case, we accept a ticket ID on input
(called "a key" in Jira) and we return a few details about the ticket to our caller.
This is the kind of a service that could be invoked from a service that is triggered by a scheduled job. That is,
we would separate the tasks, one service would be responsible for opening IMAP inboxes and parsing emails
and the one below would be responsible for communication with Jira.
Thanks to this loose coupling, we make everything much more reusable - that the services can be changed independently is but one part
and the more important side is that, with such separation, both of them can be reused by future services as well,
without tying them rigidly to this one integration alone.
# -*- coding: utf-8 -*-

# stdlib
from dataclasses import dataclass

# Zato
from zato.common.typing_ import cast_, dictnone
from zato.server.service import Model, Service

# ###########################################################################

if 0:
    from zato.server.connection.jira_ import JiraClient

# ###########################################################################

@dataclass(init=False)
class GetTicketDetailsRequest(Model):
    key: str

@dataclass(init=False)
class GetTicketDetailsResponse(Model):
    assigned_to: str = ''
    progress_info: dictnone = None

# ###########################################################################

class GetTicketDetails(Service):

    class SimpleIO:
        input  = GetTicketDetailsRequest
        output = GetTicketDetailsResponse

    def handle(self):

        # This is our input data
        input = self.request.input # type: GetTicketDetailsRequest

        # .. create a reference to our connection definition ..
        jira = self.cloud.jira['My Jira Connection']

        # .. obtain a client to Jira ..
        with jira.conn.client() as client:

            # Cast to enable code completion
            client = cast_('JiraClient', client)

            # Get details of a ticket (issue) from Jira
            ticket = client.get_issue(input.key)

        # Observe that ticket may be None (e.g. invalid key), hence this 'if' guard ..
        if ticket:

            # .. build a shortcut reference to all the fields in the ticket ..
            fields = ticket['fields']

            # .. build our response object ..
            response = GetTicketDetailsResponse()
            response.assigned_to = fields['assignee']['emailAddress']
            response.progress_info = fields['progress']

            # .. and return the response to our caller.
            self.response.payload = response

# ###########################################################################
Creating a REST channel and testing it
The last remaining part is a REST channel to invoke our service through. We will provide the ticket ID (key) on input
and the service will reply with what was found in Jira for that ticket.
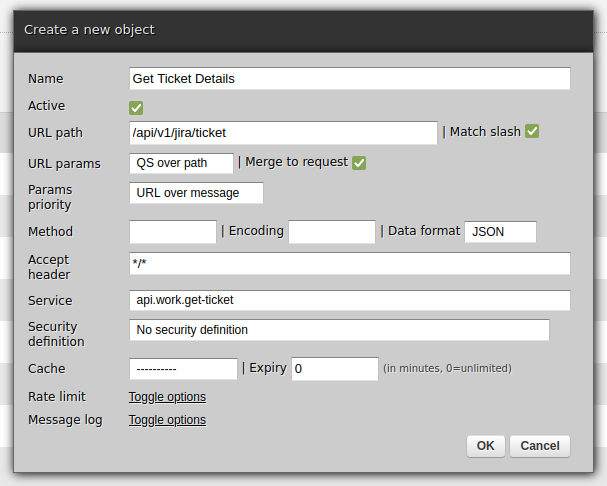
We are now ready for the final step - we invoke the channel, which invokes the service which communicates with Jira,
transforming the response from Jira to the output that we need:
$ curl localhost:17010/jira1 -d '{"key":"ABC-123"}'
{
    "assigned_to":"zato@example.com",
    "progress_info": {
        "progress": 10,
        "total": 30
    }
}
$
And this is everything for today - just remember that this is just one way of integrating with Jira. The other one,
using WebHooks, is something that I will go into in one of the future articles.
April 08, 2024 08:00 AM UTC
 This is the last bug fix release of Python 3.11
This is the ninth maintenance release of Python 3.11
Python 3.11.9 is the newest major release of the Python programming language, and it contains many new features and optimizations. Get it here:
https://www.python.org/downloads/release/python-3119/
Major new features of the 3.11 series, compared to 3.10
Among the new major new features and changes so far:
- PEP 657 – Include Fine-Grained Error Locations in Tracebacks
- PEP 654 – Exception Groups and except*
- PEP 673 – Self Type
- PEP 646 – Variadic Generics
- PEP 680 – tomllib: Support for Parsing TOML in the Standard Library
- PEP 675 – Arbitrary Literal String Type
- PEP 655 – Marking individual TypedDict items as required or potentially-missing
- bpo-46752 – Introduce task groups to asyncio
- PEP 681 – Data Class Transforms
- bpo-433030– Atomic grouping ((?>…)) and possessive quantifiers (
*+, ++, ?+, {m,n}+) are now supported in regular expressions. - The Faster Cpython Project is already yielding some exciting results. Python 3.11 is up to 10-60% faster than Python 3.10. On average, we measured a 1.22x speedup on the standard benchmark suite. See Faster CPython for details.
And now for something completely different
A kugelblitz is a theoretical astrophysical object predicted by general relativity. It is a concentration of heat, light or radiation so intense that its energy forms an event horizon and becomes self-trapped. In other words, if enough radiation is aimed into a region of space, the concentration of energy can warp spacetime so much that it creates a black hole. This would be a black hole whose original mass–energy was in the form of radiant energy rather than matter, however as soon as it forms, it is indistinguishable from an ordinary black hole.
We hope you enjoy the new releases!
Thanks to all of the many volunteers who help make Python Development and these releases possible! Please consider supporting our efforts by volunteering yourself or through organization contributions to the Python Software Foundation.
April 08, 2024 04:50 AM UTC