
Planet Python
Last update: May 15, 2024 09:43 PM UTC
May 15, 2024
Mike Driscoll
An Intro to Logging with Python and Loguru
Python’s logging module isn’t the only way to create logs. There are several third-party packages you can use, too. One of the most popular is Loguru. Loguru intends to remove all the boilerplate you get with the Python logging API.
You will find that Loguru greatly simplifies creating logs in Python.
This chapter has the following sections:
- Installation
- Logging made simple
- Handlers and formatting
- Catching exceptions
- Terminal logging with color
- Easy log rotation
Let’s find out how much easier Loguru makes logging in Python!
Before you can start with Loguru, you will need to install it. After all, the Loguru package doesn’t come with Python.
Fortunately, installing Loguru is easy with pip. Open up your terminal and run the following command:
python -m pip install loguru
Pip will install Loguru and any dependencies it might have for you. You will have a working package installed if you see no errors.
Now let’s start logging!
Logging with Loguru can be done in two lines of code. Loguru is really that simple!
Don’t believe it? Then open up your Python IDE or REPL and add the following code:
# hello.py

from loguru import logger

logger.debug("Hello from loguru!")
logger.info("Informed from loguru!")
One import is all you need. Then, you can immediately start logging! By default, the log will go to stdout.
Here’s what the output looks like in the terminal:
2024-05-07 14:34:28.663 | DEBUG    | __main__:<module>:5 - Hello from loguru!
2024-05-07 14:34:28.664 | INFO     | __main__:<module>:6 - Informed from loguru!
Pretty neat! Now, let’s find out how to change the handler and add formatting to your output.
Loguru doesn’t think of handlers the way the Python logging module does. Instead, you use the concept of sinks. The sink tells Loguru how to handle an incoming log message and write it somewhere.
Sinks can take lots of different forms:
- A file-like object, such as
sys.stderror a file handle - A file path as a string or
pathlib.Path - A
callable, such as a simple function - An asynchronous
coroutine functionthat you define usingasync def - A built-in
logging.Handler. If you use these, the Loguru records convert tologgingrecords automatically
To see how this works, create a new file called file_formatting.py in your Python IDE. Then add the following code:
# file_formatting.py

from loguru import logger

fmt = "{time} - {name} - {level} - {message}"

logger.add("formatted.log", format=fmt, level="INFO")
logger.debug("This is a debug message")
logger.info("This is an informational message")
If you want to change where the logs go, use the add() method. Note that this adds a new sink, which, in this case, is a file. The logger will still log to stdout, too, as that is the default, and you are adding to the handler list. If you want to remove the default sink, add logger.remove() before you call add().
When you call add(), you can pass in several different arguments:
- sink – Where to send the log messages
- level – The logging level
- format – How to format the log messages
- filter – A logging filter
There are several more, but those are the ones you would use the most. If you want to know more about add(), you should check out the documentation.
You might have noticed that the formatting of the log records is a little different than what you saw in Python’s own logging module.
Here is a listing of the formatting directives you can use for Loguru:
- elapsed – The time elapsed since the app started
- exception – The formatted exception, if there was one
- extra – The dict of attributes that the user bound
- file – The name of the file where the logging call came from
- function – The function where the logging call came from
- level – The logging level
- line – The line number in the source code
- message – The unformatted logged message
- module – The module that the logging call was made from
- name – The
__name__where the logging call came from - process – The process in which the logging call was made
- thread – The thread in which the logging call was made
- time – The aware local time when the logging call was made
You can also change the time formatting in the logs. In this case, you would use a subset of the formatting from the Pendulum package. For example, if you wanted to make the time exclude the date, you would use this: {time:HH:mm:ss} rather than simply {time}, which you see in the code example above.
See the documentation for details on formating time and messages.
When you run the code example, you will see something similar to the following in your log file:
2024-05-07T14:35:06.553342-0500 - __main__ - INFO - This is an informational message
You will also see log messages sent to your terminal in the same format as you saw in the first code example.
Now, you’re ready to move on and learn about catching exceptions with Loguru.
Catching exceptions with Loguru is done by using a decorator. You may remember that when you use Python’s own logging module, you use logger.exception in the except portion of a try/except statement to record the exception’s traceback to your log file.
When you use Loguru, you use the @logger.catch decorator on the function that contains code that may raise an exception.
Open up your Python IDE and create a new file named catching_exceptions.py. Then enter the following code:
# catching_exceptions.py

from loguru import logger

@logger.catch
def silly_function(x, y, z):
    return 1 / (x + y + z)

def main():
    fmt = "{time:HH:mm:ss} - {name} - {level} - {message}"
    logger.add("exception.log", format=fmt, level="INFO")
    logger.info("Application starting")
    silly_function(0, 0, 0)
    logger.info("Finished!")

if __name__ == "__main__":
    main()
According to Loguru’s documentation, the’ @logger.catch` decorator will catch regular exceptions and also work with applications with multiple threads. Add another file handler on top of the stream handler and start logging for this example.
Then you call silly_function() with a bunch of zeroes, which causes a ZeroDivisionError exception.
Here’s the output from the terminal:

If you open up the exception.log, you will see that the contents are a little different because you formatted the timestamp and also because logging those funny lines that show what arguments were passed to the silly_function() don’t translate that well:
14:38:30 - __main__ - INFO - Application starting
14:38:30 - __main__ - ERROR - An error has been caught in function 'main', process 'MainProcess' (8920), thread 'MainThread' (22316):
Traceback (most recent call last):

  File "C:\books\11_loguru\catching_exceptions.py", line 17, in <module>
    main()
    â”” <function main at 0x00000253B01AB7E0>

> File "C:\books\11_loguru\catching_exceptions.py", line 13, in main
    silly_function(0, 0, 0)
    â”” <function silly_function at 0x00000253ADE6D440>

  File "C:\books\11_loguru\catching_exceptions.py", line 7, in silly_function
    return 1 / (x + y + z)
                │   │   └ 0
                │   └ 0
                â”” 0

ZeroDivisionError: division by zero
14:38:30 - __main__ - INFO - Finished!
On the whole, using the @logger.catch is a nice way to catch exceptions.
Now, you’re ready to move on and learn about changing the color of your logs in the terminal.
Loguru will print out logs in color in the terminal by default if the terminal supports color. Colorful logs can make reading through the logs easier as you can highlight warnings and exceptions with unique colors.
You can use markup tags to add specific colors to any formatter string. You can also apply bold and underline to the tags.
Open up your Python IDE and create a new file called terminal_formatting.py. After saving the file, enter the following code into it:
# terminal_formatting.py
import sys
from loguru import logger

fmt = ("<red>{time}</red> - "
       "<yellow>{name}</yellow> - "
       "{level} - {message}")

logger.add(sys.stdout, format=fmt, level="DEBUG")
logger.debug("This is a debug message")
logger.info("This is an informational message")
You create a special format that sets the “time” portion to red and the “name” to yellow. Then, you add() that format to the logger. You will now have two sinks: the default root handler, which logs to stderr, and the new sink, which logs to stdout. You do formatting to compare the default colors to your custom ones.
Go ahead and run the code. You should see something like this:

Neat! It would be best if you now spent a few moments studying the documentation and trying out some of the other colors. For example, you can use hex and RGB colors and a handful of named colors.
The last section you will look at is how to do log rotation with Loguru!
Loguru makes log rotation easy. You don’t need to import any special handlers. Instead, you only need to specify the rotation argument when you call add().
Here are a few examples:
logger.add("file.log", rotation="100 MB")logger.add("file.log", rotation="12:00")logger.add("file.log", rotation="1 week")
These demonstrate that you can set the rotation at 100 megabytes at noon daily or even rotate weekly.
Open up your Python IDE so you can create a full-fledged example. Name the file log_rotation.py and add the following code:
# log_rotation.py

from loguru import logger

fmt = "{time} - {name} - {level} - {message}"

logger.add("rotated.log",
           format=fmt,
           level="DEBUG",
           rotation="50 B")
logger.debug("This is a debug message")
logger.info("This is an informational message")
Here, you set up a log format, set the level to DEBUG, and set the rotation to every 50 bytes. When you run this code, you will get a couple of log files. Loguru will add a timestamp to the file’s name when it rotates the log.
What if you want to add compression? You don’t need to override the rotator like you did with Python’s logging module. Instead, you can turn on compression using the compression argument.
Create a new Python script called log_rotation_compression.py and add this code for a fully working example:
# log_rotation_compression.py

from loguru import logger

fmt = "{time} - {name} - {level} - {message}"

logger.add("compressed.log",
           format=fmt,
           level="DEBUG",
           rotation="50 B",
           compression="zip")
logger.debug("This is a debug message")
logger.info("This is an informational message")
for i in range(10):
    logger.info(f"Log message {i}")
The new file is automatically compressed in the zip format when the log rotates. There is also a retention argument that you can use with add() to tell Loguru to clean the logs after so many days:
logger.add("file.log",
             rotation="100 MB",
             retention="5 days")
If you were to add this code, the logs that were more than five days old would get cleaned up automatically by Loguru!
The Loguru package makes logging much easier than Python’s logging library. It removes the boilerplate needed to create and format logs.
In this chapter, you learned about the following:
- Installation
- Logging made simple
- Handlers and formatting
- Catching exceptions
- Terminal logging with color
- Easy log rotation
Loguru can do much more than what is covered here, though. You can serialize your logs to JSON or contextualize your logger messages. Loguru also allows you to add lazy evaluation to your logs to prevent them from affecting performance in production. Loguru also makes adding custom log levels very easy. For full details about all the things Loguru can do, you should consult Loguru’s website.
The post An Intro to Logging with Python and Loguru appeared first on Mouse Vs Python.
Real Python
Python's Built-in Exceptions: A Walkthrough With Examples
Python has a complete set of built-in exceptions that provide a quick and efficient way to handle errors and exceptional situations that may happen in your code. Knowing the most commonly used built-in exceptions is key for you as a Python developer. This knowledge will help you debug code because each exception has a specific meaning that can shed light on your debugging process.
You’ll also be able to handle and raise most of the built-in exceptions in your Python code, which is a great way to deal with errors and exceptional situations without having to create your own custom exceptions.
In this tutorial, you’ll:
- Learn what errors and exceptions are in Python
- Understand how Python organizes the built-in exceptions in a class hierarchy
- Explore the most commonly used built-in exceptions
- Learn how to handle and raise built-in exceptions in your code
To smoothly walk through this tutorial, you should be familiar with some core concepts in Python. These concepts include Python classes, class hierarchies, exceptions, try … except blocks, and the raise statement.
Get Your Code: Click here to download the free sample code that you’ll use to learn about Python’s built-in exceptions.
Errors and Exceptions in Python
Errors and exceptions are important concepts in programming, and you’ll probably spend a considerable amount of time dealing with them in your programming career. Errors are concrete conditions, such as syntax and logical errors, that make your code work incorrectly or even crash.
Often, you can fix errors by updating or modifying the code, installing a new version of a dependency, checking the code’s logic, and so on.
For example, say you need to make sure that a given string has a certain number of characters. In this case, you can use the built-in len() function:
>>> len("Pythonista") = 10
  File "<input>", line 1
    ...
SyntaxError: cannot assign to function call here.
    Maybe you meant '==' instead of '='?
In this example, you use the wrong operator. Instead of using the equality comparison operator, you use the assignment operator. This code raises a SyntaxError, which represents a syntax error as its name describes.
Note: In the above code, you’ll note how nicely the error message suggests a possible solution for correcting the code. Starting in version 3.10, the Python core developers have put a lot of effort into improving the error messages to make them more friendly and useful for debugging.
To fix the error, you need to localize the affected code and correct the syntax. This action will remove the error:
>>> len("Pythonista") == 10
True
Now the code works correctly, and the SyntaxError is gone. So, your code won’t break, and your program will continue its normal execution.
There’s something to learn from the above example. You can fix errors, but you can’t handle them. In other words, if you have a syntax error like the one in the example, then you won’t be able to handle that error and make the code run. You need to correct the syntax.
On the other hand, exceptions are events that interrupt the execution of a program. As their name suggests, exceptions occur in exceptional situations that should or shouldn’t happen. So, to prevent your program from crashing after an exception, you must handle the exception with the appropriate exception-handling mechanism.
To better understand exceptions, say that you have a Python expression like a + b. This expression will work if a and b are both strings or numbers:
>>> a = 4
>>> b = 3

>>> a + b
7
In this example, the code works correctly because a and b are both numbers. However, the expression raises an exception if a and b are of types that can’t be added together:
>>> a = "4"
>>> b = 3

>>> a + b
Traceback (most recent call last):
  File "<input>", line 1, in <module>
    a + b
    ~~^~~
TypeError: can only concatenate str (not "int") to str
Because a is a string and b is a number, your code fails with a TypeError exception. Since there is no way to add text and numbers, your code has faced an exceptional situation.
Python uses classes to represent exceptions and errors. These classes are generically known as exceptions, regardless of what a concrete class represents, an exception or an error. Exception classes give us information about an exceptional situation and also errors detected during the program’s execution.
The first example in this section shows a syntax error in action. The SyntaxError class represents an error but it’s implemented as a Python exception. This could be confusing, but Python uses exception classes for both errors and exceptions.
Read the full article at https://realpython.com/python-built-in-exceptions/ »
[ Improve Your Python With 🐍 Python Tricks 💌 – Get a short & sweet Python Trick delivered to your inbox every couple of days. >> Click here to learn more and see examples ]
How to Get the Most Out of PyCon US
Congratulations! You’re going to PyCon US!
Whether this is your first time or not, going to a conference full of people who love the same thing as you is always a fun experience. There’s so much more to PyCon than just a bunch of people talking about the Python language, and that can be intimidating for first-time attendees. This guide will help you navigate all there is to see and do at PyCon.
PyCon US is the biggest conference centered around the Python language. Originally launched in 2003, this conference has grown exponentially and has even spawned several other PyCons and workshops around the world.
Everyone who attends PyCon will have a different experience, and that’s what makes the conference truly unique. This guide is meant to help you, but you don’t need to follow it strictly.
By the end of this article, you’ll know:
- How PyCon consists of tutorials, conference, and sprints
- What to do before you go
- What to do during PyCon
- What to do after the event
- How to have a great PyCon
This guide will have links that are specific to PyCon 2024, but it should be useful for future PyCons as well.
Free Download: Get a sample chapter from Python Tricks: The Book that shows you Python’s best practices with simple examples you can apply instantly to write more beautiful + Pythonic code.
What PyCon Involves
Before considering how to get the most out of PyCon, it’s important to first understand what PyCon involves.
PyCon is broken up into three stages:
-
Tutorials: PyCon starts with two days of three-hour workshops, during which you get to learn in depth with instructors. These are great to go to since the class sizes are small, and you can ask questions of the instructors. You should consider going to at least one of these if you can, but they do have an additional cost of $150 per tutorial.
-
Conference: Next, PyCon offers three days of talks. Each presentation lasts for thirty to forty-five minutes, and there are about five talks going on at a time, including a Spanish language charlas track. But that’s not all: there are also open spaces, sponsors, posters, lightning talks, dinners, and so much more.
-
Sprints: During this stage, you can take what you’ve learned and apply it! This is a four-day exercise where people group up to work on various open-source projects related to Python. If you’ve got the time, going to one or more sprint days is a great way to practice what you’ve learned, become associated with an open-source project, and network with other smart and talented people. Learn more about sprints in this blog post from an earlier year.
Since most PyCon attendees go to the conference part, that’ll be the focus of this article. However, don’t let that deter you from attending the tutorials or sprints if you can!
You may even learn more technical skills by attending the tutorials rather than listening to the talks. The sprints are great for networking and applying the skills that you’ve already got, as well as learning new ones from the people you’ll be working with.
What to Do Before You Go
In general, the more prepared you are for something, the better your experience will be. The same applies to PyCon.
It’s really helpful to plan and prepare ahead of time, which you’re already doing just by reading this article!
Look through the talk schedule and see which talks sound most interesting to you. This doesn’t mean you need to plan out all of the talks that you’re going to see, in every slot possible. But it helps to get an idea of which topics are going to be presented so that you can decide what you’re most interested in.
Getting the PyCon US mobile app will help you plan your schedule. This app lets you view the schedule for the talks and add reminders for the ones that you want to attend. If you’re having a hard time picking which talks to go to, you can come prepared with a question or problem that you need to solve. Doing this can help you focus on the topics that are important to you.
If you can, come a day early to check in and attend the opening reception. The line to check in on the first day is always long, so you’ll save time if you check in the day before. There’s also an opening reception that evening, so you can meet other attendees and speakers, as well as get a chance to check out the various sponsors and their booths.
If you’re brand-new to PyCon, the Newcomer Orientation can help you get caught up on what the conference involves and how you can participate.
Read the full article at https://realpython.com/pycon-guide/ »
[ Improve Your Python With 🐍 Python Tricks 💌 – Get a short & sweet Python Trick delivered to your inbox every couple of days. >> Click here to learn more and see examples ]
ListenData
4 Ways to Use ChatGPT API in Python
In this tutorial, we will explain how to use ChatGPT API in Python, along with examples.
Please follow the steps below to access the ChatGPT API.
- Visit the OpenAI Platform and sign up using your Google, Microsoft or Apple account.
- After creating your account, the next step is to generate a secret API key to access the API. The API key looks like this -
sk-xxxxxxxxxxxxxxxxxxxx - If your phone number has not been associated with any other OpenAI account previously, you may get free credits to test the API. Otherwise you have to add atleast 5 dollars into your account and charges will be based on the usage and the type of model you use. Check out the pricing details in the OpenAI website.
- Now you can call the API using the code below.
Real Python
Quiz: What Are CRUD Operations?
In this quiz, you’ll test your understanding of CRUD Operations.
By working through this quiz, you’ll revisit the key concepts and techniques related to CRUD operations. Good luck!
[ Improve Your Python With 🐍 Python Tricks 💌 – Get a short & sweet Python Trick delivered to your inbox every couple of days. >> Click here to learn more and see examples ]
PyCon
PyCon US 2024 Sprints will be here before you know it!
The Development Sprints are coming soon. Make sure you plan ahead:
When: Sprints will take place on May 20, 2024 8:00am through May 23, 2024 11:00pm ESTWhere: At PyCon US at the David L. Lawrence Convention Center in rooms 308-311 and 315-321
Project Signups: Get your project listed so that attendees can help support it by signing up here Submit Sprint Project:
What are Sprints?
PyCon Development Sprints are up to four days of intensive learning and development on an open source project(s) of your choice, in a team environment. It's a time to come together with colleagues, old and new, to share what you've learned and apply it to an open source project.
It's a time to test, fix bugs, add new features, and improve documentation. And it's a time to network, make friends, and build relationships that go beyond the conference.
PyCon US provides the opportunity and infrastructure; you bring your skills, humanity, and brainpower (oh! and don't forget your computer).
For those that have never attended a development sprint before or want to brush up on basics, on Sunday, May 19th, there will be an Introduction to Sprinting Workshop that will guide you through the basics of git, github, and what to expect at a Sprint. The Introduction to Sprint Workshop takes place in Room 402 on Sunday, May 19th from 5:30pm - 8:30pm EST.
Who can participate?
You! All experience levels are welcome; sprints are a great opportunity to get connected with, and start contributing to your favorite Python project. Participation in the sprints is free and included in your conference registration. Please go to your attendee profile on your dashboard and indicate the number of sprint days you will be attending.
Mentors: we are always looking for mentors to help new sprinters get up and running. Reach out to the sprint organizers for more info.
Which Projects are Sprinting?
Project Leads: Any Python project can signup and invite sprinters to contribute to their project. If you would like your project to be included, add your project to the list. Attendees, check here to see if which projects have signed up so far.
Thanks to our sponsors and support team!
Have questions? reach out to pycon-sprints@python.org
Glyph Lefkowitz
How To PyCon
These tips are not the “right” way to do PyCon, but they are suggestions based on how I try to do PyCon. Consider them reminders to myself, an experienced long-time attendee, which you are welcome to overhear.
See Some Talks
The hallway track is awesome. But the best version of the hallway track is not just bumping into people and chatting; it’s the version where you’ve all recently seen the same thing, and thereby have a shared context of something to react to. If you aren’t going to talks, you aren’t going to get a good hallway track.. Therefore: choose talks that interest you, attend them and pay close attention, then find people to talk to about them.
Given that you will want to see some of the talks, make sure that you have the schedule downloaded and available offline on your mobile device, or printed out on a piece of paper.
Make a list of the talks you think you want to see, but have that schedule with you in case you want to call an audible in the middle of the conference, switching to a different talk you didn’t notice based on some of those “hallway track” conversations.
Participate In Open Spaces
The name “hallway track” itself is antiquated, in a way which is relevant and important to modern conferences. It used to be that conferences were exclusively oriented around their scheduled talks; it was called the “hallway” track because the way to access it was to linger in the hallways, outside the official structure of the conference, and just talk to people.
But however, at PyCon and many other conferences, this unofficial track is now much more of an integrated, official part of the program. In particular, open spaces are not only a more official hallway track, they are considerably better than the historical “hallway” experience, because these ad-hoc gatherings can be convened with a prepared topic and potentially a loose structure to facilitate productive discussion.
With open spaces, sessions can have an agenda and so conversations are easier to start. Rooms are provided, which is more useful than you might think; literally hanging out in a hallway is actually surprisingly disruptive to speakers and attendees at talks; us nerds tend to get pretty loud and can be quite audible even through a slightly-cracked door, so avail yourself of these rooms and don’t be a disruptive jerk outside somebody’s talk.
Consult the open space board, and put up your own proposed sessions. Post them as early as you can, to maximize the chance that they will get noticed. Post them on social media, using the conference's official hashtag, and ask any interested folks you bump into help boost it.1
Remember that open spaces are not talks. If you want to give a mini-lecture on a topic and you can find interested folks you could do that, but the format lends itself to more peer-to-peer, roundtable-style interactions. Among other things, this means that, unlike proposing a talk, where you should be an expert on the topic that you are proposing, you can suggest open spaces where you are curious — but ignorant — about something, in the hopes that some experts will show up and you can listen to their discussion.
Be prepared for this to fail; there’s a lot going on and it’s always possible that nobody will notice your session. Again, maximize your chances by posting it as early as you can and promoting it, but be prepared to just have a free 30 minutes to check your email. Sometimes that’s just how it goes. The corollary here is not to always balance attending others’ spaces with proposing your own. After all if someone else proposed it you know at least one other person is gonna be there.
Take Care of Your Body
Conferences can be surprisingly high-intensity physical activities. It’s not a marathon, but you will be walking quickly from one end of a large convention center to another, potentially somewhat anxiously.
Hydrate, hydrate, hydrate. Bring a water bottle, and have it with you at all times. It might be helpful to set repeating timers on your phone to drink water, since it can be easy to forget in the middle of engaging conversations. If you take advantage of the hallway track as much as you should, you will talk more than you expect; talking expels water from your body. All that aforementioned walking might make you sweat a bit more than you realize.
Hydrate.
More generally, pay attention to what you are eating and drinking. Conference food isn’t always the best, and in a new city you might be tempted to load up on big meals and junk food. You should enjoy yourself and experience the local cuisine, but do it intentionally. While you enjoy the local fare, do so in whatever moderation works best for you. Similarly for boozy night-time socializing. Nothing stings quite as much as missing a morning of talks because you’ve got a hangover or a migraine.
This is worth emphasizing because in the enthusiasm of an exciting conference experience, it’s easy to lose track and overdo it.
Meet Both New And Old Friends: Plan Your Socializing
A lot of the advice above is mostly for first-time or new-ish conferencegoers, but this one might be more useful for the old heads. As we build up a long-time clique of conference friends, it’s easy to get a bit insular and lose out on one of the bits of magic of such an event: meeting new folks and hearing new perspectives.
While open spaces can address this a little bit, there's one additional thing I've started doing in the last few years: dinners are for old friends, but lunches are for new ones. At least half of the days I'm there, I try to go to a new table with new folks that I haven't seen before, and strike up a conversation. I even have a little canned icebreaker prompt, which I would suggest to others as well, because it’s worked pretty nicely in past years: “what is one fun thing you have done with Python recently?”2.
Given that I have a pretty big crowd of old friends at these things, I actually tend to avoid old friends at lunch, since it’s so easy to get into multi-hour conversations, and meeting new folks in a big group can be intimidating. Lunches are the time I carve out to try and meet new folks.
I’ll See You There
I hope some of these tips were helpful, and I am looking forward to seeing some of you at PyCon US 2024!
Thank you to my patrons who are supporting my writing on this blog. If you like what you’ve read here and you’d like to read more of it, or you’d like to support my various open-source endeavors, you can support my work as a sponsor!
-
In PyCon2024's case, #PyConUS on Mastodon is probably the way to go. Note, also, that it is #PyConUS and not #pyconus, which is much less legible for users of screen-readers. ↩
-
Obviously that is specific to this conference. At the O’Reilly Software Architecture conference, my prompt was “What is software architecture?” which had some really fascinating answers. ↩
Talk Python to Me
#462: Pandas and Beyond with Wes McKinney
This episode dives into some of the most important data science libraries from the Python space with one of its pioneers: Wes McKinney. He's the creator or co-creator of pandas, Apache Arrow, and Ibis projects and an entrepreneur in this space.<br/> <br/> <strong>Episode sponsors</strong><br/> <br/> <a href='https://talkpython.fm/neo4j-graphstuff'>Neo4j</a><br> <a href='https://talkpython.fm/mailtrap'>Mailtrap</a><br> <a href='https://talkpython.fm/training'>Talk Python Courses</a><br/> <br/> <strong>Links from the show</strong><br/> <br/> <div><b>Wes' Website</b>: <a href="https://wesmckinney.com" target="_blank" rel="noopener">wesmckinney.com</a><br/> <b>Pandas</b>: <a href="https://pandas.pydata.org" target="_blank" rel="noopener">pandas.pydata.org</a><br/> <b>Apache Arrow</b>: <a href="https://arrow.apache.org" target="_blank" rel="noopener">arrow.apache.org</a><br/> <b>Ibis</b>: <a href="https://ibis-project.org" target="_blank" rel="noopener">ibis-project.org</a><br/> <b>Python for Data Analysis - Groupby Summary</b>: <a href="https://wesmckinney.com/book/data-aggregation.html#groupby-summary" target="_blank" rel="noopener">wesmckinney.com/book</a><br/> <b>Polars</b>: <a href="https://pola.rs" target="_blank" rel="noopener">pola.rs</a><br/> <b>Dask</b>: <a href="https://www.dask.org" target="_blank" rel="noopener">dask.org</a><br/> <b>Sqlglot</b>: <a href="https://sqlglot.com/sqlglot.html" target="_blank" rel="noopener">sqlglot.com</a><br/> <b>Pandoc</b>: <a href="https://pandoc.org" target="_blank" rel="noopener">pandoc.org</a><br/> <b>Quarto</b>: <a href="https://quarto.org" target="_blank" rel="noopener">quarto.org</a><br/> <b>Evidence framework</b>: <a href="https://evidence.dev" target="_blank" rel="noopener">evidence.dev</a><br/> <b>pyscript</b>: <a href="https://pyscript.net" target="_blank" rel="noopener">pyscript.net</a><br/> <b>duckdb</b>: <a href="https://duckdb.org" target="_blank" rel="noopener">duckdb.org</a><br/> <b>Jupyterlite</b>: <a href="https://jupyter.org/try-jupyter/lab/" target="_blank" rel="noopener">jupyter.org</a><br/> <b>Djangonauts</b>: <a href="https://djangonaut.space" target="_blank" rel="noopener">djangonaut.space</a><br/> <b>Watch this episode on YouTube</b>: <a href="https://www.youtube.com/watch?v=iBe1-o8LYE4" target="_blank" rel="noopener">youtube.com</a><br/> <b>Episode transcripts</b>: <a href="https://talkpython.fm/episodes/transcript/462/pandas-and-beyond-with-wes-mckinney" target="_blank" rel="noopener">talkpython.fm</a><br/> <br/> <b>--- Stay in touch with us ---</b><br/> <b>Subscribe to us on YouTube</b>: <a href="https://talkpython.fm/youtube" target="_blank" rel="noopener">youtube.com</a><br/> <b>Follow Talk Python on Mastodon</b>: <a href="https://fosstodon.org/web/@talkpython" target="_blank" rel="noopener"><i class="fa-brands fa-mastodon"></i>talkpython</a><br/> <b>Follow Michael on Mastodon</b>: <a href="https://fosstodon.org/web/@mkennedy" target="_blank" rel="noopener"><i class="fa-brands fa-mastodon"></i>mkennedy</a><br/></div>
May 14, 2024
PyCoder’s Weekly
Issue #629 (May 14, 2024)
#629 – MAY 14, 2024
View in Browser »

Flattening a List of Lists in Python
In this video course, you’ll learn how to flatten a list of lists in Python. You’ll use different tools and techniques to accomplish this task. First, you’ll use a loop along with the .extend() method of list. Then you’ll explore other tools, including reduce(), sum(), itertools.chain(), and more.
REAL PYTHON course
What’s New in Python 3.13
Python 3.13 has gone into beta, which means the feature freeze is now in place. This is the official listing of the new features in 3.13. This release includes changes to the REPL, new typing features, experimental support for disabling the GIL, dead battery removal, and more.
PYTHON
[Webinar] Saga Pattern Simplified: Building Sagas with Temporal

Join us on May 30th: we’ll give a brief overview of Sagas, including challenges and benefits. Then we’ll introduce you to Temporal and demonstrate how easy it is to build, test, and run Sagas using our platform and coding in your preferred language. Prior knowledge of Temporal is not required →
TEMPORAL sponsor
Sets as Dictionaries With No Values
A set is a built-in data type that provides fast lookup and insertion with characteristics similar to those of dictionary keys. This article explores the relationship between sets and dictionaries by implementing a set class.
RODRIGO GIRÃO SERRÃO
Articles & Tutorials
A 100x Speedup With Unsafe Python
This is a deep, in the weeds analysis of how different packages can store the same kinds of data in a different order, and how row-based vs column-based storage order can affect NumPy’s speed to process the data. The not often examined “strides” value of a NumPy array specifies how things are stored and this article shows an interesting approach to getting around this value for speed-up.
YOSSI KREININ
The New REPL in Python 3.13
Python 3.13 just hit feature freeze with the first beta release, and it includes a host of improvements to the REPL. Automatic indenting, block-level editing, and more make the built-in REPL more powerful and easier to use.
TREY HUNNER
How to Read and Write Parquet Files With Python
Apache Parquet files are a popular columnar storage format used by data scientists and anyone using the Hadoop ecosystem. By using the pyarrow package, you can read and write Parquet files, this tutorial shows you how.
MIKE DRISCOLL
Generating Fake Django Model Instances With Factory Boy
Writing good tests means having data to test with. The factory-boy library helps you create fake data that you can use with your tests. This article shows you how to use factory-boy with Django ORM models.
AIDAS BENDORAITIS
Python Sequences: A Comprehensive Guide
This tutorial dives into Python sequences, which is one of the main categories of data types. You’ll learn about the properties that make an object a sequence and how to create user-defined sequences.
REAL PYTHON
How LLMs Work, Explained Without Math
You’ve probably come across articles on Large Language Models (LLMs) and may have tried products like ChatGPT. This article explains how these tools work without resorting to advanced math.
MIGUEL GRINBERG
Creating a Calculator With wxPython
wxPython is a GUI toolkit for the Python programming language. This article introduces you to building GUIs by creating a personal calculator.
MIKE DRISCOLL
Asyncio Run Multiple Concurrent Event Loops
Ever wanted to add concurrency to your concurrency? You can run multiple asyncio event loops by using threading. This articles shows you how.
JASON BROWNLEE
How Python asyncio Works: Recreating It From Scratch
This article explains how asyncio works by showing you how to re-create it using generators and the __await__ method.
JACOB PADILLA • Shared by Jacob Padilla
Comments on Understanding Software
Nat responds to a presentation by C J Silverio on how software gets made at small to medium sized organizations.
NAT BENNETT
Projects & Code
Events
PyCon US 2024
May 15 to May 24, 2024
PYCON.ORG
PyData Bristol Meetup
May 16, 2024
MEETUP.COM
PyLadies Dublin
May 16, 2024
PYLADIES.COM
Flask Con 2024
May 17 to May 18, 2024
FLASKCON.COM
PyGrunn 2024
May 17 to May 18, 2024
PYGRUNN.ORG
Django Girls Ecuador 2024
May 17, 2024
OPENLAB.EC
Happy Pythoning!
This was PyCoder’s Weekly Issue #629.
View in Browser »
[ Subscribe to 🐍 PyCoder’s Weekly 💌 – Get the best Python news, articles, and tutorials delivered to your inbox once a week >> Click here to learn more ]
Programiz
Python List
In this tutorial, we will learn about Python lists (creating lists, changing list items, removing items, and other list operations) with the help of examples.
Real Python
HTML and CSS Foundations for Python Developers
When you want to build websites as a Python programmer, there’s no way around HTML and CSS. Almost every website on the Internet is built with HTML markup to structure the page. To make a website look nice, you can style HTML with CSS.
If you’re interested in web development with Python, then knowing HTML and CSS will help you understand web frameworks like Django and Flask better. But even if you’re just getting started with Python, HTML and CSS can enable you to create small websites to impress your friends.
In this video course, you’ll learn how to:
- Structure a basic HTML file
- View and inspect HTML in your browser
- Insert images and page links
- Style a website with CSS
- Format HTML with accessibility in mind
- Use Python to write and parse HTML code
[ Improve Your Python With 🐍 Python Tricks 💌 – Get a short & sweet Python Trick delivered to your inbox every couple of days. >> Click here to learn more and see examples ]
PyCharm
PyCharm at PyCon US 2024: Engage, Learn, and Celebrate!
We’re thrilled to announce that the PyCharm team will be part of the vibrant PyCon US 2024 conference in Pittsburgh, Pennsylvania, USA. Join us for a series of engaging activities, expert talks, live demonstrations, and fun quizzes throughout the event!
Here’s a sneak peek at what we have lined up for you. Unless otherwise specified, all activities mentioned will take place at the JetBrains PyCharm booth.
Engaging talks and live demonstrations
1. Lies, damned lies, and large language models
Speaker: Jodie Burchell
Dive into the intricacies of large language models (LLMs) with Jodie Burchell’s talk. Discover the reasons behind LLM hallucinations and explore methods like retrieval augmented generation (RAG) to mitigate these issues.
📅 Date and time: May 18, 1:45 pm – 2:15 pm
📍 Location: Ballroom BC
Learn more about this talk
2. XGBoost demo and book signing with Matt Harrison
Get hands-on with XGBoost in this engaging demo, during which you can ask Matt Harrison any questions you have about the gradient boosting library.
📅 Date and time: May 17, 10:30 am
🎁 Giveaway: The first 20 attendees will get a free signed copy of Effective XGBoost.
3. Build a fully local RAG app for a variety of files in just 20 minutes
Presenter: Maria Khalusova
Watch a live demonstration on setting up a fully local RAG application in just 20 minutes. Gain insights from Maria Khalusova, an expert from Unstructured and former Hugging Face employee.
📅 Date and time: May 17, 4:10 pm
4. PyCharm on-demand demos
Discover how to boost your efficiency in data science and web development projects with PyCharm’s latest features. Have any questions or feedback? Our team lead, product manager, and developer advocates will be there to discuss everything PyCharm with you.
5. Qodana on-demand demos
Enhance your team’s code quality with our Qodana static code analysis tool. Drop by the PyCharm booth for on-demand demos and learn how to maintain high-quality, secure, and maintainable code.
Interactive quizzes and giveaways
1. Data science quizzes with Matt Harrison
Kick off the event with our exciting quiz session during the opening reception. Engage in challenging questions and get a chance to win a copy of Effective Pandas 2.0.
📅 Date and time: May 16, 5:30 pm
2. More quizzes! More prizes!
Continue testing your knowledge on May 17 at 1:20 pm. Win a one-year subscription to PyCharm Professional or a voucher for JetBrains merch.
Special events
1. Share your Python story
Want to share your Python experiences with us? Get interviewed by Paul Everitt at our booth! Our video crew will be on-site throughout the conference to capture your stories and insights.
2. Talk Python To Me: Live podcast recording
Join Michael Kennedy for a live recording with guests Maria Jose Molina-Contreras, Jessica Greene, and Jodie Burchell.
📅 Date and time: May 18, 10:10 am
2. The Black Python Developers Community’s first anniversary
Celebrate the Black Python Devs’ milestone with Jay Miller.
📅 Date and time: May 18, 12:45 pm
3. Frontend testing office hours with Paul Everitt
Got questions about frontend testing? Paul Everitt has the answers! Visit our booth to engage directly with an expert.
📅 Date and time: May 18, 3:45 pm
Visit our booth
Don’t miss out on these exciting opportunities to deepen your knowledge, network with peers, and celebrate achievements in the Python community. See you there!
PyCon
Get ready for PyCon US 2024! Tips and tricks from our community.
PyCon US 2024 will kick off later this week. Our staff members are all busy with the final preparation, and we know that many of you are packing and traveling to the conference too.
If you’re wondering about who else you will meet or what to do during your time at the conference, check out this video to hear advice from other experienced PyCon US attendees.
Thank you to our community members for helping us with the creation of the video, and for sharing their experiences and advice to the community:
- Carol Willing
- Ned Batchelder
- Ngazetungue Muheue
- Donghee Na
- Kojo Idrissa
- Abigail Afi Gbadago
- Velda Kiara
- Kattni Rembor
- Takanori Suzuki
- Denny Perez
- Maria Jose Molina
- Mario Munoz
- Tammy Do
- Jules/Juliana Barros Lima
In addition to all the talks, tutorials, Charlas, and keynotes, PyCon US offers additional activities and events, including Open Spaces, Sprints, Summits. Check out the full list on our conference website under the Events menu.
First time attendee at PyCon US are recommended to attend the Newcomer Orientation on Thursday at 4:30 PM.
Also new this year is the Hatchery Programs, which features four new tracks. While some of the Hatchery programs are now full, you will be delighted to know you don’t need to sign up in order to attend FlaskCon. Be sure to check them out.
Thank you everyone! Safe travels, and we look forward to meeting you soon!
Not yet registered for PyCon US? You still have time to register and join us either in-person or online.
Register here: https://us.pycon.org/2024/registration/register
Check our full schedule: https://us.pycon.org/2024/schedule/EuroPython
Community Post: The Invisible Threads that sustained me in STEM/Tech

My name is Joana Owusu-Appiah, and I am currently pursuing an MSc degree in Medical Imaging and Applications. I am originally from Ghana, but as my colleague likes to put it, I am currently backpacking through Europe. So depending on when you see this, my location might have changed.
I hold a Bachelor of Science degree in Biomedical Engineering from Kwame Nkrumah University of Science and Technology, Ghana. Prior to commencing my graduate studies, I dabbled in data science and analytics, gaining experience in visualizing and manipulating data using various tools (Python, Power BI, Excel, SQL). My current research focuses on computer vision applications on medical images.
Do I consider myself a woman in tech? I guess if it means knowing how to use a computer (lol) and understanding that photo editing is based on image processing algorithms and deep learning, then I might be close.
Has it always been this way? No.
What changed
I am a first-generation university student. In my country, or how it used to be, growing up, the smarter students were encouraged to pursue General Science in high school because it ultimately ensured job security. In high school, my primary ambition was to attend medical school. However, as a backup plan, I stumbled upon Biomedical Engineering (BME), which fascinated me with its potential. It quickly became my secondary option. Interestingly, everyone I spoke to knew nothing about it. Guess who would jump at any opportunity to give a lecture about this mystery degree? Me!
Side note: My high school biology teacher mentioned that neurons (nerve cells), once damaged, could never be repaired, but he also said that they functioned like wires. I thought to myself, if I merged this pathological accident and the BME I had read about, then I could replace damaged nerves with wires (some day). I ran with this new, uninformed career goal.
Fun fact: I didn&apost get into medical school, but I did get into the BME program. I quickly realised that technical drawing (a requisite course for all engineering freshers) was definitely not going to equip me to fix Neurons, and that the only viable role for BM E graduates in my country was clinical engineering (maintenance and installation of medical equipment - or so I thought). Clinical engineering wasn’t something I wanted to try, so I needed an escape!
Programming looked interesting, but also difficult and meant for very smart people. However, I gave it a shot during covid. PyLadies Ghana was organising a data science boot camp, and I decided to try.
[Heads up: My undergraduate degree had programming courses like Introduction to C and Object-Oriented Programming with Java( I had collaborated with people on some projects then), but for some reason, I couldn&apost get my brain to enjoy it…]
The Real Reason you’re here
During the boot camp, some of the participants were absorbed into the national online community of Python Ghana because more resources and opportunities were being shared there. It turned out: I was looking for an escape without any destination. Members of the community seemed very vibrant; there was always a job opening up for grabs, a new free online course or banter on trendy tech topics. My main struggle was finding a niche to belong; what was in tech for me?
My interest in health never waned, so you would usually see me reposting information on female health, breast cancer, etc. The PyLadies Ghana Lead, at that time, Abigail Mesrenyame Dogbe noticed it and in October (Breast Cancer Awareness month) she tasked me to help organise a session for the members of PyLadies Ghana. I moderated the session and it was very successful. My very first visible interaction with the community!

Abigail asked if I wanted to keep contributing to the Communications team( the comms team is the main organising force of PyLadies Ghana ) or default to being just a member. I opted for the former. In my eyes, this was a big deal; being asked to stay on the team meant a ton, It was a validation of a certain value I had to offer. I made mistakes, I created terrible designs, and I missed deadlines, but I also learned a lot. I learned how to use tools like Canva, schedule virtual calls, MS Office tools (Excel, Docs), write official emails, organise events, etc. I was helping with social media engagements, and I didn&apost even have a vibrant social media presence. I was recommended to help with Public Relations (PR) and social media for a connected tech community(Ghana Data Science Summit-IndabaX Ghana) that organises annual data science conferences.
Two years later, I got the opportunity to mentor ladies in the very bootcamp that led me into the community. The ripple effects of my involvement with PyLadies Ghana are diverse, ranging from giving a lightning talk to speaking to young girls about STEM, to helping organise Django Girls at PyCon Ghana 2022, and more…
 STEM outreach for teenage girls on International Women&aposs Day 2023
Unknown to everyone, I had contemplated brushing the study of data science under the carpet as a ‘failed project’ and moving on to something else. Staying committed to the community, watching the members, and participating in events encouraged me to keep trying. I attended conferences, met and saw women who had achieved great things in data science and machine learning, which meant that I could also, through their stories, find a plan to help me get close to what they had done.
I was always fascinated by their work conversations because wow, these women work in tech?! Some community members had secured scholarships and were pursuing higher STEM degrees abroad while others worked for top tech companies.
After covid, my plan for life after school was to either hone my programming skills and get a good job in a Ghanaian tech company and/or find graduate programs that would enable me to work on my Neurons(of course I had developed other interests). I got into a specialised data science and analytics fellowship with Blossom Academy (more about the training here), landed my first tech role through it, and later began my master’s degree.
 The Intro slide of the Data science bootcamp I mentored at!
The threads that sustained me in tech were the people, the conversations, and the inclusive atmosphere the Ghanaian community created for people with different personalities to thrive. My journey in STEM can be traced back to that pivotal moment in 2020 when I was offered the opportunity to belong and I seized it!
Doug Hellmann
sphinxcontrib-sqltable 2.1.1 - db cursor fix
What’s new in 2.1.1? Access cursor before closing the db connection (contributions by dopas21) use the readthedocs.org theme for docs
Python Bytes
#383 Why aren’t devs shipping faster?
<strong>Topics covered in this episode:</strong><br> <ul> <li><a href="https://greptile.com/blog/100-devs"><strong>I asked 100 devs why they aren’t shipping faster. Here’s what I learned</strong></a></li> <li><a href="https://pythoninsider.blogspot.com/2024/05/python-3130-beta-1-released.html"><strong>Python 3.13.0 beta 1 released</strong></a></li> <li><a href="https://blog.jupyter.org/a-theme-editor-for-jupyterlab-8f08ab62894d"><strong>A theme editor for JupyterLab</strong></a></li> <li><a href="https://pypi.org/project/rich-argparse"><strong>rich-argparse</strong></a></li> <li><strong>Extras</strong></li> <li><strong>Joke</strong></li> </ul><a href='https://www.youtube.com/watch?v=ZEQTL5KpPY8' style='font-weight: bold;'data-umami-event="Livestream-Past" data-umami-event-episode="383">Watch on YouTube</a><br> <p><strong>About the show</strong></p> <p>Sponsored by Mailtrap: <a href="https://pythonbytes.fm/mailtrap"><strong>pythonbytes.fm/mailtrap</strong></a></p> <p><strong>Connect with the hosts</strong></p> <ul> <li>Michael: <a href="https://fosstodon.org/@mkennedy"><strong>@mkennedy@fosstodon.org</strong></a></li> <li>Brian: <a href="https://fosstodon.org/@brianokken"><strong>@brianokken@fosstodon.org</strong></a></li> <li>Show: <a href="https://fosstodon.org/@pythonbytes"><strong>@pythonbytes@fosstodon.org</strong></a></li> </ul> <p>Join us on YouTube at <a href="https://pythonbytes.fm/stream/live"><strong>pythonbytes.fm/live</strong></a> to be part of the audience. Usually Tuesdays at 10am PT. Older video versions available there too.</p> <p>Finally, if you want an artisanal, hand-crafted digest of every week of the show notes in email form? Add your name and email to <a href="https://pythonbytes.fm/friends-of-the-show">our friends of the show list</a>, we'll never share it.</p> <p><strong>Michael #1:</strong> <a href="https://greptile.com/blog/100-devs"><strong>I asked 100 devs why they aren’t shipping faster. Here’s what I learned</strong></a></p> <ul> <li>by Daksh Gupta (via PyCoders)</li> <li>What’s stopping you from shipping faster? <ul> <li>Dependency bugs </li> <li>Complicated codebase <ul> <li>><em>There is so much undocumented in our service, including poor records of new features, nonexistent or outdated info on our dependencies, or even essential things like best practices for testing, a lot of time is wasted in syncs trying to find the right information</em></li> </ul></li> </ul></li> <li>QA Loops</li> <li>Waiting for spec <ul> <li><em>> At Amazon? Meetings, approval, talking to 10 different stakeholders because changing the color of a button affects 15 micro services</em></li> </ul></li> <li>Writing tests</li> <li>Deployment/build speed</li> <li>Scope creep <ul> <li>> <em>The human tendency to stuff last-minute items into the crevices of their luggage minutes before leaving for the airport manifests itself at software companies as scope creep.</em></li> </ul></li> <li>Unclear requirements</li> <li>Excessive meetings</li> <li>Motivation <ul> <li><em>>honest answer is i was on ads</em></li> <li><em>>and that’s a very old / complicated / large stack</em> <em>(edited)</em></li> <li><em>>and i didn’t understand it</em></li> <li><em>>my friends on younger teams seemed happier, i was miserable</em></li> </ul></li> <li><a href="https://docs.gitlab.com/ee/user/analytics/dora_metrics.html">DORA metrics</a></li> </ul> <p><strong>Brian #2:</strong> <a href="https://pythoninsider.blogspot.com/2024/05/python-3130-beta-1-released.html"><strong>Python 3.13.0 beta 1 released</strong></a></p> <ul> <li>"Python 3.13 is still in development. This release, 3.13.0b1, is the first of four beta release previews of 3.13.”</li> <li>New REPL, featuring multi-line editing, color support, colorized exception tracebacks</li> <li>Cool GIL, JIT, and GC features</li> <li>Typing changes, including typing.TypeIs . <ul> <li>See last weeks episode and <a href="https://rednafi.com/python/typeguard_vs_typeis/"><strong>TypeIs does what I thought TypeGuard would do in Python</strong></a></li> </ul></li> <li>Some nice dead battery removals</li> <li>and more</li> <li>But seriously, the REPL is cool. Just ask Trey <ul> <li><a href="https://treyhunner.com/2024/05/my-favorite-python-3-dot-13-feature/">The new REPL in Python 3.13</a> - Trey Hunner</li> </ul></li> </ul> <p><strong>Michael #3:</strong> <a href="https://blog.jupyter.org/a-theme-editor-for-jupyterlab-8f08ab62894d"><strong>A theme editor for JupyterLab</strong></a></p> <ul> <li>by Florence Haudin</li> <li><strong>A new tool for authoring JupyterLab themes</strong></li> <li>To lower the bar for customizing JupyterLab we created a new tool providing a simple interface for tuning the JupyterLab appearance interactively.</li> <li>See <a href="https://github.com/jupyterlab-contrib/jupyterlab-theme-editor"><strong>jupyterlab-theme-editor</strong></a> on github</li> </ul> <p><strong>Brian #4:</strong> <a href="https://pypi.org/project/rich-argparse"><strong>rich-argparse</strong></a></p> <ul> <li>“Format argparse and optparse help using <a href="https://pypi.org/project/rich">rich</a>.”</li> <li>“<em>rich-argparse</em> improves the look and readability of argparse's help while requiring minimal changes to the code.”</li> <li>They’re not kidding. 2 line code change. <pre><code>from rich_argparse import RichHelpFormatter parser = argparse.ArgumentParser(..., formatter_class=RichHelpFormatter) </code></pre></li> </ul> <p><strong>Extras</strong> </p> <p>Brian:</p> <ul> <li><a href="https://courses.pythontest.com/"><strong>pytest course</strong></a> is now switched to the new platform. <ul> <li>I sent out an email including how to save their spot on the old site and mark that spot complete on the new site.</li> <li>There’s now comments on the course now. Trying that out. If you’ve got a question, just ask in that section. </li> </ul></li> </ul> <p>Michael:</p> <ul> <li>A new Talk Python course: <a href="https://training.talkpython.fm/courses/getting-started-with-spacy">Getting Started with NLP and spaCy</a></li> </ul> <p><strong>Joke:</strong> <a href="https://xkcd.com/2928/">Testing holiday</a></p>
May 13, 2024
ListenData
How to Use Gemini in Python
In this tutorial, you will learn how to use Google's Gemini AI model in Python.
Follow the steps below to access the Gemini API and then use it in python.
- Visit Google AI Studio website.
- Sign in using your Google account.
- Create an API key.
- Install the Google AI Python library for the Gemini API using the command below :
pip install google-generativeai.
Tryton News
Release 1.5.0 of python-sql
We are proud to announce the release of the version 1.5.0 of python-sql.
python-sql is a library to write SQL queries in a pythonic way. It is mainly developed for Tryton but it has no external dependencies and is agnostic to any framework or SQL database.
In addition to bug-fixes, this release contains the following improvements:
- Add
MERGEquery - Support “UPSERT” with
ON CONFLICTclause onINSERTquery - Remove default escape char on LIKE and ILIKE
- Add
GROUPING SETS,CUBE, andROLLUPclauses forGROUP BY.
python-sql is available on PyPI: python-sql 1.5.0.
2 posts - 2 participants
Mike Driscoll
How to Annotate a Graph with Matplotlib and Python
The Matplotlib package is great for visualizing data. One of its many features is the ability to annotate points on your graph. You can use annotations to explain why a particular data point is significant or interesting.
If you haven’t used Matplotlib before, you should check out my introductory article, Matplotlib – An Intro to Creating Graphs with Python or read the official documentation.
Let’s get started!
Installing Matplotlib
If you don’t have Matplotlib on your computer, you must install it. Fortunately, you can use pip, the Python package manager utility that comes with Python.
Open up your terminal or command prompt and run the following command:
python -m pip install matplotlib
Pip will now install Matplotlib and any dependencies that Matplotlib needs to work properly. Assuming that Matplotlib installs successfully, you are good to go!
Annotating Points on a Graph
Matplotlib comes with a handy annotate()method that you can use. As with most of Matplotlib’s methods, annotate()can take quite a few different parameters.
For this example, you will be using the following parameters:
- text – The label for the annotation
- xy – The x/y coordinate of the point of interest
- arrowprops – A dictionary of arrow properties
- xytext – Where to place the text for the annotation
Now that you know what you’re doing, open up your favorite Python IDE or text editor and create a new Python file. Then enter the following code:
import matplotlib.pylab as plt
import numpy as np

def annotated():
    fig = plt.figure(figsize=(8, 6))

    numbers = list(range(10))
    plt.plot(numbers, np.exp(numbers))
    plt.title("Annotating an Exponential Plot using plt.annotate()")
    plt.xlabel("x-axis")
    plt.ylabel("y-axis")

    plt.annotate("Point 1", xy=(6, 400),
                 arrowprops=dict(arrowstyle="->"),
                 xytext=(4, 600))

    plt.annotate("Point 2", xy=(7, 1150),
                 arrowprops=dict(arrowstyle="->",
                                 connectionstyle="arc3,rad=-.2"),
                 xytext=(4.5, 2000))

    plt.annotate("Point 3", xy=(8, 3000),
                 arrowprops=dict(arrowstyle="->",
                                 connectionstyle="angle,angleA=90,angleB=0"),
                 xytext=(8.5, 2200))

    plt.show()

if __name__ == "__main__":
    annotated()
Here, you are creating a simple line graph. You want to annotate three points on the graph. The arrowprops define the arrowstyleand, in the latter two points, the connectionstyle. These properties tell Matplotlib what type of arrow to use and whether it should be connected to the text as a straight line, an arc, or a 90-degree turn.
When you run this code, you will see the following graph:

You can see how the different points are located and how the arrowprops lines are changed. You should check out the full documentation to learn all the details about the arrows and annotations.
Wrapping Up
Annotating your graph is a great way to make your plots more informative. Matplotlib allows you to add many different labels to your plots, and annotating the interesting data points is quite nice.
You should spend some time experimenting with annotations and learning all the different parameters it takes to fully understand this useful feature.
The post How to Annotate a Graph with Matplotlib and Python appeared first on Mouse Vs Python.
Real Python
What Is the __pycache__ Folder in Python?
When you develop a self-contained Python script, you might not notice anything unusual about your directory structure. However, as soon as your project becomes more complex, you’ll often decide to extract parts of the functionality into additional modules or packages. That’s when you may start to see a __pycache__ folder appearing out of nowhere next to your source files in seemingly random places:
project/
│
├── mathematics/
│   │
│   ├── __pycache__/
│   │
│   ├── arithmetic/
│   │   ├── __init__.py
│   │   ├── add.py
│   │   └── sub.py
│   │
│   ├── geometry/
│   │   │
│   │   ├── __pycache__/
│   │   │
│   │   ├── __init__.py
│   │   └── shapes.py
│   │
│   └── __init__.py
│
└── calculator.py
Notice that the __pycache__ folder can be present at different levels in your project’s directory tree when you have multiple subpackages nested in one another. At the same time, other packages or folders with your Python source files may not contain this mysterious cache directory.
Note: To maintain a cleaner workspace, many Python IDEs and code editors are configured out-of-the-box to hide the __pycache__ folders from you, even if those folders exist on your file system.
You may encounter a similar situation after you clone a remote Git repository with a Python project and run the underlying code. So, what causes the __pycache__ folder to appear, and for what purpose?
Get Your Code: Click here to download the free sample code that shows you how to work with the pycache folder in Python.
Take the Quiz: Test your knowledge with our interactive “What Is the __pycache__ Folder in Python?” quiz. You’ll receive a score upon completion to help you track your learning progress:

Interactive Quiz
What Is the __pycache__ Folder in Python?In this quiz, you'll have the opportunity to test your knowledge of the __pycache__ folder, including when, where, and why Python creates these folders.
In Short: It Makes Importing Python Modules Faster
Even though Python is an interpreted programming language, its interpreter doesn’t operate directly on your Python code, which would be very slow. Instead, when you run a Python script or import a Python module, the interpreter compiles your high-level Python source code into bytecode, which is an intermediate binary representation of the code.
This bytecode enables the interpreter to skip recurring steps, such as lexing and parsing the code into an abstract syntax tree and validating its correctness every time you run the same program. As long as the underlying source code hasn’t changed, Python can reuse the intermediate representation, which is immediately ready for execution. This saves time, speeding up your script’s startup time.
Remember that while loading the compiled bytecode from __pycache__ makes Python modules import faster, it doesn’t affect their execution speed!
Why bother with bytecode at all instead of compiling the code straight to the low-level machine code? While machine code is what executes on the hardware, providing the ultimate performance, it’s not as portable or quick to produce as bytecode.
Machine code is a set of binary instructions understood by your specific CPU architecture, wrapped in a container format like EXE, ELF, or Mach-O, depending on the operating system. In contrast, bytecode provides a platform-independent abstraction layer and is typically quicker to compile.
Python uses local __pycache__ folders to store the compiled bytecode of imported modules in your project. On subsequent runs, the interpreter will try to load precompiled versions of modules from these folders, provided they’re up-to-date with the corresponding source files. Note that this caching mechanism only gets triggered for modules you import in your code rather than executing as scripts in the terminal.
In addition to this on-disk bytecode caching, Python keeps an in-memory cache of modules, which you can access through the sys.modules dictionary. It ensures that when you import the same module multiple times from different places within your program, Python will use the already imported module without needing to reload or recompile it. Both mechanisms work together to reduce the overhead of importing Python modules.
Next, you’re going to find out exactly how much faster Python loads the cached bytecode as opposed to compiling the source code on the fly when you import a module.
How Much Faster Is Loading Modules From Cache?
The caching happens behind the scenes and usually goes unnoticed since Python is quite rapid at compiling the bytecode. Besides, unless you often run short-lived Python scripts, the compilation step remains insignificant when compared to the total execution time. That said, without caching, the overhead associated with bytecode compilation could add up if you had lots of modules and imported them many times over.
To measure the difference in import time between a cached and uncached module, you can pass the -X importtime option to the python command or set the equivalent PYTHONPROFILEIMPORTTIME environment variable. When this option is enabled, Python will display a table summarizing how long it took to import each module, including the cumulative time in case a module depends on other modules.
Suppose you had a calculator.py script that imports and calls a utility function from a local arithmetic.py module:
calculator.py
from arithmetic import add

add(3, 4)
The imported module defines a single function:
arithmetic.py
def add(a, b):
    return a + b
As you can see, the main script delegates the addition of two numbers, three and four, to the add() function imported from the arithmetic module.
Note: Even though you use the from ... import syntax, which only brings the specified symbol into your current namespace, Python reads and compiles the entire module anyway. Moreover, unused imports would also trigger the compilation.
The first time you run your script, Python compiles and saves the bytecode of the module you imported into a local __pycache__ folder. If such a folder doesn’t already exist, then Python automatically creates one before moving on. Now, when you execute your script again, Python should find and load the cached bytecode as long as you didn’t alter the associated source code.
Read the full article at https://realpython.com/python-pycache/ »
[ Improve Your Python With 🐍 Python Tricks 💌 – Get a short & sweet Python Trick delivered to your inbox every couple of days. >> Click here to learn more and see examples ]
Zato Blog
IMAP and OAuth2 Integrations with Microsoft 365
IMAP and OAuth2 Integrations with Microsoft 365

Overview
This is the first in a series of articles about automation of and integrations with Microsoft 365 cloud products using Python and Zato.
We start off with IMAP automation by showing how to create a scheduled Python service that periodically pulls latest emails from Outlook using OAuth2-based connections.
IMAP and OAuth2
Microsoft 365 requires for all IMAP connections to use OAuth2. This can be challenging to configure in server-side automation and orchestration processes so Zato offers an easy way that lets you read and send emails without a need for getting into low-level OAuth2 details.
Consider a common orchestration scenario - a business partner sends automated emails with attachments that need to be parsed, some information needs to be extracted and processed accordingly.
Before OAuth2, an automation process would receive from Azure administrators a dedicated IMAP account with a username and password.
Now, however, in addition to creating an IMAP account, administrators will need to create and configure a few more resources that the orchestration service will use. Note that the password to the IMAP account will never be used.
Administrators need to:
- Register an Azure client app representing your service that uses IMAP
- Grant this app a couple of Microsoft Graph application permissions:
- Mail.ReadWrite
- Mail.Send
Next, administrators need to give you a few pieces of information about the app:
- Application (client) ID
- Tenant (directory) ID
- Client secret
Additionally, you still need to receive the IMAP username (an e-mail address). It is just that you do not need its corresponding password.
In Dashboard
The first step is to create a new connection in your Zato Dashboard - this will establish an OAuth2-using connection that Zato will manage and your Python code will not have to do anything else, all the underlying OAuth2 tokens will keep refreshing as needed, the platform will take care of everything.
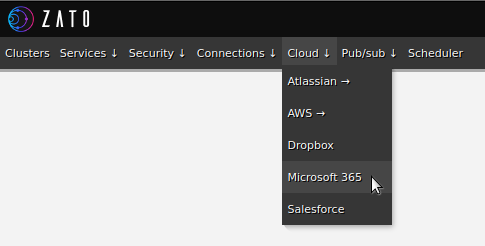
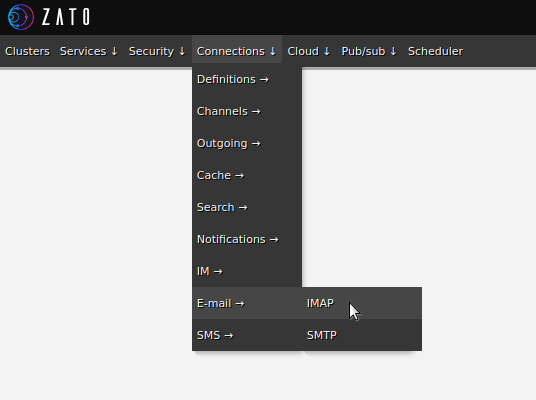
Having received the configuration details from Azure administrators, you can open your Zato Dashboard and navigate to IMAP connections:
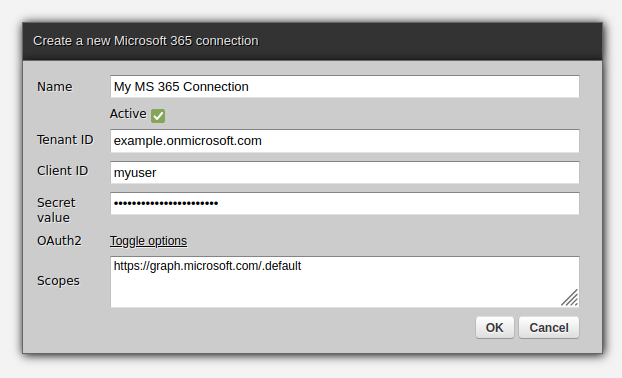
Fill out the form as below, choosing "Microsoft 365" as the server type. The other type, "Generic IMAP" is used for the classical case of IMAP with a username and password:
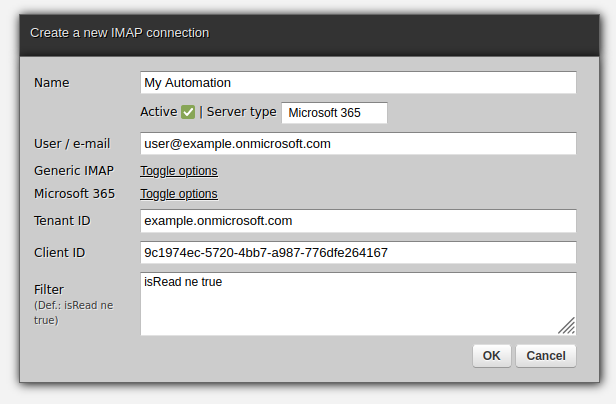
Change the secret and click Ping to confirm that the connection is configured correctly:

In Python
Use the code below to receive emails. Note that it merely needs to refer to a connection definition by its name and there is no need for any usage of OAuth2 here:
# -*- coding: utf-8 -*-

# Zato
from zato.server.service import Service

class MyService(Service):

    def handle(self):

        # Connect to a Microsoft 365 IMAP connection by its name ..
        conn = self.email.imap.get('My Automation').conn

        # .. get all messages matching filter criteria ("unread" by default)..
        for msg_id, msg in conn.get():

            # .. and access each of them.
            self.logger.info(msg.data)
This is everything that is needed for integrations with IMAP using Microsoft 365 although we can still go further. For instance, to create a scheduled job to periodically invoke the service, go to the Scheduler job in Dashboard:

In this case, we decide to have a job that runs once per hour:
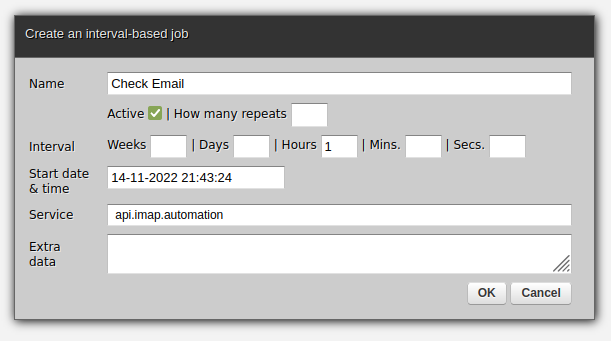
As expected, clicking OK will suffice for the job to start in background. It is as simple as that.
Next steps
- Read more about using Python in API integrations
- Start the tutorial which will guide you how to design and build Python API services for automation and integrations
May 12, 2024
Pythonicity
Packaging rundown
Companion guide to the Python packaging tutorial.
This is not an overview of packaging, nor a history of the tooling. The intended audience is an author of a simple package who merely wants to publish it on the package index, without being forced to make uninformed choices.
Build backends
The crux of the poor user experience is choosing a build backend. The reader at this stage does not know what a “build backend” is, and moreover does not care.
The 4 backends in the tutorial are described here in their presented order. An example snippet of a pyproject.toml file is included, mostly assuming defaults, with a couple common options:
- dynamic version
- package data for type information
hatchling
 - 83 kB with 4 dependencies
requires = ["hatchling"]
build-backend = "hatchling.build"

[tool.hatch.build.targets.sdist]
include = ["<package>/*"]

[tool.hatch.version]
path = "<package>/__init__.py"
Part of - not to be confused with - the project manager Hatch.
The source distribution section is included because by default hatchling ostensibly includes all files that are not ignored. However, it only abides by the root .gitignore. It will include virtual environments, if not named .venv. For a project that advocates sensible defaults, this is surprising behavior and a security flaw. Even if the issue is fixed, it will presumably include untracked files and clearly omissible directories such as .github.
setuptools
 - 894 kB with 0 dependencies
[build-system]
requires = ["setuptools>=61.0"]
build-backend = "setuptools.build_meta"

[tool.setuptools]
packages = ["<package>"]

[tool.setuptools.dynamic]
version = {attr = "<package>.__version__"}

[tool.setuptools.package-data]
<package> = ["py.typed"]
The original build tool, and previously the de facto standard. It is no longer commonly included in Python distributions, so they are all on equal footing with respect to needing installation.
Setuptools requires explicitly specifying the package, as well as any package data. It also includes legacy “.egg” and “setup.cfg” files, which a modern user will not be familiar with.
flit-core
 - 63 kB with 0 dependencies
[build-system]
requires = ["flit-core>=3.4"]
build-backend = "flit_core.buildapi"
Part of the Flit tool for publishing packages.
Flit automatically supports dynamic versions (and descriptions), and includes the source directory with data files in the source distribution.
pdm-backend
 - 101 kB with 0 dependencies
requires = ["pdm-backend"]
build-backend = "pdm.backend"

[tool.pdm]
version = {source = "file", path = "<package>/__init__.py"}
Part of - not to be confused with - the project manager PDM.
PDM automatically includes the source and test directories, with data files, in the source distribution.
Evaluations
Popularity and endorsements
The popularity of Setuptools should be discounted because of its history. The popularity of Hatchling and PDM-backend is clearly influenced by their respective parent projects. PDM has significantly less downloads than the others, but they are all popular enough to expect longevity.
Setuptools, Hatch, and Flit are all under the packaging authority umbrella, though as the previously cited article points out, PyPA affiliation does not indicate much.
The tutorial “defaults” to Hatchling, which presumably is not intended as an endorsement, but will no doubt be interpreted as such.
Size and dependencies
Setuptools is by far the largest; no surprise since it is much more than a build backend. Hatchling is the only one with dependencies, but the 3 modern ones seem appropriately lightweight.
File selection
Wheels have a standard layout, but source distributions do not. Whether sdist should include docs and tests is a matter of debate.
There was a time when open source software meant “distributed with an open source license”, so the source distribution was the primary way to acquire the code. This all seems anachronistic in the age of distributed version control and public collaboration. Not to mention wheels are zip files which have the source code.
One piece of advice is that the sdist should be buildable. Generated portable files could be included, thereby not needing the tools that generate them. But for a simple (read pure) Python project, that is not particularly relevant.
There is another issue with backends creating different artifacts when using their own build commands. This rundown only evaluated python -m build.
Metadata
The modern 3 implicitly support data files. All 4 support dynamic versioning in some manner. Then again, maybe the __version__ attribute is no longer the leading convention among the 7 options for single-sourcing the version. Now that importlib.metadata is no longer provisional, is that preferred?
Recommendations
It would be disingenuous to not end with recommendations, since the refusal to - in a document titled tool recommendations - is the problem. The PyPA endorses pip, build, and twine as standard tools, even though there are alternatives.
Author’s disclosures: I am a long-time Python developer of several packages, and a couple with extension modules. I use no project management tools, and am not affiliated with any of these projects.
- flit-core - No criticisms. The dynamic version and description feature are a plus; not having any flit-specific sections feels like less coupling.
- pdm-backend - No criticisms. A natural choice if one wants tests in the source distribution.
- hatchling - The file selection issue is significant. Users need a warning that they should include an sdist section and check their tarballs. Many are going to have unnecessarily large distributions, and someone with a local secrets directory - whether ignored or untracked - is going to have a seriously bad day.
- setuptools - Requires the most customization and is perpetually handicapped by backwards compatibility. The only advantage setuptools had was being already installed. It may be time to disavow it for new projects without extension modules.
My projects currently use setuptools for purely historically reasons. For new projects, I would likely use flit-core. I may switch-over existing projects, though there is really no incentive to.
Unless a standard emerges, of course.
Epilogue
A meta case could be made for Flit(-core) as well: that its limited scope and independence from a project manager is itself an asset. Whereas choosing Hatch(ling) or PDM(-backend) feels like picking a side. Flit can position itself as the minimalist choice for those who resent having to choose.
May 11, 2024
Mike Driscoll
Ruff – The Fastest Python Linter and Formatter Just Got Faster!
I’m a little late in reporting on this topic, but Ruff put out an update in April 2024 that includes a hand-written recursive descent parser. This update is in version 0.4.0 and newer.
Ruff’s new parser is >2x faster, translating to a 20-40% speedup for all linting and formatting invocations. Ruff’s announcement includes some statistics to show improvements that are worth checking out.
What’s This New Parser?
I’ve never tried writing a code parser, so I’ll have to rely on Ruff’s announcement to explain this. Basically, when you are doing static analysis, you will turn the source code into Abstract Syntax Trees (ASTs), which you can then analyze. Python has an AST module built in for this purpose. Ruff is written in Rust, though, so their AST analyzer is also written in Rust.
The original parser was called a generated parser, specifically LALRPOP. The parser requires a grammar to be defined in a Domain Specific Language (DSL), which is then converted into executable code for the generator.
Ruff’s new hand-written parser is a recursive descent parser. Follow that link to Wikipedia to learn all the nitty gritty details.
Their team created a hand-written parser to give them more control and flexibility over the parsing process, making it easier to work on the many weird edge cases they need to support. They also created a new parser to make Ruff faster and provide better error messages and error resilience.
Wrapping Up
Ruff is great and makes linting and formatting your Python code so much faster. You can learn much more about Ruff in my other articles on this topic:
The post Ruff – The Fastest Python Linter and Formatter Just Got Faster! appeared first on Mouse Vs Python.
May 10, 2024
Go Deh
Predicting results from small samples.
I've run simulations, tens of thousands of them at a time, over and over as we developed chips. In one project I noticed that I could predict the final result after only a small number of results were in which allowed me to halt the rest of the simulations, or make advance preparations for the final result.
I looked it up at the time and, indeed, there is an equation where if you want the pass rate of a "large" population to within a given accuracy, it will give you the minimum sample size to use.
To some, that's all gobledygook so I'll try to explain with some code.
Explanation
Lets say you have a large randomised population of pass/fails or ones and zeroes:
And that we take a sample from it and compute the pass rate of that single, smaller sample
Every time we run that pass_rate expression we get a different value. It is random. We need to run that pass_rate calculation many times to get an idea of what the likely pass_rate would be when using the given sample size:
I have learnt that the question to ask is not how many times the sample pass rate was the population pass rate, but to define an acceptable margin of error, (say 5%) and say we want to be confident that pass rates be within that margin a certain percentage of the time
So for a sample size of 123 we could expect the pass rate of the sample to be within 5% of the actual pass rate of the population, 0.5 or 50%, onlr o.4 or 40% of the time!
We need more!
What is actually done is we state what we think the population pass rate is, p_hat, (choose closer to 50% if you are unsure); the margin of error around p_hat we want, epsilon, usually +/-5% or +/-3%; and the confidence_level in hitting within the pass_rates margin of error.
There are calculators that will then give you n, the size of the sample needed to satisfy those condition.
Doing it myself
I calculated for one specific sample size, above. Obviousely, if I calculated pass_rates over a range of sample_sizes, and increqasing runs_per_sample, I could search out the sample size needed.
That is done in my next program. I have to switch to using the numpy library for its speed and sample_size becomes a range.
When the pass rate confidence levels are calculated I end up with a list of confidence levels for increasing sample sizes that are usually not increasing due to the randomness, e.g.
range_hits = [...0.94, 0.95, 0.93, 0.954, ... 0.95, 0.96, 0.95, 0.96, 0.96, 0.97, ...] # confidence levels
The range of sample_size corresponding to the first occurrence>= the requested confidence level, and the last occorrence of a confidence level < the requested confidence level in then slightly widened and the runs_per_sample increased on another iteration to get a better result.
Here's a sample of the output I get when searching
Sample output
My Code
END.
Mike Driscoll
One Week Left for Python Logging Book / Course Kickstarter
My latest Python book campaign is ending in less than a week. This book is about Python’s logging module. I also include two chapters that discuss structlog and loguru.

Why Back A Kickstarter?
The reason to back the Kickstarter is that I have exclusive perks there that you cannot get outside of it. Here are some examples:
- Signed paperback copy of the book
- Early access to the video course lessons
- T-shirt with the cover art
- Exclusive price for Teach Me Python, which includes ALL my self-published books and courses
- Exclusive price for all my self-published books
What You’ll Learn
In this book, you will learn how about the following:
- Logger objects
- Log levels
- Log handlers
- Formatting your logs
- Log configuration
- Logging decorators
- Rotating logs
- Logging and concurrency
- and more!
Book formats
The finished book will be made available in the following formats:
- paperback (at the appropriate reward level)
- epub
The paperback is a 6″ x 9″ book and is approximately 150 pages long.
The post One Week Left for Python Logging Book / Course Kickstarter appeared first on Mouse Vs Python.